How to Add or Remove Lock Screen Widgets on Windows 11

Lock screen widgets in Windows 11 put live updates like weather and calendar events directly on your sign-in screen before you unlock your PC. You can fit up to four interactive elements onto the display at once.
Personalizing these glanceable displays ensures your sign-in screen shows the most relevant details for your daily routine. Adding or removing these shortcuts takes only a few moments in your settings, and you don’t need to restart the PC afterward.
The steps below are for current Windows 11 with recent updates installed. Home and Pro behave the same here. If your Lock screen page has no widget options, the feature probably hasn’t reached your build yet. Run Windows Update and check again.
Open Settings Personalization Lock screen, scroll to Your widgets, and click Add widget to choose up to four items like Weather or Calendar. Click the X next to any widget to remove it. Changes apply immediately without restarting.
Step 1Turn On Lock Screen Widgets
Turning on Windows 11 lock screen widgets lets observers see important info like weather or a calendar at a glance, even before unlocking the PC.
Anyone standing near your PC can read what’s on the lock screen. Weather is harmless, but calendar entries can show meeting names or other details you may not want visible in a shared space.
Step 2Open Windows Settings
Press Win+I to open Settings , or click the Start button and select Settings. Both methods open the same app, so use whichever is faster for you.
- Click the Start button and then click Settings. If Settings isn't pinned to the Start menu, click All apps and find it in the list. The Settings window opens with a list of categories on the left.
- Or press
Windows key + Ion your keyboard. This opens Settings straight away, with no menus to click through.
Step 3Go to Lock Screen Settings
Open Settings, select Personalization, and click Lock screen. This page holds every lock screen option, including the background picture and the widgets.
- Click on Personalization in the left menu. The right side now shows the personalization options, such as background, colors and themes.
- On the right side, find and click Lock screen. The lock screen settings page opens, with a preview of your current lock screen at the top.
If you can't find Personalization in the left menu, widen the Settings window. When the window is narrow, the sidebar can shrink to icons only.


Step 4Add or Remove Widgets
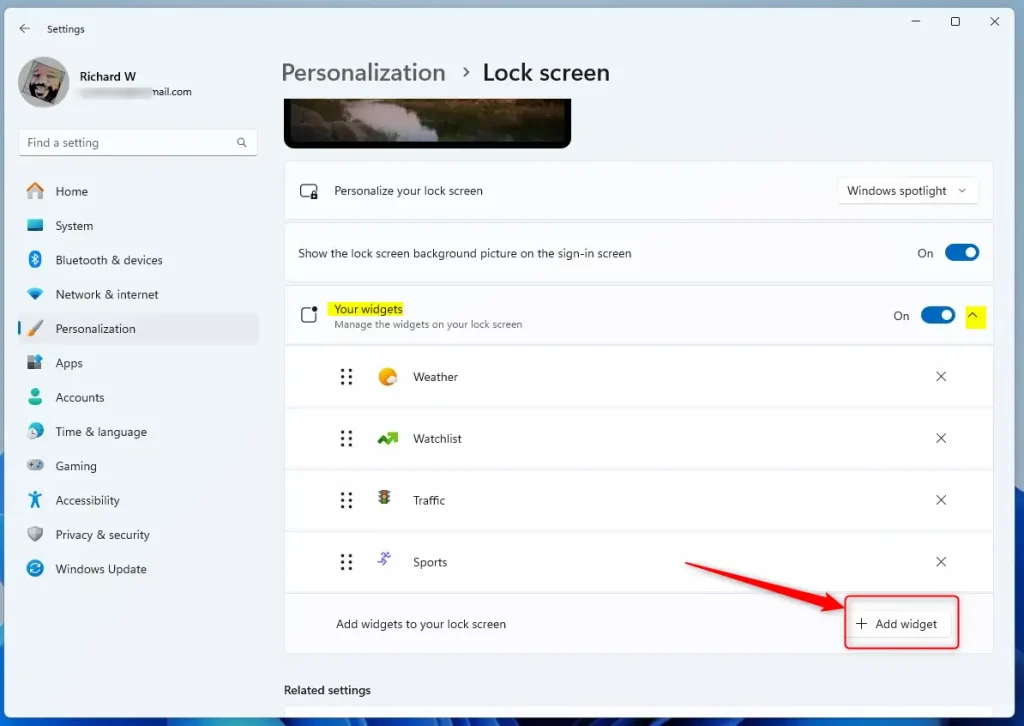
The customization panel controls what information appears on screen. Scroll down to the "Your widgets" area and click it to open an expandable list of available options.
On a fresh setup it may be empty or hold only a default widget. If you don't see "Your widgets" at all, install pending updates from Settings Windows Update and open the Lock screen page again.
To Add Widgets:
Once "Your widgets" is open, adding a widget takes three clicks. Remember the limit of four widgets on the lock screen at one time.
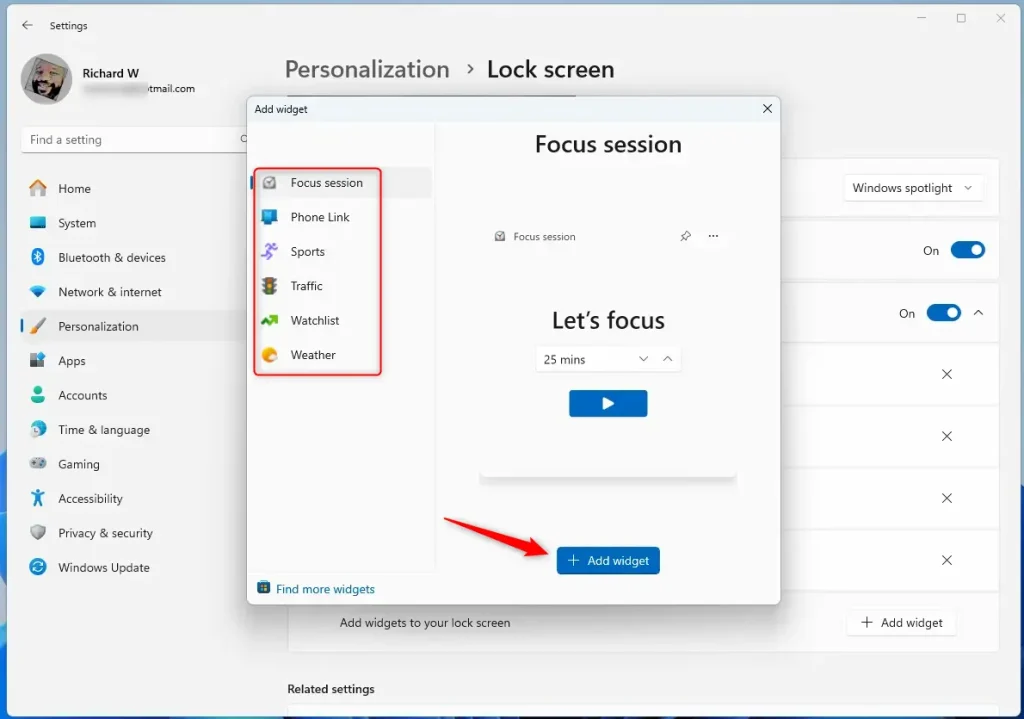
- Click the Add widget button. A list of the widgets you can use on the lock screen appears.
- Choose the widgets you want from the list (such as Weather or Calendar). Pick the ones you check most often, since space is limited.
- Click Add widget again to confirm your choice. The new widget now shows up under "Your widgets", and the lock screen preview updates to match.
If Add widget is greyed out, you have probably reached the limit of four. Remove one first (see the next section), then try again.
To Remove a Widget:
Removing a widget is just as quick, and it is the way to undo an addition you no longer want. Go back to Settings Personalization Lock screen first if you closed the page.
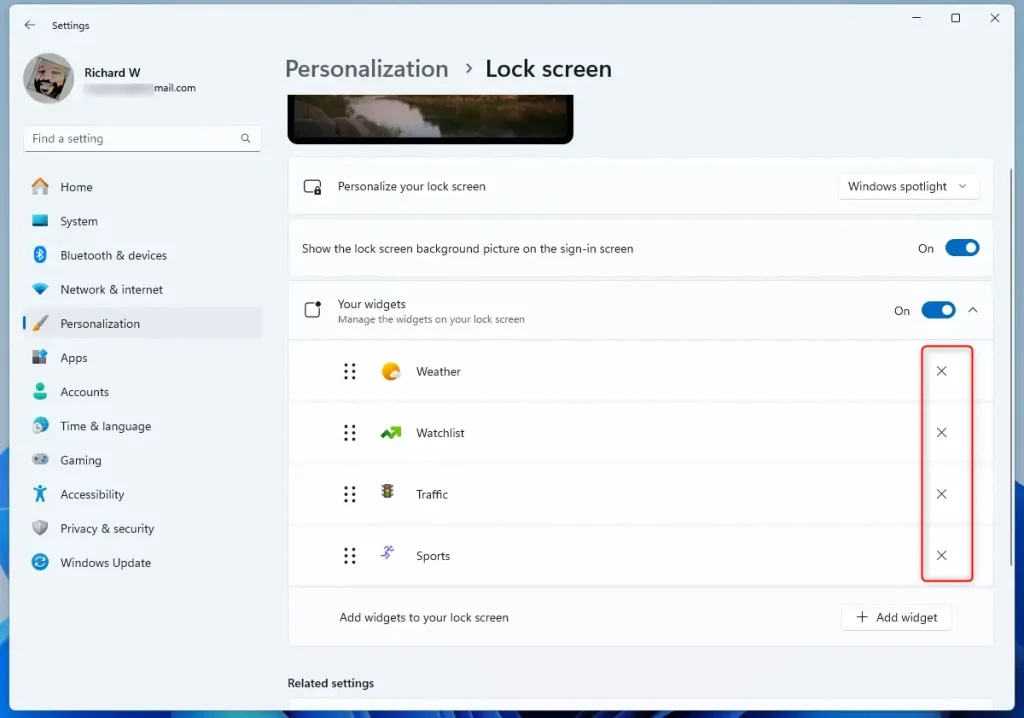
- Look at the list of your added widgets under Your widgets. Each widget you added has its own entry.
- Click the X button next to the widget you want to delete. The entry disappears from the list, and the lock screen preview no longer shows it.
Removing a widget doesn't uninstall anything. You can add it back at any time with Add widget.
Step 5Close Settings
Closing the configuration window applies the new layout. The display updates immediately to show the newly selected items.
To check the result, press Windows Key + L to lock the PC. The widgets should appear on the lock screen. If they don't show right away, wake the screen with a key press or a mouse click. No restart is needed.
Why Use Lock Screen Widgets?
Windows 11 lock screen widgets let you see important updates at a glance without unlocking your computer. You can check the weather forecast, your next calendar appointment, or sports scores right from the sign-in screen. This saves you time by putting the information you need most often right where you can see it immediately.
Here is a quick summary of what makes them worth setting up:
- Quick Info: See important information like the weather or your calendar without unlocking your PC.
- Easy to Change: Add or remove widgets anytime through Settings. Nothing is permanent, and no restart is needed.
- Make It Yours: Customize what information you want to see, within the limit of four widgets.
- Stay Updated: Keep Windows updated to get the newest widget features. If an option in this guide is missing on your PC, a pending update is the most likely reason.
- Simple Interface: The Settings app makes managing widgets easy to understand.
Summary
Controlling these glanceable displays takes three quick clicks inside the Settings app: open Lock screen, open "Your widgets", then add or remove what you need. Check the lock screen once after each change, and keep privacy in mind when you choose what to display.
Was this guide helpful?

About the Author
Richard
Tech Writer, IT Professional
Richard is a writer at Geek Rewind who turns complex IT tasks into clear, step-by-step guides. He draws on years of hands-on experience in system administration and enterprise IT operations, focusing on Windows, Linux and WordPress: the problems people actually run into, and the fixes that work. His server and WordPress guides come from systems he runs himself. Richard builds and maintains the platform behind Geek Rewind, from its Ubuntu servers and Nginx configuration to its custom WordPress plugins. Many new tutorials start with readers' questions, and he's always glad to answer them in the comments.
No comments yet — be the first to share your thoughts!