How to Enable or Disable USB Selective Suspend Windows 11


This guide shows you how to turn USB selective suspend on or off for any power plan in Windows 10 and 11. The steps and screenshots below were written for Windows 11, and the Power Options steps look almost the same on Windows 10. The setting is the same on Home and Pro.
Open Control Panel , click Power Options, select your power plan, click Change advanced power settings, expand USB settings, then expand USB selective suspend and choose Enabled or Disabled for each power source. Click OK to apply the change without restarting.
What Is USB Selective Suspend?
USB selective suspend is a power-saving feature in Windows 11. It turns off power to USB devices that aren’t being used. The USB hub driver can pause power to one device or port while the others keep working. That helps your computer use less energy, run cooler, and make less fan noise.
The main benefits are:
- It saves battery power, which matters most on laptops.
- It reduces heat and fan noise.
Some devices, such as fingerprint readers, don’t need power all the time. When they sleep, the computer uses less energy. The reverse also matters. One device that stays active can keep the whole USB controller out of its low-power state. That in turn can stop the processor from reaching deeper sleep modes.
Some older or badly written USB devices don’t wake up properly after being suspended. If a mouse, keyboard, external drive or USB audio device drops out or freezes, turn selective suspend off and test again. You can switch it back on at any time.
Further reading:
USB Selective Suspend - Windows drivers - This article discusses how to choose the right way to implement the selective suspend feature.
Demystifying USB Selective Suspend | Microsoft Community Hub - First published on MSDN on May 10, 2011. Hi, I am Vivek Gupta, a software developer on the USB team.
Selective Suspend in USB Drivers (WDF) - Windows drivers - A USB function driver supports runtime idle detection by implementing USB selective suspend.
USB devices may stop functioning correctly when multiple devices connected to the same USB hub go into selective suspend - Microsoft Support - This article provides methods for working around slow or unresponsive USB devices attached to the same hub.
Option 1Use Power Options Settings
Power Options in Control Panel is the easiest way to change this setting. It also lets you choose different values for battery and mains power, so you control how USB devices manage power in each case. The setting belongs to a power plan. If you use more than one plan, repeat the steps for each one.
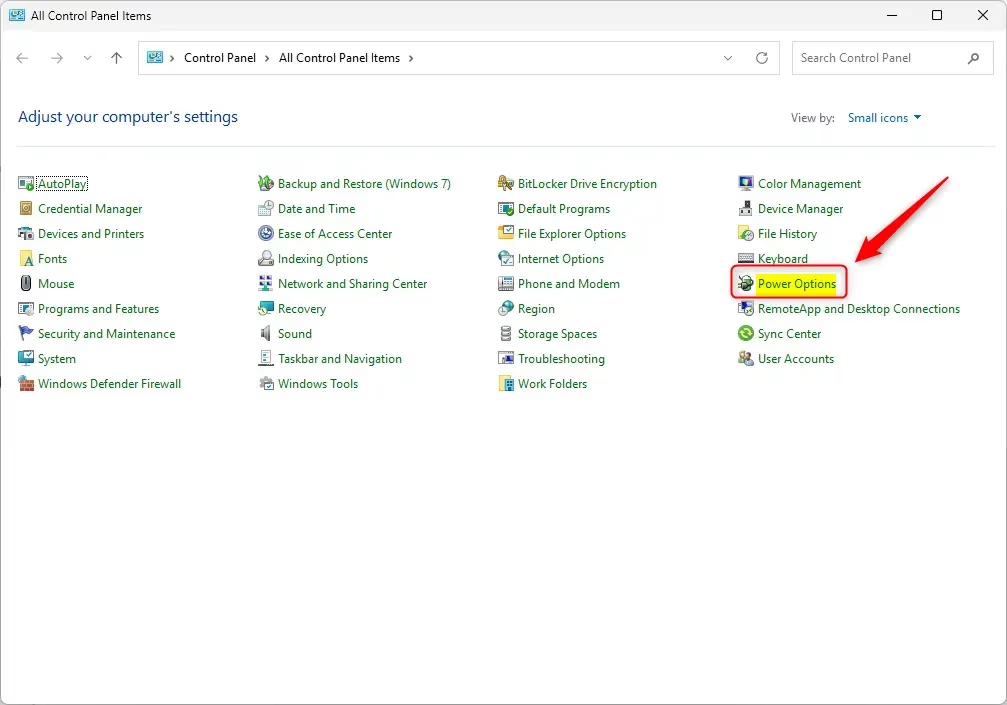
- Open the Control Panel and switch it to the icons view (Large icons or Small icons) if it shows categories. Click the Power Options icon. You should see a list of your power plans.
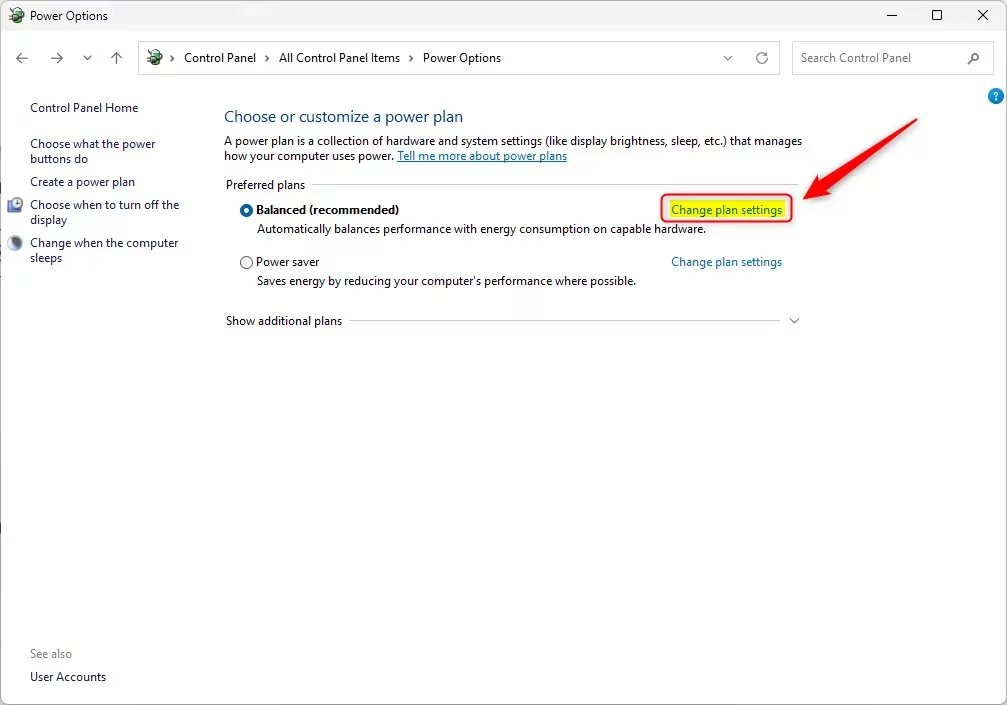
- Find the plan marked as selected (usually "Balanced"). Click Change plan settings next to it. The plan's display and sleep options will appear.
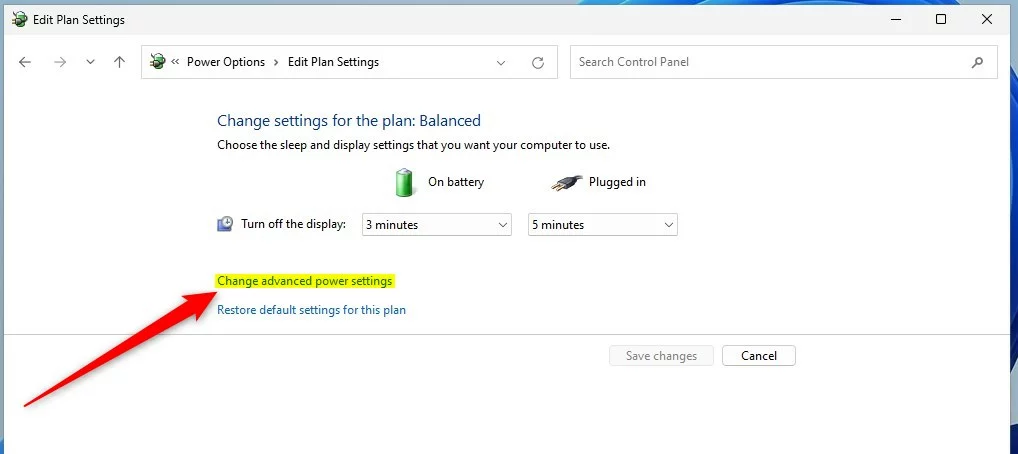
- Click Change advanced power settings. A small Power Options window opens with a list of settings.
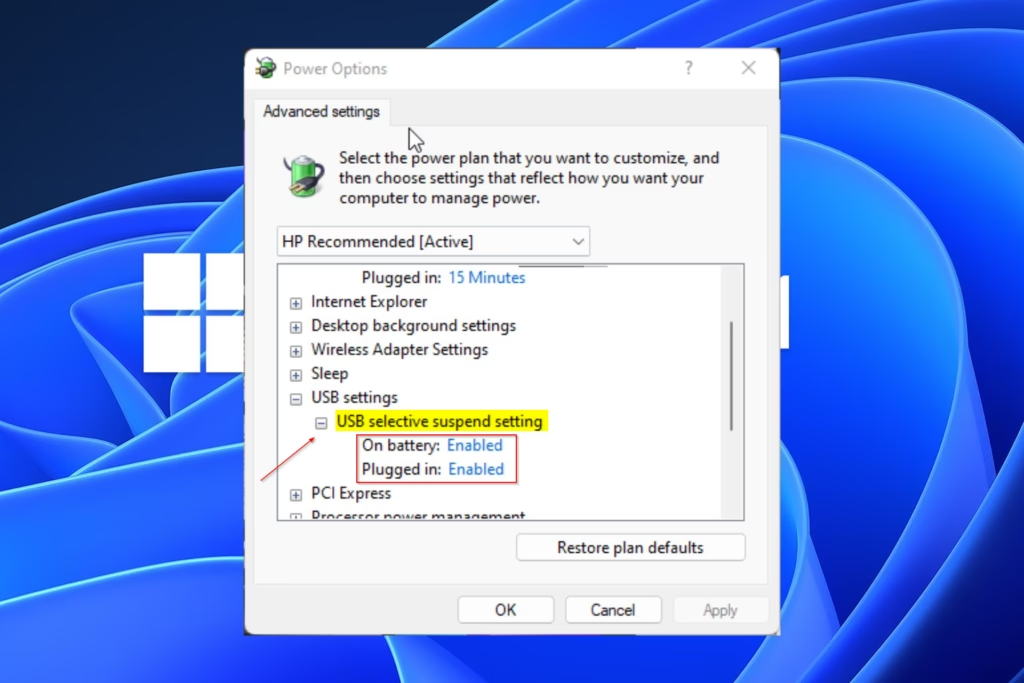
- Scroll to USB settings and click the plus sign to expand it. Expand USB selective suspend setting to see its values.
- Choose Enabled (the default) or Disabled. Set it for both On battery and Plugged in, then click OK.
On a typical desktop you will see a single value.
You normally don't need to restart. If a device still misbehaves, unplug it and plug it back in, or restart once to be sure. To undo the change, go back to the same screen and set the value back to Enabled.
Option 2Use Command Line
If you prefer commands, you can turn USB selective suspend on or off from Windows Terminal. One command changes the setting for your current power plan, so you don't have to click through menus. This is also handy if you manage several PCs.
- Open Windows Terminal. Use either a Windows PowerShell or a Command Prompt tab. If a command is refused, close the window and reopen Windows Terminal as administrator.
- Copy and paste one of the commands below into Windows Terminal, then press Enter. Pick the command that matches the power source and the state you want.
On battery
- On battery: Enabled (Default)
powercfg /SETDCVALUEINDEX SCHEME_CURRENT 2a737441-1930-4402-8d77-b2bebba308a3 48e6b7a6-50f5-4782-a5d4-53bb8f07e226 1
- On battery: Disabled
powercfg /SETDCVALUEINDEX SCHEME_CURRENT 2a737441-1930-4402-8d77-b2bebba308a3 48e6b7a6-50f5-4782-a5d4-53bb8f07e226 0
Plugged in
Use these options for a desktop computer. Desktops usually don't have separate On battery and Plugged in options unless they are connected to a UPS.
- Plugged in: Enabled (Default)
powercfg /SETACVALUEINDEX SCHEME_CURRENT 2a737441-1930-4402-8d77-b2bebba308a3 48e6b7a6-50f5-4782-a5d4-53bb8f07e226 1
- Plugged in: Disabled
powercfg /SETACVALUEINDEX SCHEME_CURRENT 2a737441-1930-4402-8d77-b2bebba308a3 48e6b7a6-50f5-4782-a5d4-53bb8f07e226 0
To check the result, open Change advanced power settings as described in the first method and look at USB selective suspend setting. To undo a change, run the matching Enabled (Default) command.
That's it!
Summary
USB selective suspend saves power by turning off idle USB devices. You can control it with either Power Options or command-line tools in Windows 11. Leave it enabled unless a USB device drops out or fails to wake up.
Was this guide helpful?

About the Author
Richard
Tech Writer, IT Professional
Richard is a writer at Geek Rewind who turns complex IT tasks into clear, step-by-step guides. He draws on years of hands-on experience in system administration and enterprise IT operations, focusing on Windows, Linux and WordPress: the problems people actually run into, and the fixes that work. His server and WordPress guides come from systems he runs himself. Richard builds and maintains the platform behind Geek Rewind, from its Ubuntu servers and Nginx configuration to its custom WordPress plugins. Many new tutorials start with readers' questions, and he's always glad to answer them in the comments.




No comments yet — be the first to share your thoughts!