How to Disable Security Questions in Windows 11


Disabling security questions in Windows 11 stops the forced prompt that asks you to pick 3 backup questions when you create a local account. These questions let you reset a forgotten password, but many people skip them to speed up setup and avoid storing personal answers on the PC. They only apply to local (offline) accounts. A Microsoft account recovers its password online, so none of this affects it.
Turning off this feature works on Windows 11 Home and Pro. You bypass the personal questions entirely and finish setting up your offline account faster. The trade-off is that without questions, a forgotten local password has no built-in recovery path. Use a password manager or a password reset disk before you rely on this.
You can disable Windows 11 security questions using the Group Policy Editor on Pro versions, or the Registry Editor or PowerShell on all versions. Navigate to Computer Configuration Administrative Templates Windows Components Credential User Interface and enable “Prevent the use of security questions for local accounts” via Group Policy, or create a DWORD value named NoLocalPasswordResetQuestions in the registry.
🪟 Windows 11 Home vs. Pro: What You Need to Know
The method depends on your edition. Windows 11 Pro and Enterprise include the Local Group Policy Editor, so use that. Windows 11 Home does not have it, so use the Registry Editor or PowerShell. To check your edition, go to Settings System About and look under Windows specifications.
Important Disclaimer: Back Up Your Registry
Before we start, create a System Restore point or back up your registry. This way, you can undo any changes if something goes awry.
For a restore point, type “Create a restore point” into the Start menu , open the result, and click Create on the System Protection tab. If System Protection is off for your drive, turn it on first. For a registry backup, open Registry Editor, then use File Export and save the whole registry to a file you can double-click later to restore it.
Method 1Using the Group Policy Editor (Pro/Enterprise Only)
The Group Policy Editor lets Windows 11 Pro and Enterprise users disable security questions for local accounts without touching the registry. You open the editor from the Start menu , browse to Computer Configuration Administrative Templates Windows Components Credential User Interface, and turn on the policy that prevents security questions. If you search for “Edit group policy” and nothing comes up, you are on Home. Skip to the registry method.
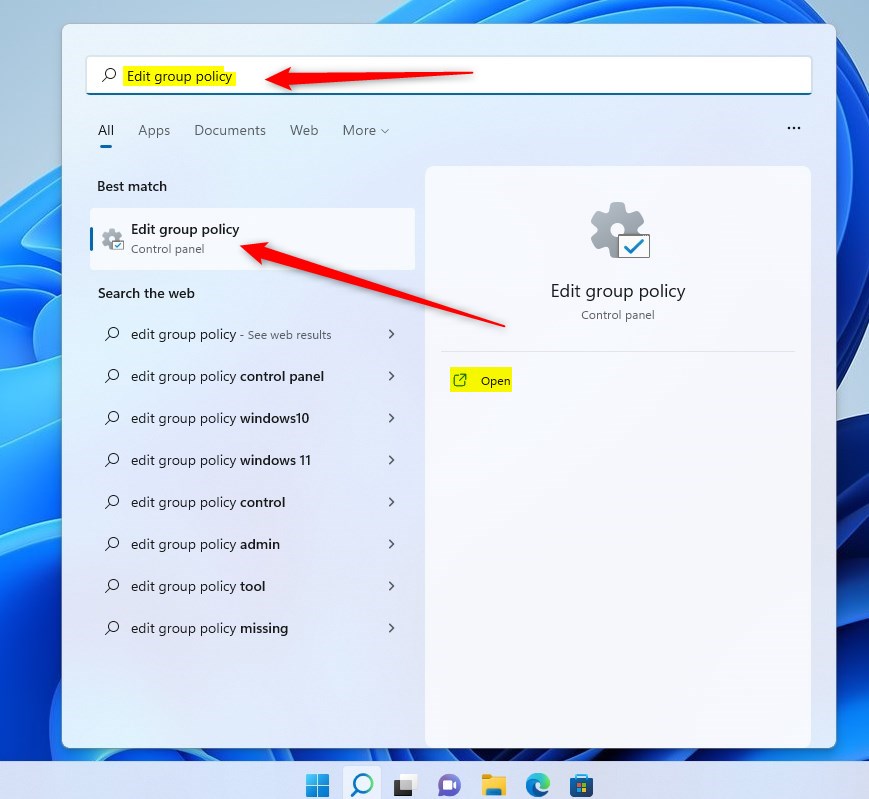
- Click the Start button and type "Edit group policy." The search results should show Edit group policy at the top.
- Select the Edit group policy result. The Local Group Policy Editor window opens, with a folder tree on the left and settings on the right. If Windows asks for permission, click Yes.
In the left pane, expand each folder in this path by double-clicking it or using the arrow beside it:
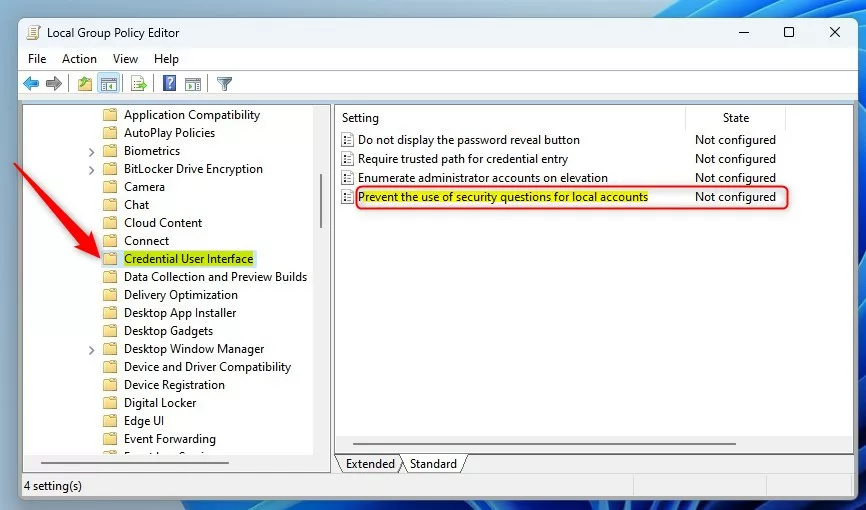
Computer Configuration Administrative Templates Windows Components Credential User Interface
Click Credential User Interface once. The policies in that folder are listed on the right. Double-click the one labeled Prevent the use of security questions for local accounts. Its settings window opens.
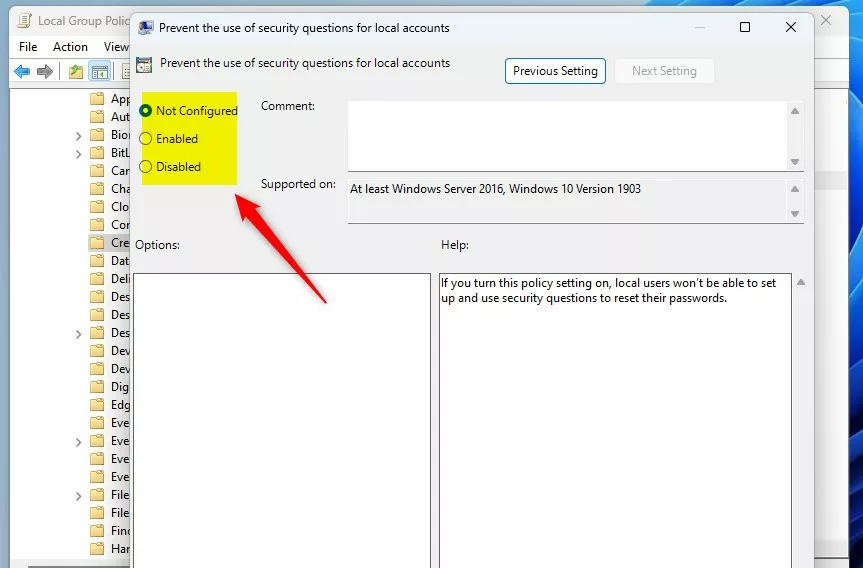
At the top left of that window, choose one of the options below. This policy is worded as a "prevent" rule, so Enabled is the setting that turns the questions off.
- Enabled: This turns off (disables) the security questions. Pick this one.
- Not Configured / Disabled: This keeps the security questions turned on. Use Not Configured later if you want to undo the change.
Click Apply, then OK. The policy window closes and the policy's state in the list shows as Enabled. Restart your computer to make the change stick. Setting it only blocks the prompts going forward. Do not assume it wipes questions you already saved on an existing account.
Method 2Using the Registry Editor (All Versions)
The Registry Editor lets you disable security questions on Windows 11 Home, where the Group Policy Editor is not available. You add a policy value to the registry that does the same job as the Group Policy setting above. It also works on Pro if you prefer it. Windows then stops asking you to set up account recovery questions.
To open the Registry Editor and reach the right key:
- Click the Start button and type "regedit".
- Select Registry Editor and click Yes at the User Account Control prompt. The Registry Editor window opens.
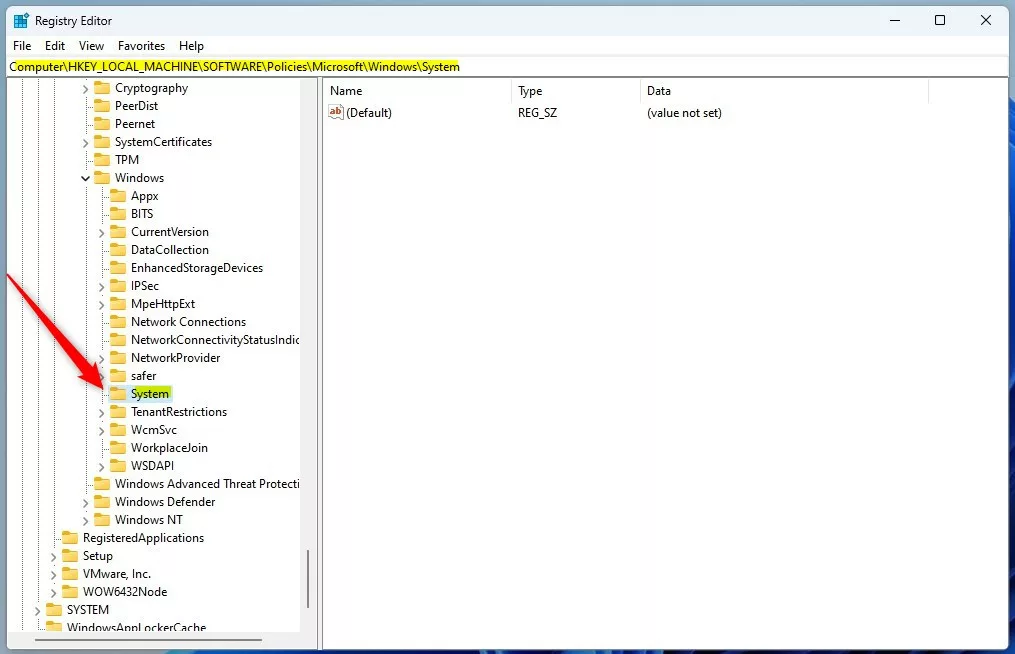
- In the left pane, expand the folders until you reach the key below. You can also paste it into the address bar at the top of the window and press Enter.
This key is where you will disable security questions for your Windows 11 account.
HKEY_LOCAL_MACHINE\SOFTWARE\Policies\Microsoft\Windows\System
If the System folder is missing, right-click the Windows folder, select New Key, and name it System. The new key appears under Windows in the left pane. Click it so it is selected before you continue.
- Right-click in the empty space on the right side. A small menu appears.
- Select New DWORD (32-bit) Value. A new entry appears in the list with its name highlighted for editing.
- Name this value
NoLocalPasswordResetQuestions. Type it exactly, then press Enter. - Double-click it and set the Value data to
1. Leave Base on Hexadecimal, click OK, and check that the value shows in the list with the data you entered.
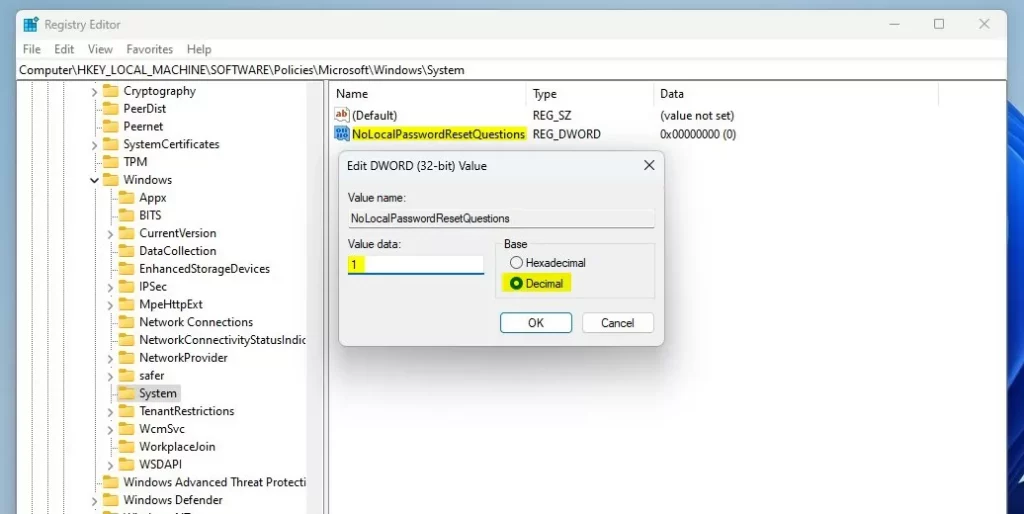
Close the Registry Editor and restart your computer to finish. To undo the change later, return to the same key and either delete the value or set its Value data to 0. Then restart again.
Method 3PowerShell Automation
PowerShell lets you make the same registry change from a console window instead of clicking through the Registry Editor. To get started, open the Start menu and search for PowerShell. Right-click Windows PowerShell and select Run as administrator. Click Yes at the prompt. A blue console window opens, and its title bar should say Administrator.
The original version of this article gave a command called Disable-Computer-RequireSecurityQuestions. I could not confirm that this is a built-in Windows or PowerShell command, and I would not rely on it. PowerShell has no dedicated setting for this. What it can do is create the same registry key and value described in the registry section. If a typed command reports that it is not recognized, that is the reason. In that case, use the Registry Editor steps above, which are reliable.
New-ItemProperty -Path "HKLM:\SOFTWARE\Policies\Microsoft\Windows\System" -Name "NoLocalPasswordResetQuestions" -Value 1 -PropertyType DWORD -Force
However you create it, the end result is the same registry value as in the manual steps. After you add it, restart your computer, then open the Registry Editor to confirm the value is in place.
Summary
Have a question about this guide?
Answered by AI from this guide. Good questions may be added to this page — please don't include personal details.
Did this guide fix your problem?

About the Author
Richard
Tech Writer, IT Professional
Richard is a writer at Geek Rewind who turns complex IT tasks into clear, step-by-step guides. He draws on years of hands-on experience in system administration and enterprise IT operations, focusing on Windows, Linux and WordPress: the problems people actually run into, and the fixes that work. His server and WordPress guides come from systems he runs himself. Richard builds and maintains the platform behind Geek Rewind, from its Ubuntu servers and Nginx configuration to its custom WordPress plugins. Many new tutorials start with readers' questions, and he's always glad to answer them in the comments.
No comments yet — be the first to share your thoughts!