How to Edit the Hosts File in Windows 11

The Hosts file in Windows 11 lets you map website names to specific IP addresses before your computer asks a DNS server. It is a plain text system file at C:\Windows\System32\drivers\etc\hosts. Think of it as a local routing table. Windows reads it first, so an entry there overrides what public DNS would say. You can use it to block unwanted domains, redirect web traffic, or test local servers.
Windows protects this file, so you need administrator permissions and a text editor such as Notepad to change it. The steps below are the same on Windows 11 Home and Pro. Any edit you make changes how your PC resolves web addresses, so go slowly and keep a backup copy of the original file.
Open Command Prompt as administrator, type notepad 📁C:\
Why Would You Edit the Hosts File?
Editing the hosts file lets you map website names to specific IP addresses by hand. People usually do it for one of three reasons:
- Block websites: Stop your computer from reaching certain sites by redirecting their names to your own machine or another address that goes nowhere.
- Test websites: Web developers point a domain name at a test server or at their own computer. That lets them check a new site or design before it goes live.
- Fix network issues: You can link a name to a specific IP address for easier local access. It also works as a stopgap when DNS routing on your local network is giving you trouble.
The hosts file only affects the PC you edit. Other devices on your network will not see your changes.
Where is the Hosts File Located?
The Hosts file is stored in this location on your computer:
C:\Windows\System32\Drivers\etc\hostsWhat Does the Hosts File Look Like?
The file is plain text. Each line holds an IP address followed by the website name it maps to, and each entry sits on its own line. Any line that starts with a hash symbol (#) is a comment. Windows ignores it, so it works as a note rather than an active rule. The default file is mostly comments like these:
# This is a comment - lines starting with # are ignored by your computer
127.0.0.1 localhost
# 127.0.0.1 example.com (this line is ignored because it starts with #)
Without that separator, Windows can't read the line properly. A wrong mapping can stop you from reaching the site you meant to change.
The file has no extension. It is called hosts, not hosts.txt, and you should keep it that way.
How to Edit the Hosts File: Step-by-Step
Step 1Open Notepad as Administrator
You need to open Notepad as an administrator because Windows 11 protects the system folder that holds the hosts file. If you open Notepad normally, you can read the file but you will get a permission error when you try to save. Starting the editor with elevated rights avoids that.
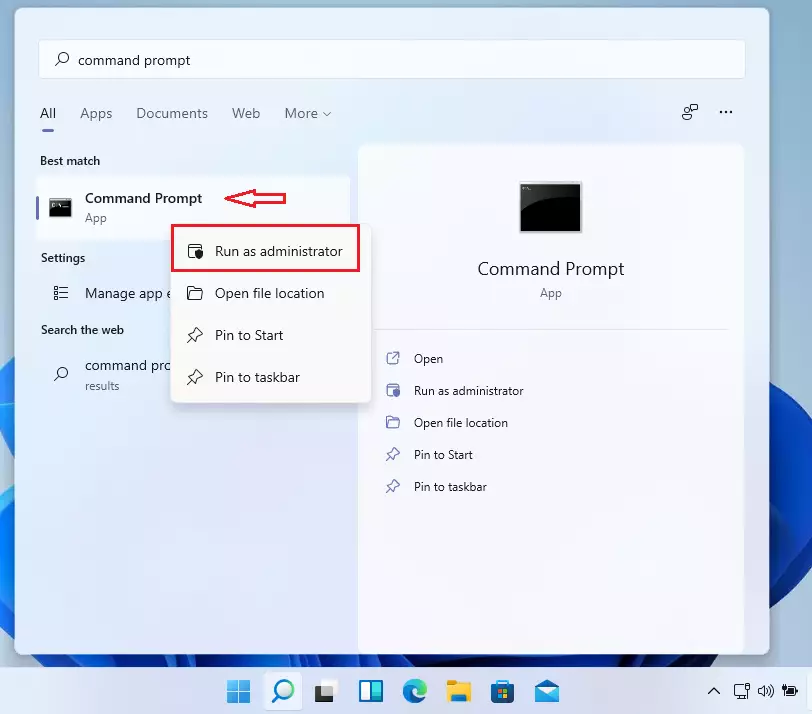
- Click the Start button or press the Windows key. The Start menu opens with the search box ready.
- Type
Command Promptin the search box. Command Prompt appears in the results. - Right-click Command Prompt in the results and select Run as administrator.
- Click Yes if User Account Control asks whether to allow the app to make changes. A Command Prompt window opens with Administrator in its title bar.
If you don't see Run as administrator, or you are asked for a password you don't have, you are signed in with a standard account. Sign in with an administrator account and try again.
Step 2Open the Hosts File in Notepad
Because you started the Command Prompt as administrator, anything you launch from it also runs with administrator rights. That is why this method works for Notepad.
- Type the following command in the Command Prompt window and press Enter.
Opening the Hosts file in Notepad with administrative permissions lets you edit and save changes. This is necessary because the Hosts file needs elevated privileges to prevent unauthorized changes.
Notepad opens with the hosts file loaded. If the window comes up empty or asks to create a new file, the path was mistyped. Close Notepad and run the command again.
Step 3Add Your Changes
Before you change anything, consider saving a copy of the original file somewhere safe. If a new entry causes trouble, you can restore it.
- Scroll to the bottom of the file, below the existing lines that start with #.
- Click at the end of the last line and press Enter to start a new line.
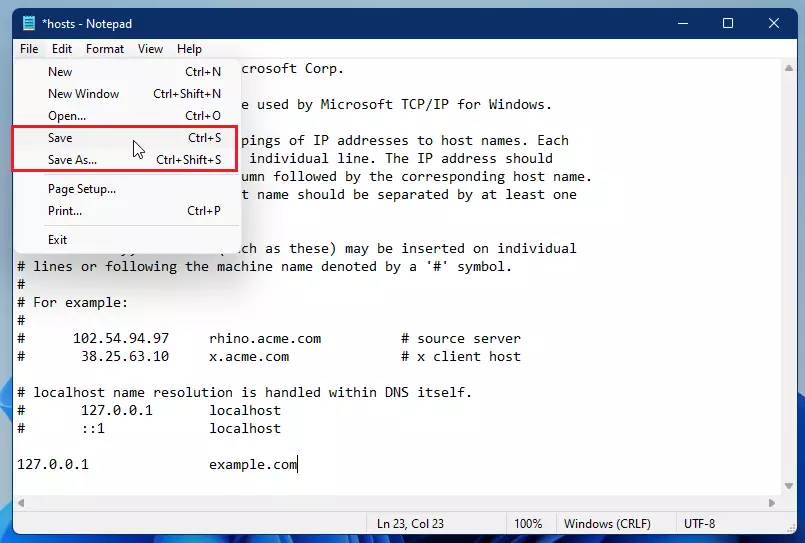
- Type your new entry. For example, to make your computer treat example.com as your own local computer, which is useful to block or test the site, add this line:
127.0.0.1 example.comKeep one entry per line, with a space or tab between the IP address and the name. Add as many entries as you need.
Step 4Save Your Changes
- Click File in Notepad, then click Save. The title bar stays on hosts and no error appears.
Close it and start again from the elevated Command Prompt. Also avoid Save As here. It can create a file named hosts.txt, which Windows ignores.
Your changes take effect immediately, and you do not need to restart. If a site still behaves the old way, close and reopen your browser. Browsers keep their own cache of address lookups.
To undo a change, open the file as administrator again. Then delete the line you added, or put a # at the start of it to turn it into a comment. Save the file, and the old behavior returns.
Tips and Things to Remember
Backing up your original hosts file before making any changes prevents accidental lockouts or broken internet connections. Always verify your administrative permissions before saving, and use the hash symbol to disable lines temporarily without deleting them.- Always run Notepad as administrator to make sure you can save the changes.
- Make a backup: Before you edit, copy the original Hosts file somewhere safe. This way, you can restore it if something goes wrong.
- Use # for comments: If you want to disable a line without deleting it, just put a
#at the start of that line. - Changes are instant: After saving, your computer immediately uses the new settings.
Summary
- The Hosts file lets you control how your computer finds websites.
- You can block websites or test your own sites locally.
- You must run Notepad as an administrator to edit and save the file.
- Always save a backup before making changes.
Editing the hosts file in Windows 11 gives you direct control over how your computer resolves website addresses for blocking or testing purposes. Success requires running Notepad as an administrator and saving a backup copy of the original document before making changes.
Have a question about this guide?
Answered by AI from this guide. Good questions may be added to this page — please don't include personal details.
Did this guide fix your problem?

About the Author
Richard
Tech Writer, IT Professional
Richard is a writer at Geek Rewind who turns complex IT tasks into clear, step-by-step guides. He draws on years of hands-on experience in system administration and enterprise IT operations, focusing on Windows, Linux and WordPress: the problems people actually run into, and the fixes that work. His server and WordPress guides come from systems he runs himself. Richard builds and maintains the platform behind Geek Rewind, from its Ubuntu servers and Nginx configuration to its custom WordPress plugins. Many new tutorials start with readers' questions, and he's always glad to answer them in the comments.
No comments yet — be the first to share your thoughts!