How to Disconnect or Remove a Printer from Windows 11

Removing a printer from Windows 11 takes about a minute and only deletes it from your PC—the printer itself stays untouched. Open Settings , go to Bluetooth & devices, select Printers & scanners, choose your printer, and click Remove.
If the printer keeps showing up after you restart, or if you also want to delete its driver files, the sections below cover those cases. The menu names and steps here match current Windows 11 builds.
Open Settings Bluetooth & devices Printers & scanners, select the printer, and click Remove. Windows deletes the printer from your PC’s list immediately without restarting or affecting the physical device.
What Removing a Printer Actually Does
Removing a printer deletes its entry from the list of printers Windows offers in apps such as Word, Edge and Notepad. It does not unplug the cable, switch off the device or erase anything from the printer.
Three things are worth knowing before you start:
- The driver usually stays. The driver—the software Windows uses to talk to your specific printer model—stays on the PC after you remove the printer. This is useful if you plan to reconnect later. If you want the driver gone too, see the driver section further down.
- A connected printer can come back. If a USB printer is still plugged in, or a network printer is still on and visible to Windows, Windows may add it again.
- A shared network printer is only a connection. If you remove a printer that lives on another computer or a print server, you remove your PC’s link to it. The printer stays available to everyone else.
Before You Remove a Printer
Do these two quick checks first. They prevent most of the errors people hit later.
Clear the Print Queue
A stuck print job is the most common reason a printer won’t be removed. The print queue is the list of documents waiting to print. Clearing it first avoids the problem.
- Open Settings Bluetooth & devices Printers & scanners
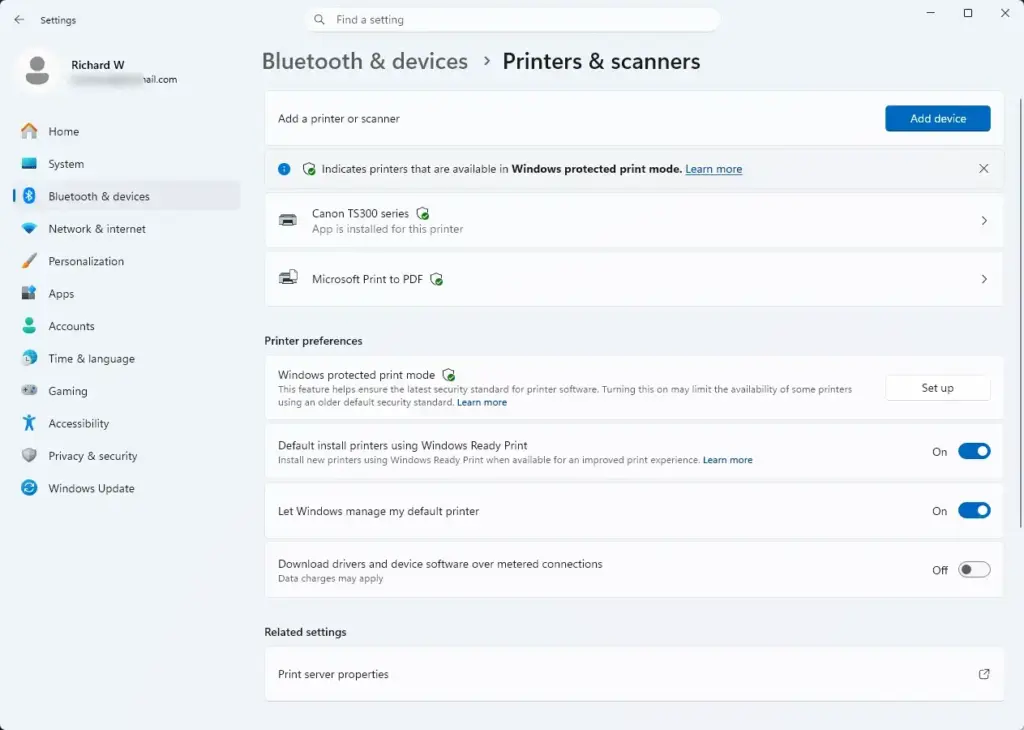
Settings › Bluetooth › Printers - Click the printer you want to remove.
- Click Open print queue. A window listing waiting documents opens.
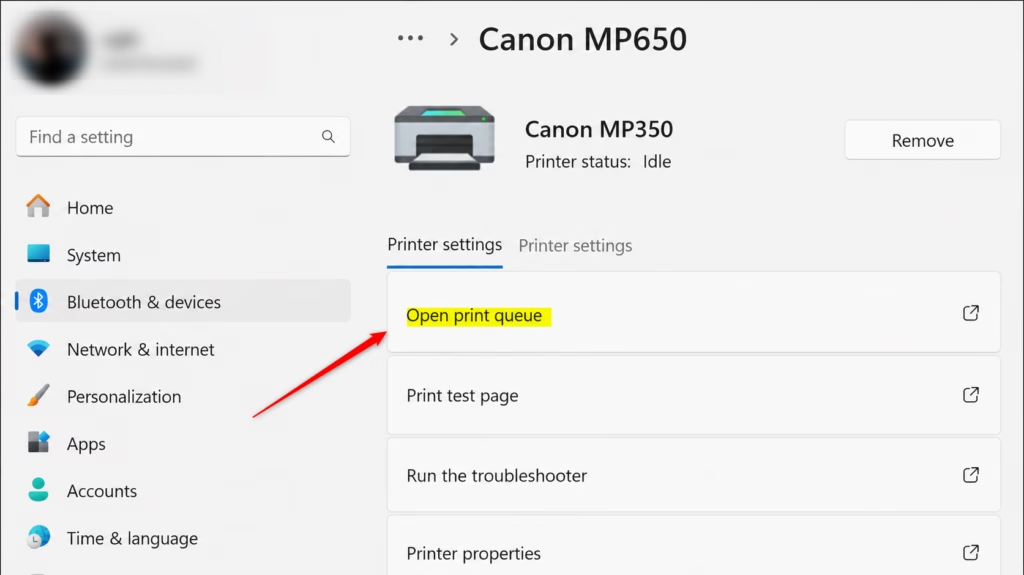
Clicking the Open print queue button to check print queue on this computer - In that window, click Printer in the menu bar, then click Cancel All Documents.
- Click Yes if Windows asks you to confirm. The list should empty.
If the queue is already empty, move on.
Note the Details If You Plan to Reconnect
If you may add this printer again later, write down its exact name. For a network printer, also note its IP address (for example, 192.0.2.10). You'll need this if you set up the printer manually later. You can usually print a configuration page from the printer's own menu to see it.
How to Disconnect a Printer in Settings
This is the standard method. It works on Windows 11 Home, Pro, Enterprise and Education.
Administrator privileges: Removing a printer that was installed for all users may prompt for administrator approval. If a User Account Control box appears, enter the password of an administrator account.
- Press the Windows key + I to open Settings.

Windows 11 Start menu with Settings gear icon highlighted. - Click Bluetooth & devices in the left pane.
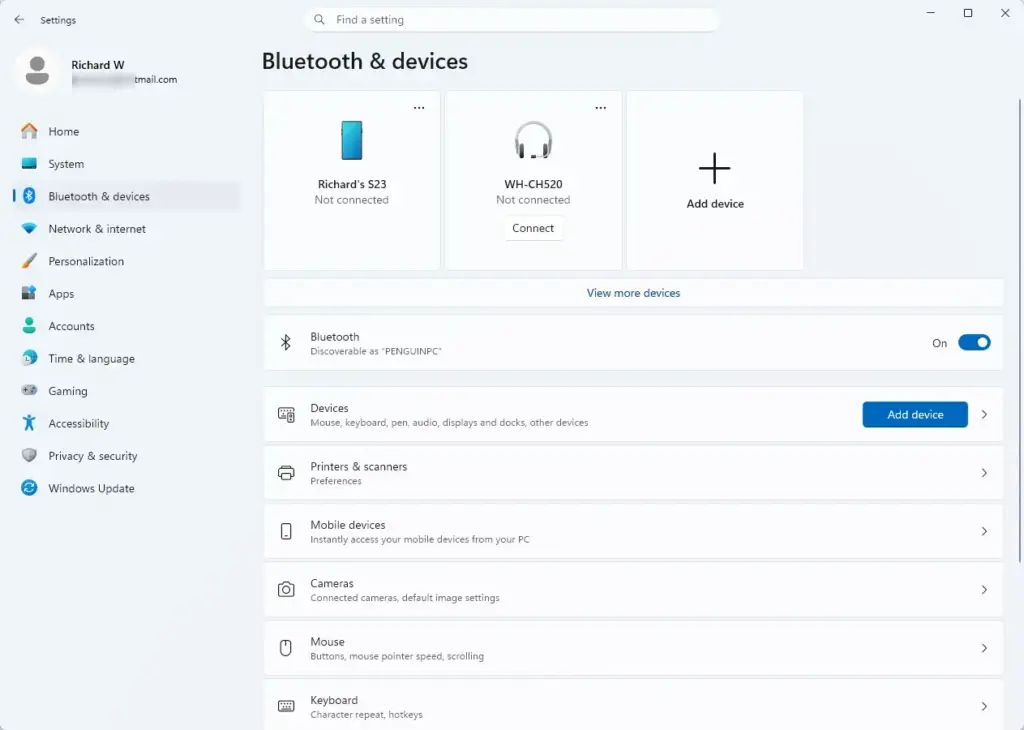
Windows Settings menu highlighting the Bluetooth and devices option for printers - Click Printers & scanners. A list of every printer and scanner Windows knows about appears.
- Click the name of the printer you want to remove. Its own page opens, with buttons such as Open print queue, Printer properties and Remove.
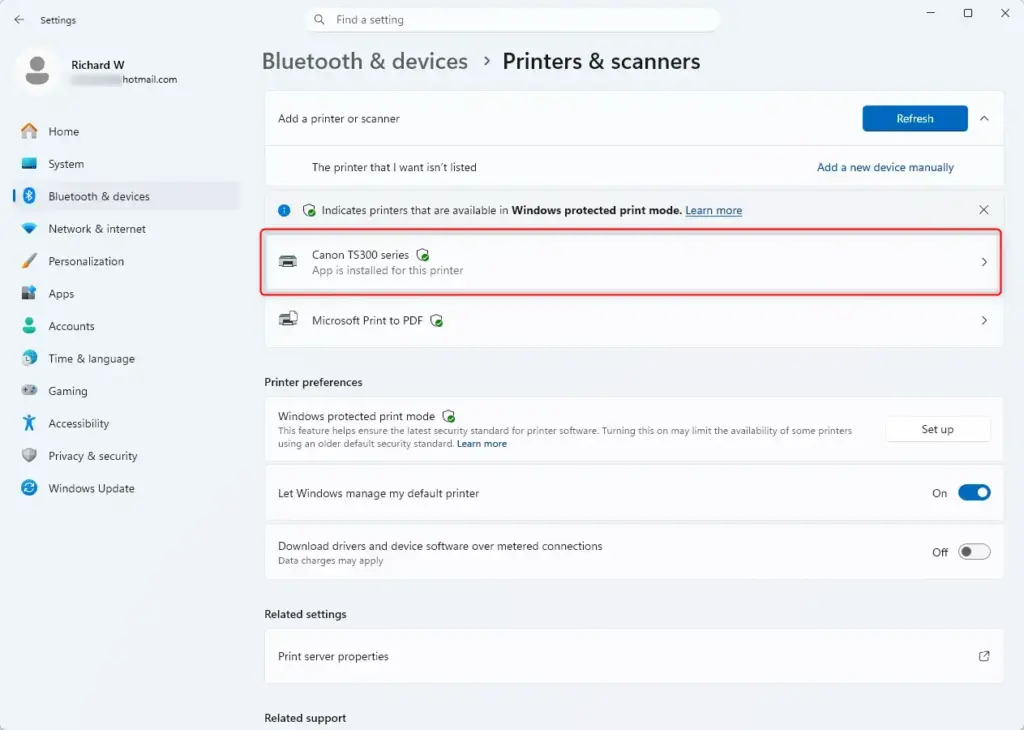
Windows 11 Settings app showing list of installed printers. - Click Remove. Windows asks whether you are sure you want to remove the device.
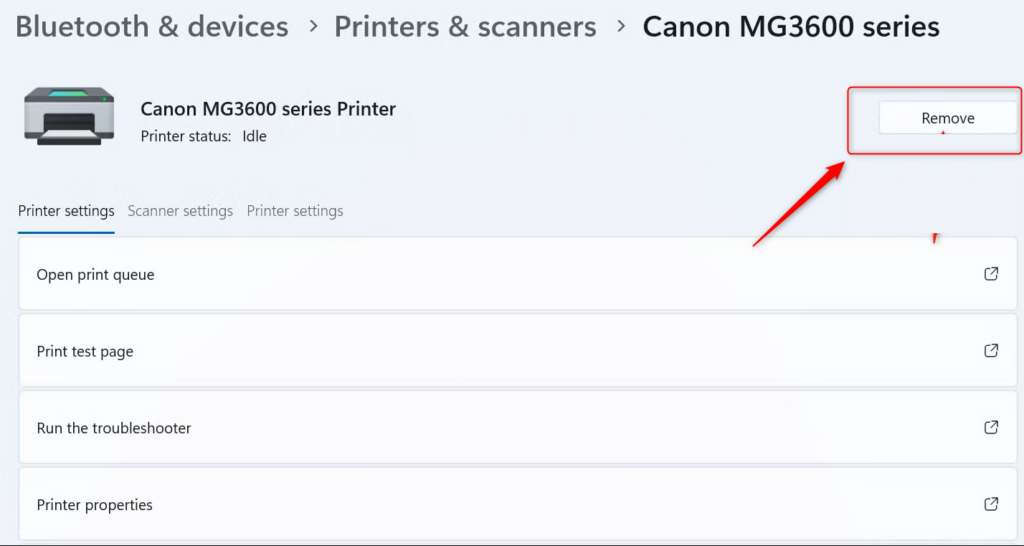
Windows 11 Settings showing Bluetooth & devices and Printers & scanners options. - Click Yes. Windows returns you to the printer list, and the printer no longer appears.
You do not need to restart the PC. If an app such as Word still shows the printer in its printer drop-down, close the app fully and reopen it. Apps read the printer list when they start.
If the Printer Is Still in the List
Refresh the view first. Close Settings and open it again. If the printer is still listed, one of these is usually the cause:
- A print job is stuck. Clear the print queue as described above, then try Remove again.
- The Print Spooler is jammed. The Print Spooler is the Windows service that queues up print jobs and sends them to the printer one at a time. If it hangs, the printer entry can stay locked. The Print Spooler reset section below fixes this.
- You are not an administrator. A standard account cannot always remove a printer set up for everyone. Sign in with an administrator account and repeat the steps.
- Your organization manages the PC. On a work or school computer, printers may be pushed to the PC by policy. Windows may re-add them after you remove them, or block the removal. Ask your IT department. Do not try to bypass the policy.
If the Printer Was Your Default
If you remove the default printer, Windows picks another one. This happens when Let Windows manage my default printer is on. That switch is at the top of the Printers & scanners page.
To choose the default yourself, turn that setting off. Then click the printer you want, and click Set as default.
How to Remove a Printer in Control Panel
Use this method if you prefer the older Devices and Printers window. It also helps if the Settings page will not load. It works on all editions of Windows 11.
- Click Start, type Control Panel, and press Enter.
- Click Hardware and Sound. If your Control Panel is in icon view, skip to the next step and look for Devices and Printers.
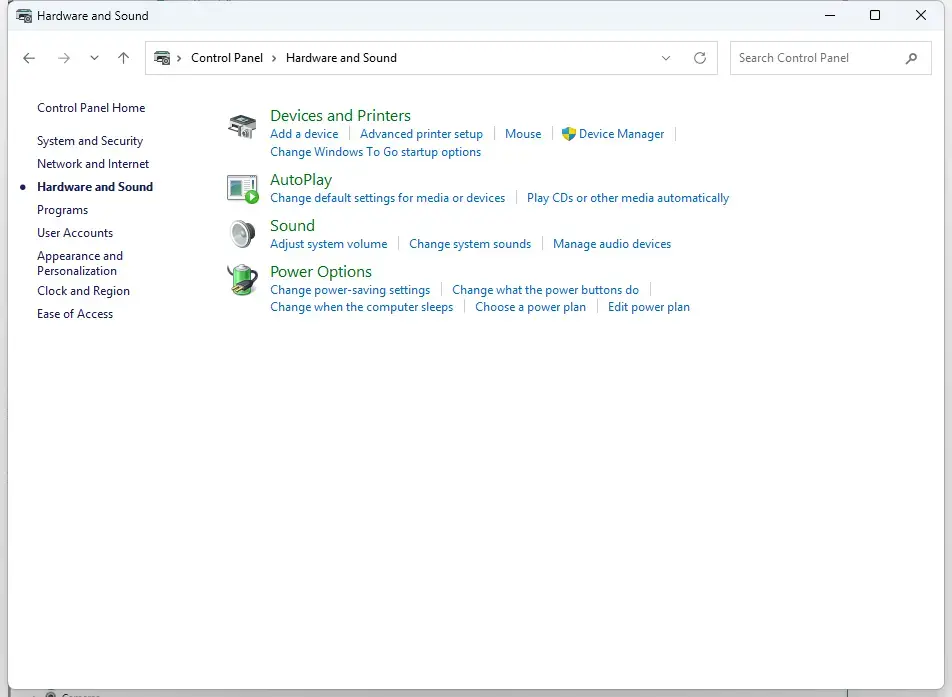
Control Panel › Hardware and Sound - Click Devices and Printers. The window lists your printers under a Printers heading.
- Right-click the printer you want to remove.
- Click Remove device. A confirmation box appears.
- Click Yes. The printer icon disappears from the window.
If Remove device is missing from the right-click menu, you have probably right-clicked a different kind of device. Right-click an icon in the Printers section instead.
How to Remove a Printer with PowerShell
PowerShell is the fastest route when you have several printers to remove, or when the graphical methods fail. It also shows the exact printer names Windows uses, which helps when two entries look alike.
Administrator privileges required. Right-click Start and choose Terminal (Admin). Click Yes at the User Account Control prompt.
- List the printers by typing the command below and pressing Enter. Each printer appears with its name, driver, and port (the connection point Windows uses to reach it).PowerShell
Get-Printer - Find the exact name of the printer you want to remove in the Name column.
- Remove it by typing the next command with your printer's name in place of the example. Keep the quotation marks.Code
Remove-Printer -Name "Example Printer" - Run
Get-Printeragain. The printer should no longer be in the list.
If PowerShell shows a red error, read the first line. A message saying the printer cannot be found means the name does not match exactly. Copy it again from the Get-Printer output. A message about the printer being in use points to a stuck job, so reset the Print Spooler as described below.
How to Remove a Printer in Print Management (Pro and Higher)
Print Management is a console for managing printers, ports and drivers in one place. It is included in Windows 11 Pro, Enterprise and Education. It is not included in Windows 11 Home, so Home users should use one of the other methods.
Administrator privileges required.
- Press Windows key + R to open the Run box.
- Type
printmanagement.mscand press Enter. Click Yes if prompted. - In the left pane, expand Print Servers, then expand your computer's name.
- Click Printers. Your printers appear in the middle pane.
- Right-click the printer and click Delete.
- Click Yes to confirm. The printer leaves the list.
The same console has a Drivers node and a Ports node under your computer's name. You can use them for the cleanup steps in the next section.
How to Remove the Printer Driver and Port as Well
Remove the driver only if you want a fresh start, the driver is causing problems, or you are getting rid of the printer for good. Leave it if you may reconnect the printer soon, since the existing driver will save a download.
Removing a driver affects every printer that uses it. If you have two printers of the same model, remove the driver only after you have removed both. Take this step only after you have removed the printer itself.
Administrator privileges required.
- Press Windows key + R to open the Run box.
- Type
printui.exe /s /t2and press Enter. The Print Server Properties window opens on the Drivers tab. - Click Change Driver Settings if the Remove button is greyed out. Approve the User Account Control prompt. The window refreshes with the buttons active.
- Select the driver for your printer in the list.
- Click Remove.
- Choose Remove driver and driver package, then click OK.
- Click Yes if Windows asks you to confirm. The driver leaves the list.
If you see a message that the driver is in use, a printer still depends on it or the Print Spooler is holding it. Make sure no printer entry still uses the driver. If the message persists, restart the PC and try again before anything else loads.
You can also open the same window from Settings Bluetooth & devices Printers & scanners by clicking Print server properties under Related settings.
Remove a Leftover Port
Network printers leave behind a port, which is the connection point Windows used to reach the printer. A leftover port is harmless, but you can remove it for tidiness. In an administrator PowerShell window, run Get-PrinterPort to list the ports. Then run the command below with the port's name from that list:
Remove-PrinterPort -Name "PORT-NAME"Windows refuses to remove a port that a printer still uses. Remove the printer first, then the port.
How to Reset the Print Spooler When a Printer Will Not Go Away
Use this when a printer remains after you remove it, a print job will not cancel, or a removal fails with an "in use" style error. It stops the Print Spooler, clears its temporary job files, and starts it again.
This clears every waiting print job for every printer on the PC. The jobs are not recoverable, so you need to print them again afterwards.
Administrator privileges required. Open Terminal (Admin) as described earlier.
- Stop the service by typing the command below and pressing Enter. Windows reports that the Print Spooler service was stopped successfully.Code
net stop spooler - Open File Explorer and go to
C:\Windows\System32\spool\PRINTERS. Click Continue if Windows asks for permission to access the folder. - Select all files in that folder and delete them. Delete only the files inside the folder. Do not delete the folder itself.
- Return to the terminal and start the service again:Code
net start spooler - Open Settings Bluetooth & devices Printers & scanners and try Remove again.
If the PRINTERS folder is already empty, the spooler restart alone may still release the printer. Try removing it again after step 4.
How to Get Rid of Microsoft Print to PDF and Other Built-In Printers
Microsoft Print to PDF and Microsoft XPS Document Writer are virtual printers, meaning they create files instead of paper copies. You can remove them like any other printer in Settings. If Windows brings one back after an update, turn the feature off instead.
Administrator privileges required.
- Click Start, type Turn Windows features on or off, and press Enter.
- Find Microsoft Print to PDF in the list and clear its check box. Do the same for Microsoft XPS Document Writer if it appears and you want it gone.
- Click OK. Windows applies the change. It may ask you to restart.
After the restart, the virtual printer should no longer appear in app print dialogs. To get it back, return to the same window and tick the box again.
Why a Printer Keeps Coming Back
If the entry reappears after you remove it, Windows is rediscovering the device. Check these causes in order:
- The printer is still connected. Unplug the USB cable, or switch the printer off, before you remove it. Windows re-adds USB printers automatically when it sees them.
- Manufacturer software is re-adding it. Printer companies often install a helper app that sets the printer up again. Uninstall that app in Settings Apps Installed apps if you no longer need it.
- Your organization pushes it. On a managed work or school PC, the printer may return at every sign-in. Only your IT department can change that.
- The same printer exists twice. Network printers sometimes appear under two names, for example one with a copy number at the end. Remove both entries.
How to Add the Printer Back Later
Removal is reversible. To reconnect, switch the printer on and make sure it's on the same network, or plug in its USB cable. Then open Settings Bluetooth & devices Printers & scanners and click Add device. Windows searches and lists any printer it finds. Click Add device next to yours.
If you removed the driver, Windows tries to download it again. If that fails, install the driver from the printer manufacturer's support page for your exact model.
What to Do Next
Open Settings Bluetooth & devices Printers & scanners and check that the list shows only the printers you use. If you removed your default printer, pick a new one with Set as default before your next print job. If the printer you want to use needs a fresh start, click Add device on the same page and Windows will set it up again from scratch.
Was this guide helpful?

About the Author
Richard
Tech Writer, IT Professional
Richard is a writer at Geek Rewind who turns complex IT tasks into clear, step-by-step guides. He draws on years of hands-on experience in system administration and enterprise IT operations, focusing on Windows, Linux and WordPress: the problems people actually run into, and the fixes that work. His server and WordPress guides come from systems he runs himself. Richard builds and maintains the platform behind Geek Rewind, from its Ubuntu servers and Nginx configuration to its custom WordPress plugins. Many new tutorials start with readers' questions, and he's always glad to answer them in the comments.


No comments yet — be the first to share your thoughts!