How to Clear Printer Queue in Windows 11

Clearing the printer queue in Windows 11 fixes print jobs that get stuck and stop new documents from printing.
The printer queue is like a waiting line for documents you send to your printer. If one job in the line freezes, it can hold up everything behind it, preventing any new printing.
This common problem happens when a print job has an error or gets blocked. Fixing it means stopping and restarting a special service called the Print Spooler and then removing those stuck jobs.
Once you clear the queue, your printer can start printing new documents again. This process helps get your printer back to normal when it’s not responding.
Stop the Print Spooler service via the Services app, delete all files in the 📂%windir%System32spoolPRINTERS folder, and then restart the Print Spooler service. This process clears any stuck print jobs preventing your printer from working.
Why clear the print queue?
When you send a file to your printer, Windows creates a temporary file in a “queue.” If that file becomes corrupted or stuck, it blocks everything else behind it. Clearing the queue removes these stuck files so your printer can start fresh.
What happens when you are done?
Clearing the printer queue in Windows 11 removes any print jobs that are stuck or failed. This helps your printer start fresh, making sure it’s ready for your next printing task by getting rid of old or problematic documents. You can view and cancel these jobs right from your notification area or through the Windows Settings app.
You can view and cancel print jobs through the notification area or the Windows Settings app. To learn how to cancel a single job, check out this guide: How to cancel a print job in Windows 11.
How to force clear the printer queue
If regular cancellation doesn’t work, follow these steps to clear the queue forcefully.
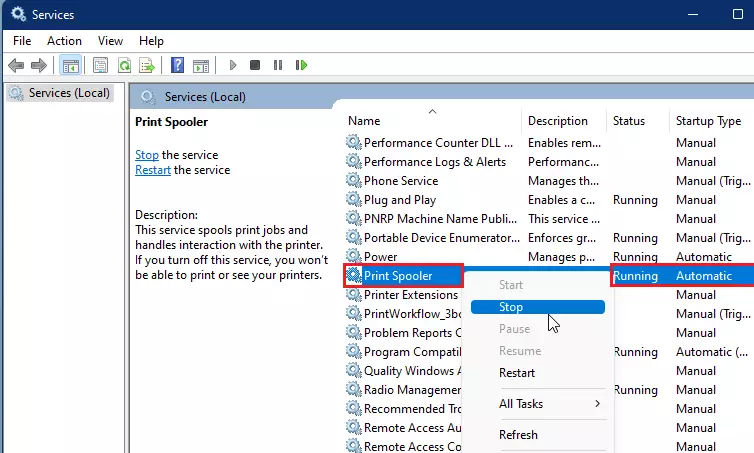
Step 1Stop the Print Spooler
Open the Services console, which is a tool that manages background tasks, including printing. Press the Windows key, type ‘Services,’ and open the app. Locate ‘Print Spooler’ in the list, then right-click it and choose ‘Stop.’
Step 2Delete stuck print files
Deleting stuck print files is a key step to clear your printer queue in Windows 11 if jobs aren’t printing. You’ll need administrator rights to do this. Open File Explorer by pressing Windows key + E. Paste the following path into the address bar at the top:
Open File Explorer by pressing Windows key + E. Paste the following path into the address bar at the top:
%windir%\System32\spool\PRINTERS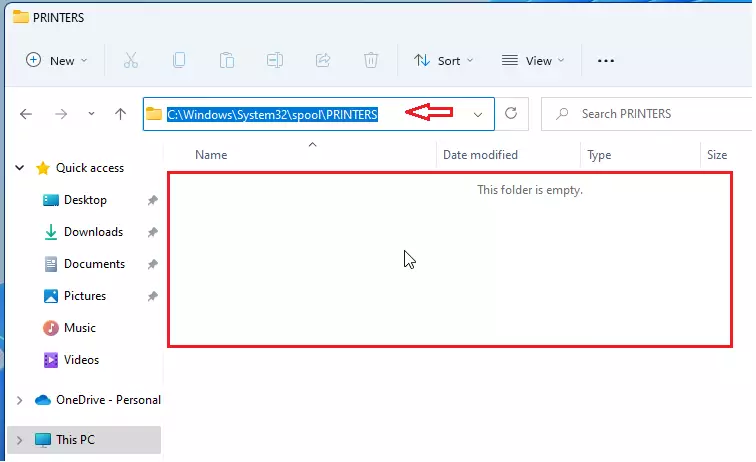
Step 3 Restart the Print Spooler
Go back to the Services window. Right-click the Print Spooler service again and select Start. You can also restart your computer to finish the process.
Summary
Clearing your printer queue in Windows 11 is a fix for printers that aren’t working right, helping you get back to printing quickly.
How do I reset my print spooler in 🪟 Windows 11?
Press Windows key + R, type services. Scroll down and locate Print Spooler. Right-click on Print Spooler and select Restart.
Was this guide helpful?

About the Author
Richard
Tech Writer, IT Professional
Richard, a writer for Geek Rewind, is a tech enthusiast who loves breaking down complex IT topics into simple, easy-to-understand ideas. With years of hands-on experience in system administration and enterprise IT operations, he’s developed a knack for offering practical tips and solutions. Richard aims to make technology more accessible and actionable. He's deeply committed to the Geek Rewind community, always ready to answer questions and engage in discussions.


No comments yet — be the first to share your thoughts!