Manage OneDrive Upload and Download Rates in Windows 11
Managing OneDrive upload and download rates in Windows 11 lets you control how much internet speed the app uses.
OneDrive syncs files between your PC and Microsoft’s cloud storage, making them available on any device you sign into.
By default, essential folders like Desktop, Documents, and Pictures back up automatically to the cloud.
You can set a specific speed limit for how fast OneDrive uploads and downloads files. This frees up your internet connection for other activities like browsing or streaming.
You can also pause syncing entirely if you are on a slow internet connection or using mobile data.
Open OneDrive settings, go to Sync and backup, then Advanced settings. Use the “Limit download rate” and “Limit upload rate” options to set your desired speeds. Choose “Adjust automatically” for uploads if preferred.
Control the OneDrive app upload and download rate in 🪟 Windows 11
Control the OneDrive app upload and download rate in Windows 11. As mentioned, the OneDrive app lets you control how much network bandwidth it uses. You can also pause OneDrive syncing temporarily if you’re connected to a slow network.
Here’s how to control the OneDrive app upload and download rate.
First, set up OneDrive in Windows 11. Then, if you’ve identified large, unimportant files and folders you don’t need to download, open the OneDrive app.
You can launch it from the Start menu or by browsing to its installed location at (“C:Program FilesMicrosoft OneDriveOneDrive.exe “).
The OneDrive icon is also quickly accessible from the Taskbar overflow area.
Once the app window appears, click the Help & Settings (gear) icon, and then select Settings.
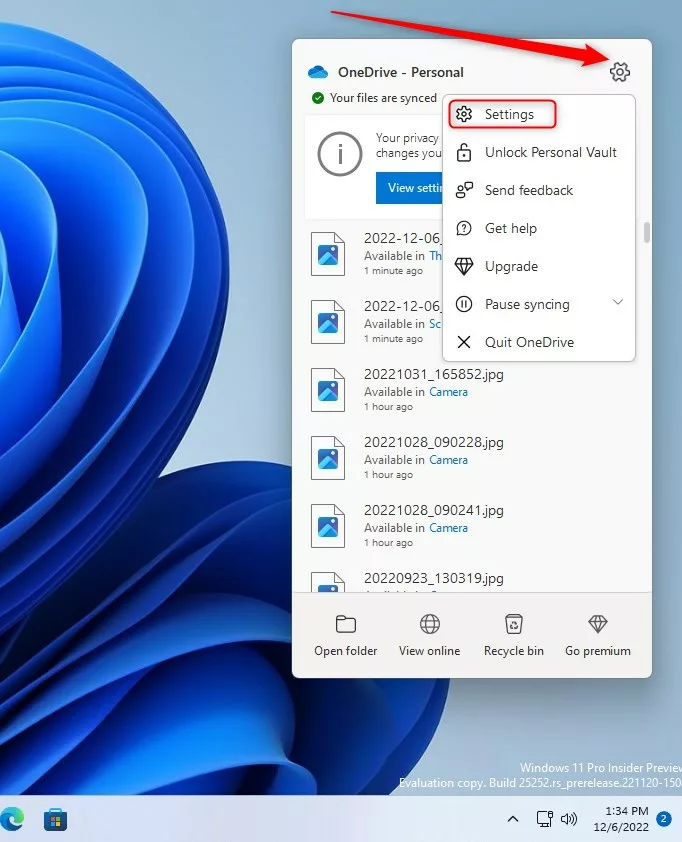
In the Settings pane, under Sync and backup, click the “Advanced settings” link to expand this section.

Expand the Limit download rate and Limit upload rate sections within Advanced settings, then configure your preferences.
- Limit the download rate:
- If you turned on Limit download rate, enter a Limit to the rate.
- Limit upload rate:
- If you turned on the Limit upload rate, choose one of these:
- Adjust automatically
- Limit to: Enter the rate.
- If you turned on the Limit upload rate, choose one of these:
Adjust automatically: This setting allows the OneDrive sync client (OneDrive.exe) to upload data in the background by using only unused bandwidth, so it won’t interfere with other network activity.

Save your changes to complete the process. You can then close the OneDrive app.
Reference:
Conclusion:
- This article has outlined the steps to control the OneDrive app upload and download rate in Windows 11, offering users the flexibility to manage their network bandwidth effectively.
- Following the instructions provided, users can limit the upload and download throughput to a fixed rate, and even pause OneDrive syncing temporarily when on a slow network.
- The comprehensive guide ensures that users can adjust the OneDrive sync client settings to suit their network requirements, enabling a seamless experience while utilizing the OneDrive app in Windows 11.
- For further details and reference, the official Microsoft support page is linked for additional assistance.
- Utilize the comment section for any feedback, error reporting, or supplementary information concerning the content.
How to control what gets uploaded to OneDrive?
You can choose which folders sync with OneDrive. Open OneDrive settings, go to the ‘Account’ tab, and click ‘Choose folders’. Uncheck any folders you don’t want to upload to the cloud, and click ‘OK’ to save your changes.
Can I restrict Downloads in OneDrive?
Yes, you can limit download speeds in OneDrive. Open OneDrive settings, go to the ‘Network’ tab. Under ‘Download rate’, select ‘Limit to’ and enter a speed in KB/s. This ensures other apps have enough bandwidth when OneDrive is downloading.
How do I change my OneDrive upload settings?
To change upload settings, open OneDrive settings. Navigate to the ‘Network’ tab. You’ll see an ‘Upload rate’ option. Click ‘Limit to’ and enter your desired speed in KB/s. This helps manage your internet connection when uploading files.
How to upload and download files on OneDrive?
To upload, drag and drop files into your OneDrive folder on your PC. To download, open your OneDrive folder, find the file, and double-click it. If the file isn’t on your PC yet, OneDrive will download it automatically.
Was this guide helpful?

About the Author
Richard
Tech Writer, IT Professional
Richard, a writer for Geek Rewind, is a tech enthusiast who loves breaking down complex IT topics into simple, easy-to-understand ideas. With years of hands-on experience in system administration and enterprise IT operations, he’s developed a knack for offering practical tips and solutions. Richard aims to make technology more accessible and actionable. He's deeply committed to the Geek Rewind community, always ready to answer questions and engage in discussions.


No comments yet — be the first to share your thoughts!