How to Sync Only Essential OneDrive Folders in Windows 11

Selective sync in OneDrive for Windows 11 lets you pick exact folders to download to your PC while the rest stays stored safely in the cloud. It stops large photo collections and backup files from filling up your local drive. It works the same on Home and Pro.
You manage these settings from the OneDrive cloud icon on your taskbar , and it takes about 3 clicks to get to the right screen. Unchecking a folder removes its local copy right away, but the files stay untouched on the online server. No restart is needed, and you can undo the change at any time.
Open OneDrive Settings from the cloud icon in your taskbar , go to the Account tab, and click Choose folders. Untick the folders you don’t want on this PC, then click OK twice. OneDrive removes their local copies straight away, but the files stay in your cloud storage and can be re-synced at any time.
Choosing which folders to sync
To sync only the OneDrive folders you need, open your OneDrive settings from the taskbar , go to the Account tab, and choose which folders to keep on your computer. This stops OneDrive from downloading every file to your hard drive. You save space and keep things tidy, because only the folders you actually use are stored locally.
Before you start, make sure OneDrive is running and signed in. If you are signed in to both a personal and a work or school account, each one has its own settings and its own list of folders. Change the account you want to trim.

Follow these steps to change your sync settings. The first three steps open the OneDrive settings window:
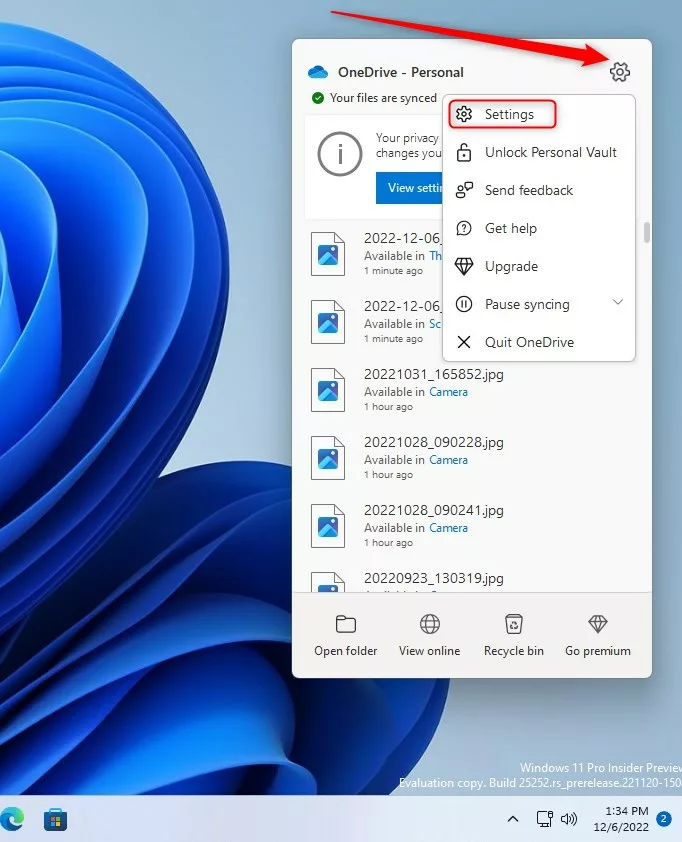
- Click the OneDrive cloud icon in your taskbar . If you don’t see it, click the small up arrow (Show hidden icons) next to the clock and look there. A small panel opens above the taskbar .
- Click the Help & Settings (gear) icon at the top right of that panel. A short menu drops down.
- Select Settings from the menu. The Settings window for OneDrive opens.
If you are on a work or school PC, your organisation may also control some OneDrive options. If the folder choices don't behave as described below, ask your IT team whether a policy is in place.
- On the Settings screen, click the Account tab. You will see your account name, your storage details and a few account options.
- Click the Choose folders button. A new window opens with the list of folders in your OneDrive.

The folder list shows the size of each folder, so you can quickly spot the ones that take the most space. Folders that contain subfolders have an arrow you can expand. This lets you keep one subfolder and drop the others.
- In the new window, uncheck the folders you do not want to keep on your computer. Leave checked the folders you use every day.
- Click OK in the folder window, then click OK again in the Settings window to save your changes. OneDrive then removes the local copies of the folders you unchecked.
Unchecking them can remove those files from the PC's normal folders. Check what you are unchecking before you click OK.

Unchecked files disappear from your PC, but stay safely in your cloud storage until you need them again. You can see them any time by signing in to OneDrive on the web.
To undo the change, open the same Choose folders window, tick the folder again and click OK. OneDrive downloads it again, which can take a while for large folders. For more detail on cloud file management, see the Microsoft support page at aka.ms/onedrive-files-on-demand.
Files On-Demand and Storage Management
OneDrive's Files On-Demand feature lets you browse cloud files in File Explorer without downloading them to your PC. Selective sync and Files On-Demand work well together, but they are not the same thing. Selective sync removes a folder from the PC entirely. Files On-Demand keeps the file names visible and downloads the content only when you open a file.
In File Explorer, a cloud icon next to a file means it is online only and takes no space. A green tick means the file is stored on your PC. To free space on a single file or folder, right-click it and choose Free up space. To keep it on the PC at all times, choose Always keep on this device.
Troubleshooting Sync Issues
If cloud folders fail to update on Windows 11, check the taskbar icon for error notifications first. This is the primary troubleshooting step. Hover over the cloud icon or click it, and OneDrive shows a message when something is wrong.
Look for these common causes:
- Syncing is paused. Click the cloud icon and resume syncing if you see a paused message.
- You are signed out or your password has changed. Sign in to OneDrive again when it asks.
- Your cloud storage is full. Free up space online or buy more storage.
- The PC is offline. Check your network connection.
Summary
Choosing which folders sync, and using Files On-Demand for the rest, keeps storage under control on your Windows 11 machines. Review the folder list now and then. Large folders you no longer use locally are good candidates to uncheck, and your files stay safe in the cloud.
Have a question about this guide?
Answered by AI from this guide. Good questions may be added to this page — please don't include personal details.
Did this guide fix your problem?

About the Author
Richard
Tech Writer, IT Professional
Richard is a writer at Geek Rewind who turns complex IT tasks into clear, step-by-step guides. He draws on years of hands-on experience in system administration and enterprise IT operations, focusing on Windows, Linux and WordPress: the problems people actually run into, and the fixes that work. His server and WordPress guides come from systems he runs himself. Richard builds and maintains the platform behind Geek Rewind, from its Ubuntu servers and Nginx configuration to its custom WordPress plugins. Many new tutorials start with readers' questions, and he's always glad to answer them in the comments.
[…] can free up space manually at any time. Right-click any folder or file in your OneDrive folder and select Free up space. This removes the local copy while keeping the file safe in the […]