How to Change External Drive Removal Settings in Windows 11

- 10 steps
- Needs administrator rights
External drive removal settings in Windows 11 control how your PC disconnects USB thumb drives and external hard drives. Windows 11 offers two modes for external storage: “Quick removal” and “Better performance.”
“Quick removal” lets you unplug your drive at any time without clicking the taskbar icon. “Better performance” speeds up file transfers, but you must use the “Safely Remove Hardware” tool first to prevent data loss. Windows 11 uses Quick removal by default, so you only need to change anything if you want the faster mode.
Open Device Manager, expand Disk drives, right-click your external drive, select Properties, go to the Policies tab, and choose Quick removal or Better performance. Quick removal lets you unplug anytime; Better performance speeds up transfers but requires using “Safely Remove Hardware” first.
Why Does Removal Policy Matter?
Your external drive removal settings control whether you must use the “Safely Remove Hardware” icon before unplugging a USB drive. Windows 11 uses two modes: Quick Removal, which lets you unplug safely at any time, and Better Performance, which speeds up file transfers but requires you to safely disconnect the drive to avoid data loss.
The setting belongs to each individual drive, not to the whole PC. If you change it for one USB drive, your other drives keep their own setting.
- Quick RemovalYou can unplug your USB drive or external drive anytime without using the “Safely Remove Hardware” option. Windows writes data to the drive right away instead of holding it in memory, so nothing is left waiting to be saved. This is the safer choice for thumb drives and for any drive you plug and unplug often. The trade-off is that file transfers can be a little slower.
- Better PerformanceWindows saves data in batches (this is called write caching) to make file transfers faster. Some of your data may still be in memory when a copy looks finished. You need to use the “Safely Remove Hardware” option before unplugging, so Windows can write everything out first. If you skip this step, you can lose files or corrupt the drive.
How to Change Removal Policy Using Settings
You can start from the Settings app, which you can open from the Start menu or by pressing Win+I.
- Click Start and select Settings, or press Win+I. The Settings window opens.
- Use the Settings app to check that Windows sees your external drive. If the drive is listed, it is connected and working.
The removal policy itself is not a switch in the main Settings pages. It lives on the drive’s Policies tab in Device Manager, which the next section walks through. The steps are the same on Windows 11 Home and Pro.
How to Change Removal Policy Using Device Manager
External drive removal settings are changed using Device Manager, a built-in tool that lets you manage all connected hardware. You open Device Manager, find your drive in the list of disk drives, and open its properties to switch between Quick Removal and Better Performance mode. You need to be signed in as an administrator to change these options.
If it is not connected, it will not appear in the list.
- ADMIN PRIVILEGES REQUIRED – Open Device Manager by searching for it in the Start menu . You can also right-click the Start button and pick it from the menu. If you are signed in as a standard user, Windows asks for an administrator password before you can save changes.
- Expand Disk drives and find your external drive. You should see a list of drives. Your USB drive is usually named after its maker or model, and may include “USB” in the name. If you are not sure which one it is, unplug the drive and see which entry disappears, then plug it back in.
- Right-click your external drive and select Properties. A properties window opens with several tabs along the top.
- Go to the Policies tab. If you do not see this tab, you probably opened the wrong entry, such as your internal drive. Go back and pick the one that matches your USB drive.
- Choose one of these options:
- Quick removal (default): unplug safely anytime. Use this if you want the lowest risk of losing data.
- Better performance: faster, but use “Safely Remove Hardware” first. Choose this only if you move large files often and will always eject the drive properly. When you select it, an option to enable write caching on the device is shown below it.
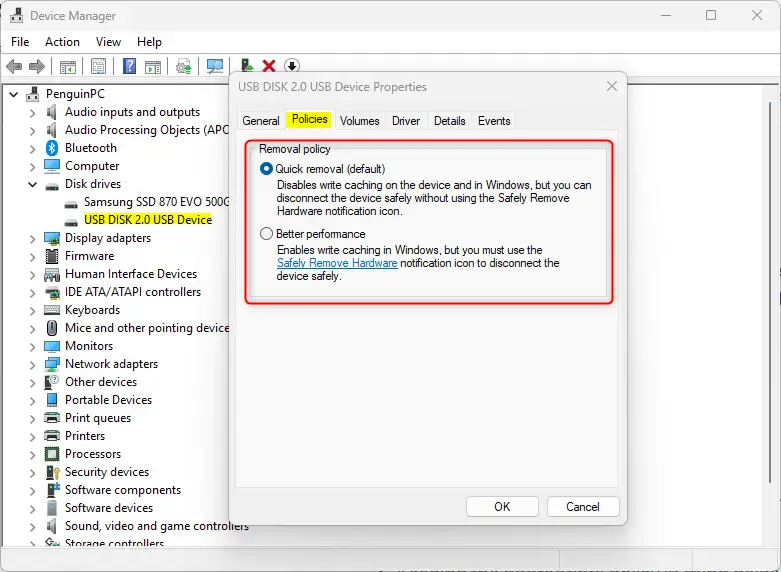
Device Manager showing disk removal policy settings in Windows 11. - Click OK to save. The window closes and the new policy applies to that drive. If the change does not seem to take effect, unplug the drive and connect it again. A full restart is not normally needed.
To undo the change, repeat the same steps and select the other option.
Summary
External drive removal settings involve choosing between convenience and speed for your USB storage. Quick Removal is best for daily use because you can unplug the drive without warning. Better Performance speeds up file copying at the cost of requiring you to manually disconnect the drive every time.
However, always use the "Safely Remove Hardware" option before unplugging any external drive to prevent data loss. In Windows 11, the icon is in the system tray at the right of the taskbar. You may need to click the up arrow to show hidden icons.
You can check your drive in Settings, and you change the removal policy in Device Manager. Choosing the right policy helps keep your data safe. It also keeps your drives working well. If you are unsure which to pick, leave the drive on Quick removal.
For more details, see how to Safely Remove External Drives in Windows 11 and how to enable write caching for better performance.
Have a question about this guide?
Answered by AI from this guide. Good questions may be added to this page — please don't include personal details.
Did this guide fix your problem?

About the Author
Richard
Tech Writer, IT Professional
Richard is a writer at Geek Rewind who turns complex IT tasks into clear, step-by-step guides. He draws on years of hands-on experience in system administration and enterprise IT operations, focusing on Windows, Linux and WordPress: the problems people actually run into, and the fixes that work. His server and WordPress guides come from systems he runs himself. Richard builds and maintains the platform behind Geek Rewind, from its Ubuntu servers and Nginx configuration to its custom WordPress plugins. Many new tutorials start with readers' questions, and he's always glad to answer them in the comments.
No comments yet — be the first to share your thoughts!