How to Enable Disk Write Caching in Windows 11


- 2 ways to do it
- Needs administrator rights
Disk write caching speeds up file saves by holding data in system memory for a moment before writing it to your drive. It is on by default for most internal drives in Windows 11. This tutorial shows how to check the setting and change it, and what to watch out for.
Open Disk Management by pressing Win+R, typing diskmgmt.msc, and pressing Enter. Right-click your disk label in the lower pane, select Properties, click the Policies tab, and check or uncheck “Enable write caching on the device”. Click OK to save. No restart required.
What is Disk Write Caching?
Disk write caching uses a small part of your system memory as a temporary holding spot. Think of it as a waiting area: data lands there first, and Windows writes it to your hard drive or SSD (Solid-State Drive) a moment later. Because your apps don’t have to wait for the slower drive, saving files can feel quicker.
Data in the cache is not yet on the disk, so a sudden power cut can lose it.
In the worst case, a file that was mid-write can end up corrupted. Desktops without a UPS (uninterruptible power supply) are most exposed. Laptops are safer because the battery works like a built-in UPS.
You need to be signed in with an administrator account to change this setting. It works the same on Windows 11 Home and Pro.
How to Turn On or Off Disk Write Caching
Two methods let you change this setting: Disk Management or Device Manager. Both end up on the same Policies tab, so use whichever you find easier. The change applies to one drive at a time. If you have several drives, repeat the steps for each one.
Method 1Using Disk Management
- Press
Windows + Ron your keyboard to open the Run box. You should see a small window with a text field. - Type
diskmgmt.mscand pressEnter. Disk Management opens. - In the lower half of the window, find the disk you want to change in the left column. Usually, Disk 0 is your main drive. If you aren’t sure, check the sizes shown next to each disk label.
- Right-click the disk label (like “Disk 0”, not the partition to its right) and choose Properties. The properties window for that drive opens.
- Click the Policies tab.
- Check or uncheck the box next to “Enable write caching on the device” to turn it on or off. Checked means caching is on.
- Click OK to save your changes.
If you don’t see a Policies tab or the checkbox is greyed out, you are probably not signed in as an administrator. Some drives, USB devices and drivers also don’t let Windows change this setting. In that case the option is simply not available for that drive.
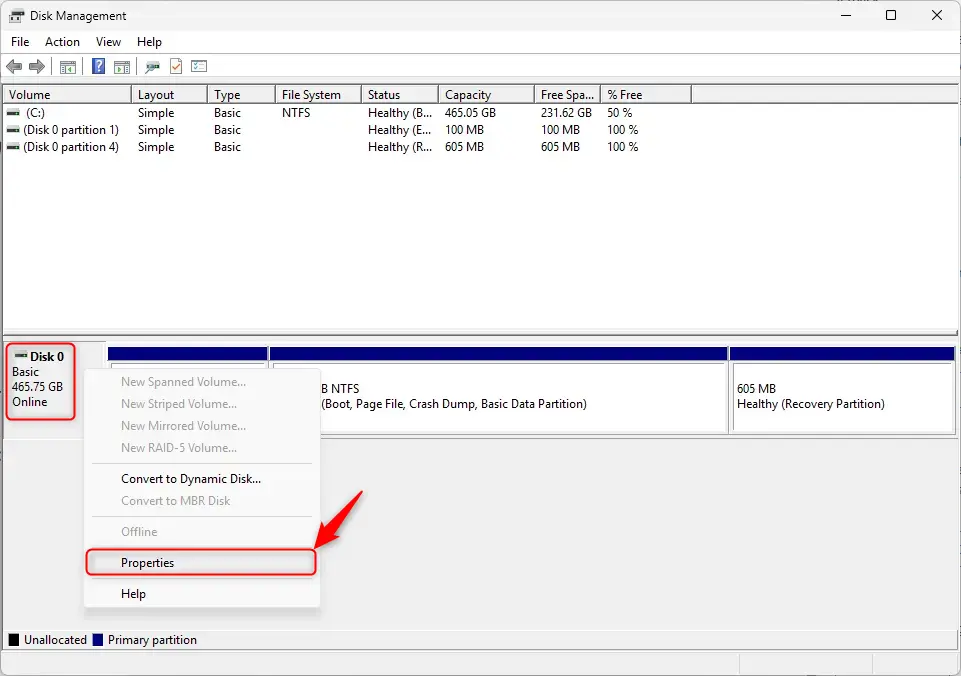
In short: press Win+R to open the Run dialog, type diskmgmt.msc, and press Enter. When Disk Management opens, find your main drive, right-click its label, and select Properties. The caching setting is on the Policies tab.
Make sure you right-click the disk label on the left and not the volume (such as C:) in the main pane. The volume’s properties don’t have a Policies tab.
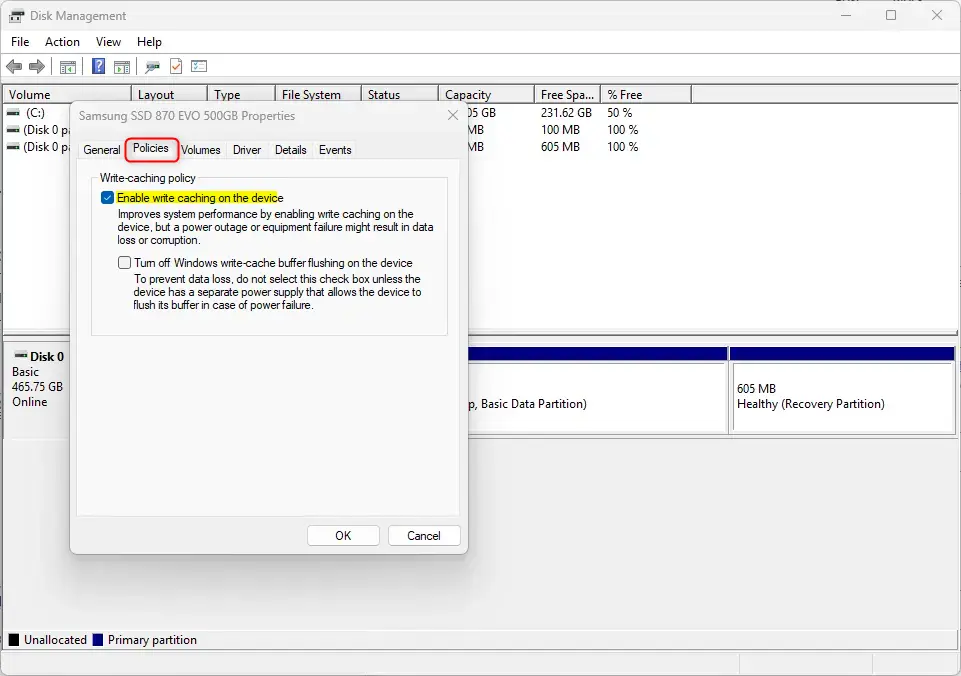
Once you have clicked OK, the change is saved. Windows normally applies it straight away, without a restart. For removable drives, any new setting takes effect the next time you plug the drive in. If you want to undo the change, open the same Policies tab and set the checkbox back the way it was.
- Close Disk Management when finished.
Method 2Using Device Manager
- Press
Windows + Xand select Device Manager from the list. The Device Manager window opens with a list of hardware categories. - Expand the Disk drives section. You will see each physical drive listed by its model name.
- Right-click your disk drive and select Properties.
- Go to the Policies tab.
- Check or uncheck the box next to “Enable write caching on the device” to turn it on or off.
- Click OK to save. If Windows asks you to restart, do so to be sure the change applies.
The tab may also show a second option about turning off Windows write-cache buffer flushing. Leave it unchecked unless your drive maker or a UPS-backed setup specifically calls for it. Checking it removes a safety measure and raises the risk of data loss during a power failure.
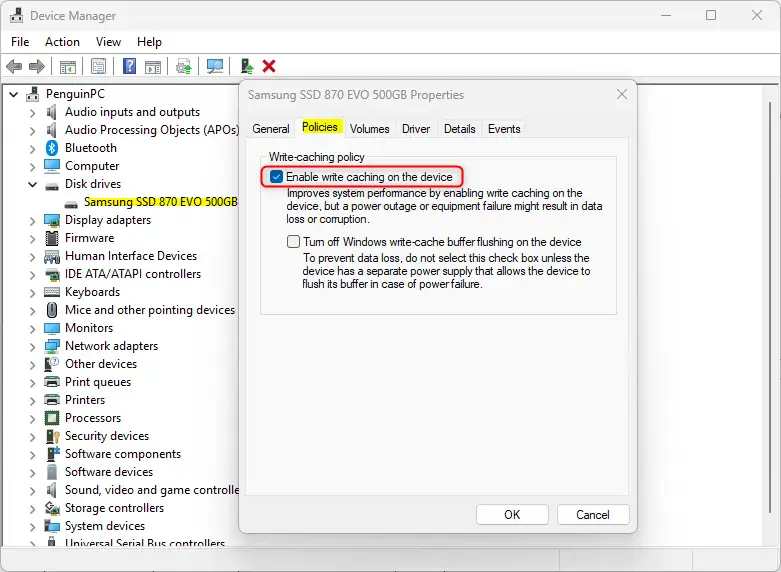
Device Manager is another way to configure disk write caching for your drives in Windows 11. After pressing Windows + X and selecting Device Manager, expand Disk drives. Then right-click the drive you want to adjust and choose Properties to find the caching option on the Policies tab.
If you ever notice data problems after power cuts, come back here and turn caching off for that drive. Expect saves to feel a little slower, especially on older hard drives.
Important Things to Remember
When you enable disk write caching in Windows 11, it can make saving files faster, but it's important to know the main risk. If your computer suddenly loses power or crashes, any data that was in the cache but not yet saved to the disk could be lost. Toggle this feature on or off whenever needed, but maintain regular backups of critical files while write caching remains active.- Write caching can make your computer faster by speeding up how data saves.
- If your PC shuts down suddenly, some recent data might be lost if it's still in the cache.
- You can easily turn this feature on or off anytime using Disk Management or Device Manager.
- Make sure to regularly back up your important files, especially if you use write caching.
- If you want to learn more about managing disks in Windows 11, check out this helpful article on How to Initialize a New Disk in Windows 11.
Summary
Disk write caching in Windows 11 helps your computer save files faster by using memory, and you can turn it on or off using Disk Management or Device Manager.
Have a question about this guide?
Answered by AI from this guide. Good questions may be added to this page — please don't include personal details.
Did this guide fix your problem?

About the Author
Richard
Tech Writer, IT Professional
Richard is a writer at Geek Rewind who turns complex IT tasks into clear, step-by-step guides. He draws on years of hands-on experience in system administration and enterprise IT operations, focusing on Windows, Linux and WordPress: the problems people actually run into, and the fixes that work. His server and WordPress guides come from systems he runs himself. Richard builds and maintains the platform behind Geek Rewind, from its Ubuntu servers and Nginx configuration to its custom WordPress plugins. Many new tutorials start with readers' questions, and he's always glad to answer them in the comments.
No comments yet — be the first to share your thoughts!