How to Change Display Language Preferences in Windows 11 Language Settings

Changing the display language in Windows 11 updates the text used in menus, buttons, Settings and apps to match the language you prefer. You can install new language packs, set a primary display language, and add typing tools without losing access to your original system layout.
Windows 11 treats the display language, the regional formats for dates and times, and the keyboard layouts as separate settings. You can configure them independently or all at once. That matters in practice. For example, you can keep English menus but show dates in the format your country uses.
Open Settings , go to Time & language Language & region, click the three-dot menu next to your desired language, select Language options, then choose your preferred language from the Windows display language dropdown and sign out to apply the change.
How to Open Language Settings
Every language task in this tutorial starts on the same page of the Settings app. This is where you manage installed languages, the display language and regional formats.
- Press Win+I on your keyboard to open Settings .

Windows 11 Start menu with Settings gear icon highlighted. - Click Time & language in the left-hand sidebar.
- Click Language & region. You should now see your currently installed languages under Preferred languages, and your regional formats further down the page.
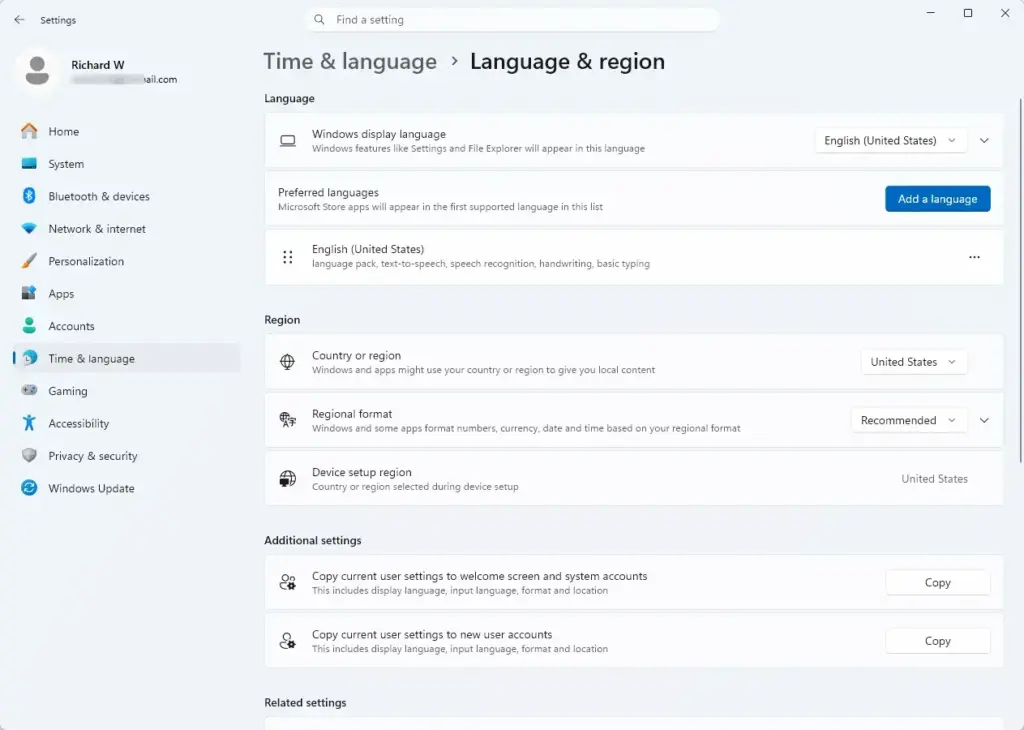
Settings › Time & language › Language & region
How to Add a New Language
You need an internet connection, because Windows downloads the pack from Microsoft. Installing a language does not switch your display language unless you tick the option for that, so it is safe to add one and try it later.
- Open Settings and go to Time & language Language & region.
- Find the Preferred languages section and click the Add a language button. A window opens with a list of languages.
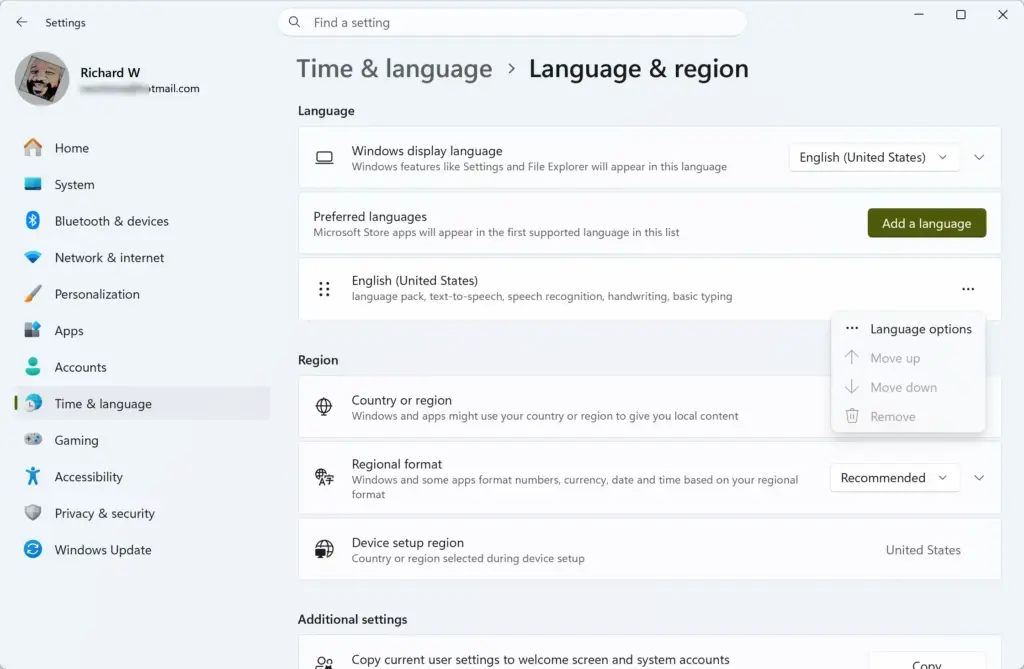
Settings › Time & language › Language & region › Preferred languages - Type the name of the language you want into the search bar, or scroll through the list to find it.
- Click the language you want to install, then click Next. A list of optional language features appears.
- Check the boxes next to the features you want, such as Set as my Windows display language or Text-to-speech. Leave the display language box unticked if you only want to add typing support for now.
- Click the Install button. Windows downloads the language pack, and you can watch its progress in the Preferred languages list. Larger packs can take several minutes.
If you ticked the display language box, Windows will ask you to sign out before the change takes effect. If a language installs but never appears as a display language, it may be offered for typing only. Also, Windows 11 Home Single Language editions are limited to one display language, and a work PC managed by an organization may block language changes. In that case, ask your IT department. To undo an installation, remove the language as described later in this tutorial.
How to Change Your Windows Display Language
Changing the display language updates the menus, apps and settings to the language you choose. The language must already be installed with display language support, so add it first if you have not done so.
- Open Settings and go to Time & language Language & region.
- Find your desired language under the Preferred languages list.
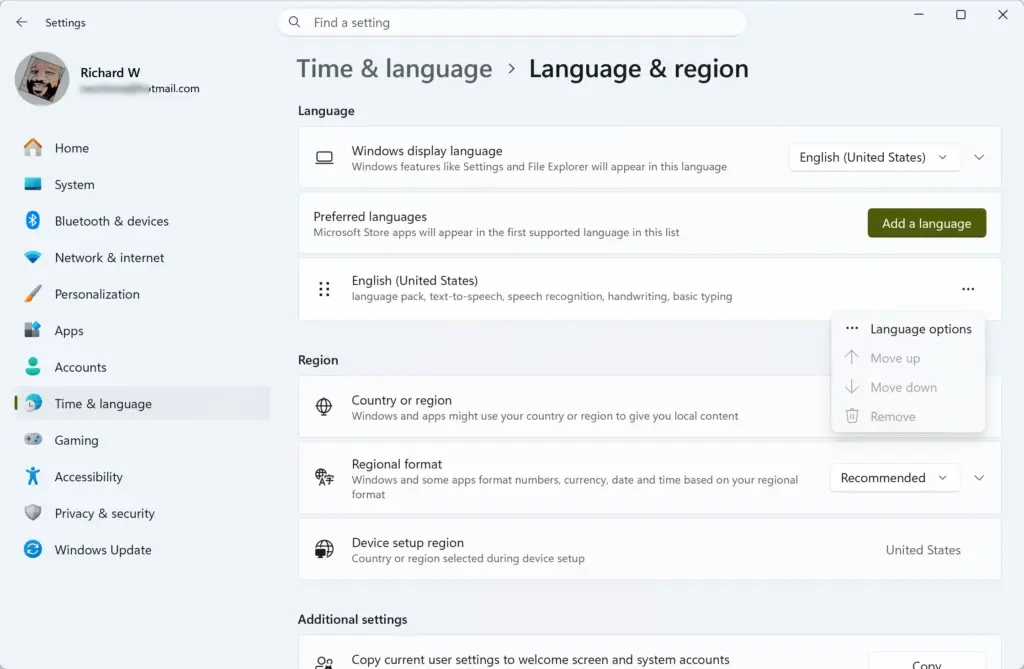
- Click the three-dot menu icon next to the language name and select Language options. If the option is already visible, skip to the next step.
- Locate the Windows display language dropdown menu near the top of the Language & region page.
- Select your preferred language from the dropdown menu. If the language is not listed, its pack is not installed yet, or it does not support display text. Go back and install it first.
- Click the Sign out button on the notification prompt that appears, then sign back into your user account. The new language is applied when you sign back in. Unsaved work is lost on sign-out, so save your files first.
To undo the change, repeat these steps, choose your original language in the Windows display language dropdown, and sign out again.
How to Remove an Unwanted Language
Removing a language you no longer use clears clutter from your language list and frees up storage space, because Windows deletes the downloaded language pack.
- Open Settings and go to Time & language Language & region.
- Look under the Preferred languages section to find the language you want to delete.
- Click the three-dot menu icon next to the language name.
- Click Remove from the drop-down menu. The language disappears from the list.
Switch to another language first, using the steps in the previous section, sign out and back in, and then remove it. If you remove a language by mistake, you can add it again with Add a language.
Configuring Regional Formats and Administrative Settings
Regional formats control how dates, times and numbers appear. You can change them without altering your main display language. A separate setting applies your language choices to the welcome screen and to new user accounts.
- Open Settings and go to Time & language Language & region.
- Scroll down to the Region section.
- Click the Regional format dropdown menu and choose a country or region. Dates, times and numbers now follow that region's conventions, with no sign-out needed in most cases.
- To apply your display language to your welcome screen, login screen and new user accounts, click the Administrative language settings link under related settings. This step requires administrator privileges, so you may be asked to approve a prompt or enter an administrator password.
- Click the Copy settings button in the Region window that opens. It is on the Administrative tab.
- Check the boxes for Welcome screen and system accounts and New user accounts, then click OK. Windows may ask you to restart for the change to take effect, so restart when you are ready.
If you want to go back, set the Regional format dropdown to your original region. For the welcome screen and new accounts, switch your display language back and repeat the copy steps.
What to do next
You should now see your computer interface updated with your chosen language preferences. If you write in more than one alphabet, set up your typing tools next. Open the language's Language options from the three-dot menu and add the keyboard layouts you need. Once you have more than one keyboard, you can switch between them with Windows key + Space.
Have a question about this guide?
Answered by AI from this guide. Good questions may be added to this page — please don't include personal details.
Did this guide fix your problem?

About the Author
Richard
Tech Writer, IT Professional
Richard is a writer at Geek Rewind who turns complex IT tasks into clear, step-by-step guides. He draws on years of hands-on experience in system administration and enterprise IT operations, focusing on Windows, Linux and WordPress: the problems people actually run into, and the fixes that work. His server and WordPress guides come from systems he runs himself. Richard builds and maintains the platform behind Geek Rewind, from its Ubuntu servers and Nginx configuration to its custom WordPress plugins. Many new tutorials start with readers' questions, and he's always glad to answer them in the comments.
No comments yet — be the first to share your thoughts!