How to Automatically Turn Off Your Screen with Presence Sensing in Windows 11

Presence sensing in Windows 11 locks your screen or turns off your display automatically the moment you walk away from your desk. This hardware feature uses a built-in sensor to detect your physical movement, which helps save battery life and keeps your private data safe when you step away.
Most newer laptops released since 2023 include this sensor by default. You can turn on and configure the feature in your system power settings if your computer hardware supports it. It does not depend on Home or Pro. What matters is the sensor, its driver, and a reasonably current build of Windows 11. No restart is needed to turn it on or off.
Go to Settings System Power & battery Screen and sleep. Turn on “Automatically turn off my screen when I leave” if your device has a presence sensor. This feature saves power and enhances security by turning off your display when you step away.
Why Use Presence Sensing?
This capability conserves energy by blanking the display whenever you step away from the desk. On a laptop running on battery, that adds up over a day of meetings and coffee breaks.
It also adds a layer of security by preventing unauthorized eyes from viewing sensitive data. Returning to the computer brings the system back online rapidly, so you don’t have to wait for it or press a key to get your screen back. If your sign-in settings require a password after the screen turns off, you will still need to authenticate.
What Happens When You Turn It On?
The built-in sensor monitors whether you are at your desk and turns off the display when you walk away. Approaching the computer again wakes the hardware based on active preferences.
Depending on the device, the sensor may be an infrared module or a camera next to the webcam. Windows only gets a “someone is there / nobody is there” signal from it. Which sensor you have, and which options appear, is set by your manufacturer and its drivers.
Step 1Open Your PC's Settings
Open Settings by pressing the Windows key on your keyboard, typing Settings, and pressing Enter. You can also click the Start button in the taskbar and select the gear-shaped Settings icon. This central app contains all the controls you need to set up Windows 11 presence sensing and manage your device.
Either method works the same way. Use whichever is faster for you. The steps below use the search method.
- Click the Start button. This is the Windows logo usually found in the bottom-left corner of the taskbar (on some setups it sits in the center). The Start menu opens.
- Type
Settingsin the search bar. Search results appear as you type. - Click on Settings when it appears in the search results. The Settings window opens with a list of categories on the left.
The primary control panel houses hardware configurations, power schemes, and display options. Everything in the rest of this tutorial happens inside this window.
Step 2Go to Power and Battery Settings
Navigate to the power management menu by clicking System on the left menu of the Settings window, then clicking Power & battery on the right. This page controls how your computer uses power, which is where you must go to configure Windows 11 presence sensing features for your display.
The full path is Settings System Power & battery.
- In the Settings window, click on System in the list on the left side. The System page loads on the right.
- On the right side, find and click on Power & battery. You should now see battery status, power mode and the screen and sleep options.
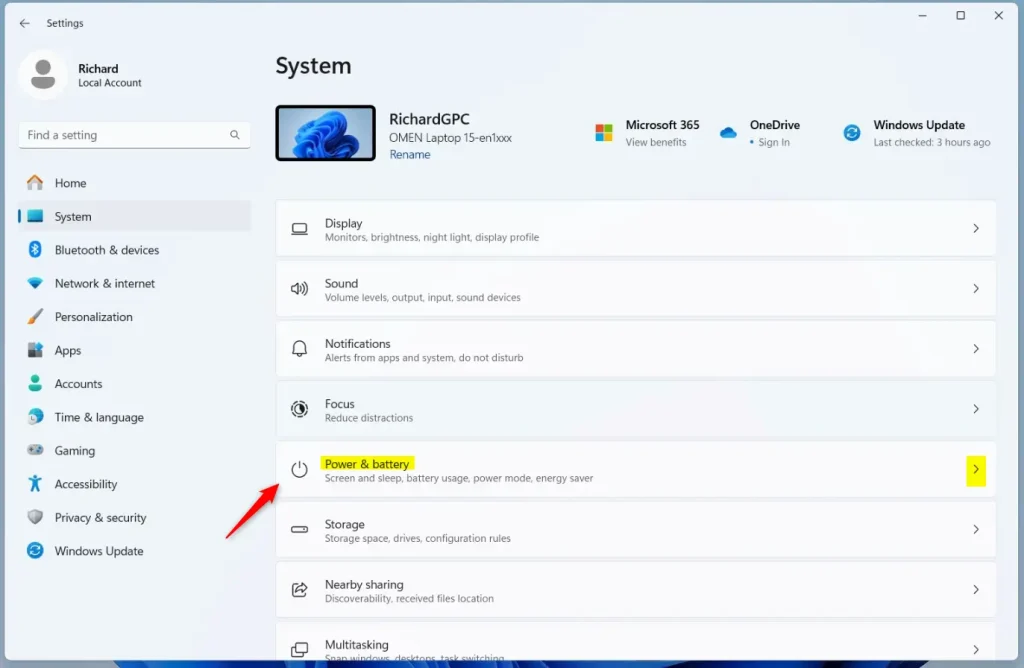
This screen controls how your computer manages power and battery life. On a desktop PC without a battery, the page is shorter, but the screen and sleep options are still there.
Step 3Find Screen and Sleep Options
Open the Screen and sleep menu from the Power & battery page to adjust display timeout rules. This submenu contains the exact controls for how long your monitor stays on when you step away, laying the groundwork for enabling Windows 11 presence sensing.
The full path is Settings System Power & battery > Screen and sleep.
- Within the "Power & battery" settings, click on Screen and sleep. The section expands and shows the timeout drop-down lists.
Dedicated sliders determine exact idle durations before the monitor blanks or the system enters sleep mode. Those timers still work alongside presence sensing. They act as a fallback if the sensor doesn't detect that you left, so keep them at sensible values.
Step 4Turn On Automatic Screen Off When You Leave
Enable Windows 11 presence sensing by finding the option that says Automatically turn off my screen when I leave and clicking the toggle switch next to it. Your compatible PC will now use its built-in sensors to blank the display the moment you walk away from your desk.
If you want to undo it later, come back to this same page and switch the toggle to Off. The change applies immediately.
- Look for the option that says Automatically turn off my screen when I leave. It sits in the expanded Screen and sleep section.
- If it's not already on, click the switch next to it to turn it On. The label next to the switch changes to On.
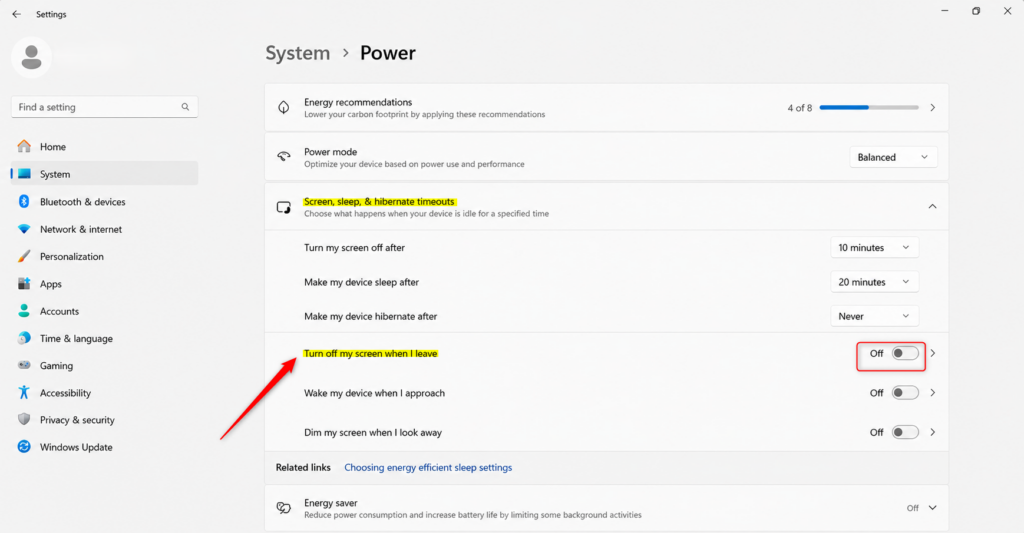
Helpful Tip: Compatible machines often include an option labeled 'Automatically wake up my device when I approach.' Activating this companion toggle prepares the system for use the moment you step forward, improving both convenience and security.
To test it, leave your desk for a minute or so and watch the screen go dark. Then walk back. If nothing happens, check that the sensor isn't covered and that your device drivers and Windows are up to date.
Important Note: Older hardware lacks the necessary camera modules or infrared components. Absence of these menus indicates a hardware limitation. Checking manufacturer specifications or inspecting the bezel near the webcam confirms sensor availability.
If the options are missing or greyed out on a laptop that should have the sensor, run Windows Update and check your manufacturer's support page for chipset or sensor driver updates. Some manufacturers also provide a utility that controls the sensor.
Reference:
Summary
Configuring Windows 11 presence sensing protects sensitive documents, conserves electricity, and automates workflow security. It takes a minute to set up, and you can switch it off again from the same page if it doesn't suit the way you work.
Have a question about this guide?
Answered by AI from this guide. Good questions may be added to this page — please don't include personal details.
Did this guide fix your problem?

About the Author
Richard
Tech Writer, IT Professional
Richard is a writer at Geek Rewind who turns complex IT tasks into clear, step-by-step guides. He draws on years of hands-on experience in system administration and enterprise IT operations, focusing on Windows, Linux and WordPress: the problems people actually run into, and the fixes that work. His server and WordPress guides come from systems he runs himself. Richard builds and maintains the platform behind Geek Rewind, from its Ubuntu servers and Nginx configuration to its custom WordPress plugins. Many new tutorials start with readers' questions, and he's always glad to answer them in the comments.
… liked this!