How to Automatically Wake PC with Presence Sensing in Windows 11

Presence sensing in Windows 11 wakes your computer when you walk up to your desk and locks it when you step away. It uses a compatible hardware sensor built into your PC to detect that you are there. The screen turns on from sleep without you touching the keyboard or mouse.
You need a Windows 11 PC with a supported presence sensor to use this feature. Most desktops and laptops don’t have one. It is mainly found on newer laptops and some monitors, and the manufacturer’s spec sheet will tell you if yours does.
Enable automatic wake-up by navigating to Settings System Power & battery Screen and sleep. Turn on the “Automatically wake up my device when I approach” switch if your PC has a compatible presence sensor. This feature uses sensors to wake your PC when you are near.
What is Presence Sensing?
Presence sensing relies on specialized hardware built into your machine to detect a person nearby. Windows doesn’t do this with software alone. It reads the sensor through a driver, usually supplied by the PC or monitor manufacturer.
This matters because the settings only appear when Windows finds a working sensor. If the hardware is missing, or the driver isn’t installed, the presence sensing options won’t show up, and nothing you change in Settings will bring them back.
How to Make Your PC Wake Up When You Get Close
You can turn this on in a few quick steps. The feature works the same on Windows 11 Home and Pro. You don’t need to restart afterwards, and you can turn it off again in the same place.
Here is the route you will follow:
- Open Settings.
- Check your power and sleep timings.
- Turn on the wake option under Privacy & security.
Step 1Open Windows Settings
- Press the Windows key + I to open Settings.
The Settings app opens with the navigation list on the left and the System page on the right.
Windows key + I keys on your keyboard together to open Settings immediately.You can also right-click Start and choose Settings if the shortcut doesn't work.

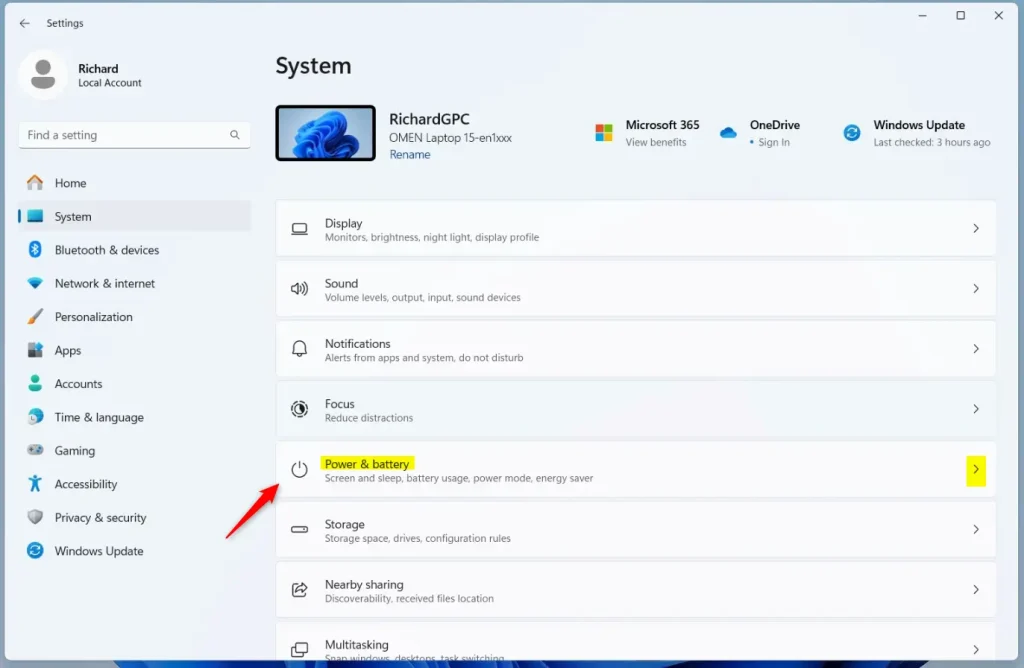
Step 2Go to Power & Battery Settings
- Click System in the left menu.
- Scroll down the right pane until you find Power & battery, then click it.
The Power & battery page opens. This is where Windows keeps its power management controls, including the screen and sleep timers.
Step 3Find Screen and Sleep Settings
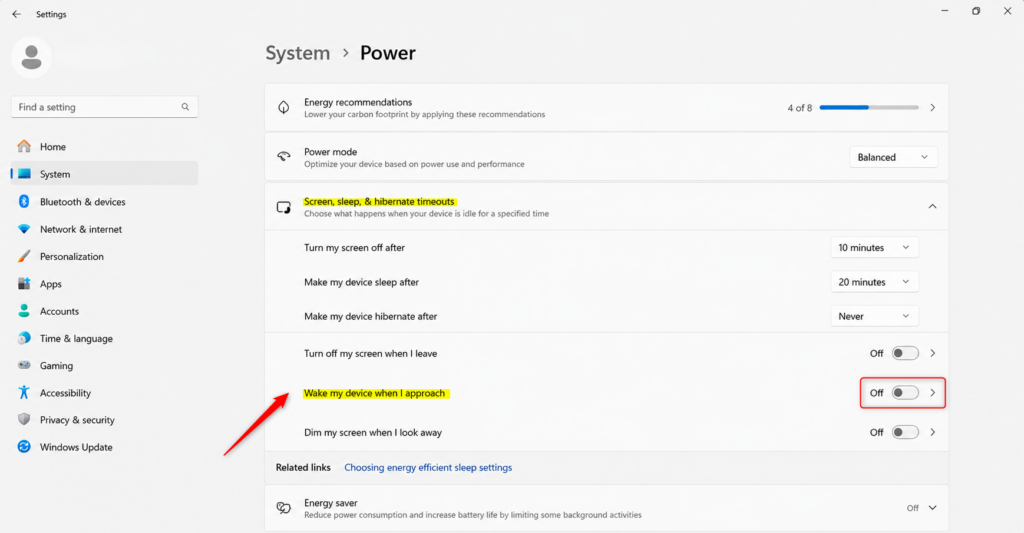
- Find Screen and sleep on the Power & battery page and click it to expand it. On some newer builds of Windows 11, this section is called Screen, sleep, & hibernate timeouts.
The section expands to show how long Windows waits before turning off the screen and before going to sleep. Each timer has separate values for when the PC is on battery and when it is plugged in. Desktops only show the plugged-in values.
Wake on approach only helps if the PC actually goes to sleep or turns off the screen. If a timer is set to Never, the PC never sleeps and there is nothing to wake. Set a timeout you are happy with.
Step 4Turn on Automatic Wake-Up
You have to turn the wake setting on yourself, because it is not enabled by default. Follow these steps:
- Open Settings Privacy & security Presence sensing
- Find the option Automatically wake up my device when I approach and switch it on.
The toggle should now show as On. Your PC will wake when you approach it, so it is ready by the time you sit down.
The same page may also offer an option to lock your device when you leave. It appears only if your sensor supports it. If you don't want the PC waking or locking on its own, come back to this page and switch the option off.
If you don't see the option, work through these checks:
- Confirm in the manufacturer's specifications that your PC or monitor has a presence sensor.
- Run Windows Update and install any optional driver updates.
- Check the manufacturer's support page for a presence sensor or chipset driver for your exact model.
If the PC has no sensor, the option will not appear however many drivers you install.
Reference:
Summary
Presence sensing makes Windows 11 react to you being at the desk while also saving power. The screen can sleep when you are away and be ready when you return. If the setting doesn't appear, it is almost always a hardware or driver issue rather than something you have missed in Settings.
Did this guide fix your problem?

About the Author
Richard
Tech Writer, IT Professional
Richard is a writer at Geek Rewind who turns complex IT tasks into clear, step-by-step guides. He draws on years of hands-on experience in system administration and enterprise IT operations, focusing on Windows, Linux and WordPress: the problems people actually run into, and the fixes that work. His server and WordPress guides come from systems he runs himself. Richard builds and maintains the platform behind Geek Rewind, from its Ubuntu servers and Nginx configuration to its custom WordPress plugins. Many new tutorials start with readers' questions, and he's always glad to answer them in the comments.
… liked this!