How to Disable App Installations on Non-System Drives in Windows 11
This article explains how to prevent installing or moving apps on non-system drives in Windows 11.
Prevent app installations on non-system drives by enabling the “Disable installing Windows apps on non-system volumes” setting in Group Policy Editor or by setting the RestrictAppToSystemVolume DWORD to 1 in the Registry Editor. These actions restrict app installations to your system drive.
Why Control Where Apps Install?
You can control where apps install on Windows 11 to keep your main drive from getting too full. Apps from the Microsoft Store typically install on your C: drive by default. Installing new apps on other drives can help manage storage space and keep your system drive tidy.
By default, apps from the Microsoft Store install on your C: drive. You can move already installed apps to another internal or external drive, and Windows 11 lets you install new apps there too.
If you want to prevent this, you can disable the feature using either Group Policy or the Registry Editor.
Method 1Disable Installing Apps Using Group Policy
You can disable installing apps on drives other than your main system drive in Windows 11 using the Group Policy editor. This approach establishes a system-wide rule, ensuring new programs install only where you intend. Follow these steps to open the editor and make the change.
To access the local group policy editor and make this change, follow the steps below.
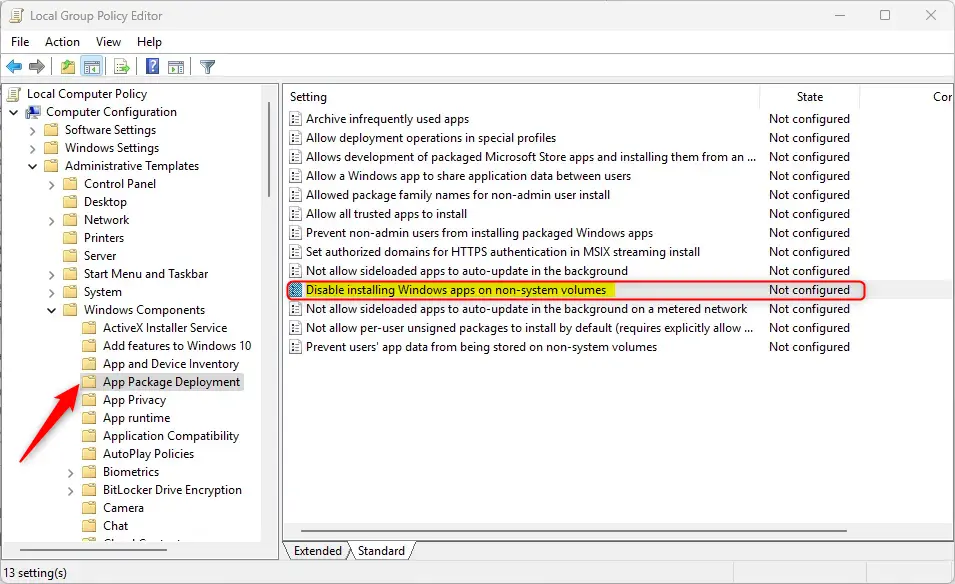
- Open the Local Group Policy Editor. Search for “Edit group policy” on the Start menu.
- Navigate to the folders in this order:
- Computer Configuration
- Administrative Templates
- Windows Components
- App Package Deployment
- In the App Package Deployment pane on the right, find and double-click “Disable installing Windows apps on non-system volumes”.
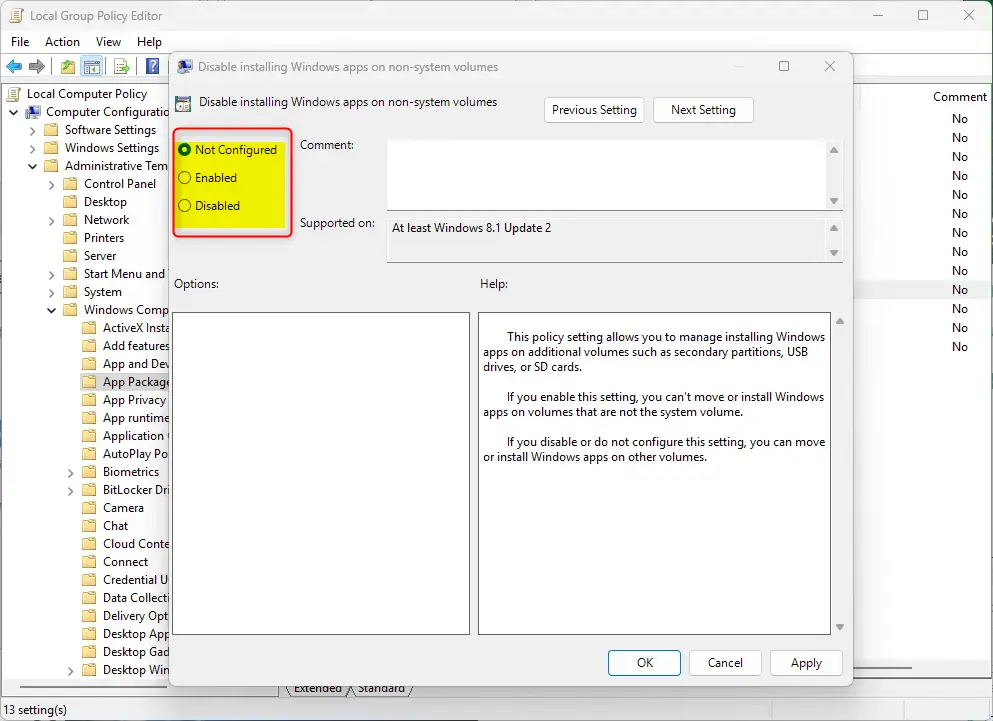
- Choose one of these three options:
- Not Configured (default) – Apps can be moved or installed on other drives.
- Enabled – Apps cannot be moved or installed on drives other than the system drive.
- Disabled – Apps can be moved or installed on other drives.
- Click OK to save your changes.
Method 2Disable Installing Apps Using Registry Editor
The Windows Registry Editor offers another way to prevent apps from installing on drives other than your main system drive in Windows 11. This tool allows for fine-grained adjustments to your Windows settings. Using the Registry Editor is another way to control where new apps are installed on your PC.
Another way to prevent installing apps on non-system drives is to use the Windows Registry Editor.
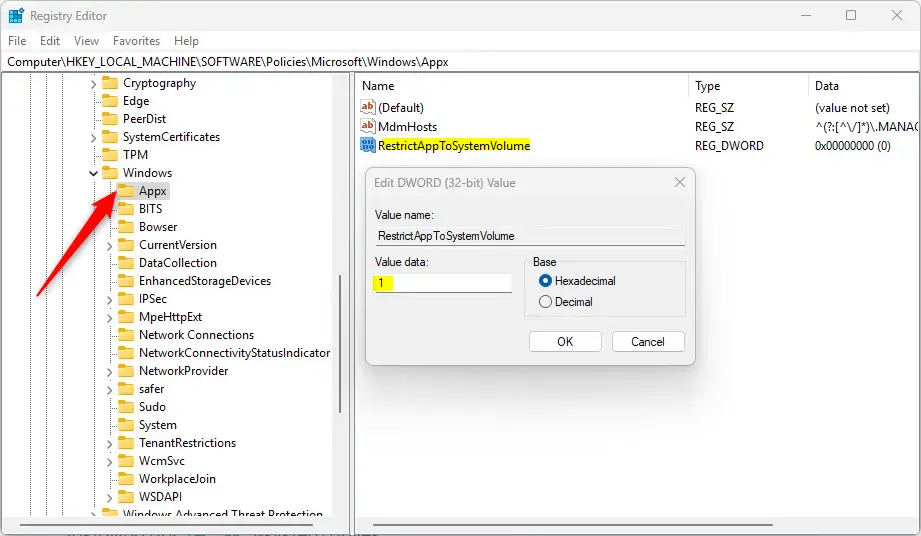
- Open the Windows Registry and navigate to this folder path:
Computer\HKEY_LOCAL_MACHINE\SOFTWARE\Policies\Microsoft\Windows\Appx - Right-click Appx, select New, then DWORD (32-bit) Value.
- Name the new DWORD
RestrictAppToSystemVolume. - Double-click
RestrictAppToSystemVolumeto open it. Type1to prevent installing apps on non-system drives.
What Happens When You Enable This Setting?
When you set RestrictAppToSystemVolume to 1, you prevent users from installing or moving apps to any drive except the system drive (usually C:).
How to Restore Default Behavior
To allow users to install apps on non-system drives again, delete the RestrictAppToSystemVolume value you created above.
You may need to restart your computer for your changes to take effect.
Summary
To stop apps from installing on drives other than your main system drive in Windows 11, you can use either the Group Policy editor or the Registry Editor. Both methods help you manage where new apps are stored, keeping your system drive tidy and preventing it from filling up too quickly.
**Key Points:**
* **App Types:** Apps come from the Microsoft Store or from standalone installers.
* **Default Behavior:** Apps install on your C: drive by default, but you can move them elsewhere.
* **Group Policy:** Use the Local Group Policy Editor and set the ‘Disable installing Windows apps on non-system volumes’ option to ‘Enabled’ to prevent installations on other drives.
* **Registry:** Modify the Windows Registry by creating a DWORD named ‘AllowNonSystemDrives’ under ‘Appx’ and setting its value to ‘0’ to restrict app installations to the system volume.
* **Backup:** Always back up your registry or create a System Restore point before making changes.
* **Restart:** You may need to restart your computer for your changes to take effect.
- Two App Types: Apps come from the Microsoft Store or from standalone installers.
- Default Behavior: Apps install on the C: drive, but users can move them to other drives.
- Group Policy Method: Use the Local Group Policy Editor to disable installations on non-system drives. Set the option to Enabled.
- Registry Method: Modify the Windows Registry to restrict app installations to the system volume. Create a DWORD named
RestrictAppToSystemVolumeand set its value to1. - Backup First: Always back up your registry or create a System Restore point before making changes.
- Reboot Required: You may need to restart your computer for changes to take effect.
How to stop auto installation of apps in PC?
Selecting ‘Store only’ is recommended. This will stop people from downloading and installing apps from outside the Microsoft Store. This setting is often the most direct method for achieving that goal.
Was this guide helpful?

About the Author
Richard
Tech Writer, IT Professional
Richard, a writer for Geek Rewind, is a tech enthusiast who loves breaking down complex IT topics into simple, easy-to-understand ideas. With years of hands-on experience in system administration and enterprise IT operations, he’s developed a knack for offering practical tips and solutions. Richard aims to make technology more accessible and actionable. He's deeply committed to the Geek Rewind community, always ready to answer questions and engage in discussions.


No comments yet — be the first to share your thoughts!