How to Create a Guest Account on Windows 11
You can create a functional guest account on Windows 11 by setting up a standard local user profile.
Unlike older Windows versions that featured a dedicated ‘Guest’ account, Windows 11 requires a slightly different approach. A standard local account restricts users from making system-wide changes, effectively providing guest-like privacy and security.
This method is ideal for allowing temporary users to use your PC without access to your personal files or system settings. Standard user accounts, unlike administrator accounts, prevent unauthorized software installations and critical system modifications, ensuring your system remains safe.
Why create a guest account?
Sharing your computer can be risky. If you let someone use your main account, they might see your private files or change your settings. Creating a separate account keeps your personal data safe. It acts as a digital sandbox where guests can browse the web or use apps without touching your stuff.
What happens when you are done?
Once you finish these steps, you will have a new, restricted user profile. Your guest can log in using this profile. Their activities will be kept separate from yours. When they are done, you can simply delete the account to wipe their history.
Method 1Using System Settings
This is the easiest way to create a local account for guests.
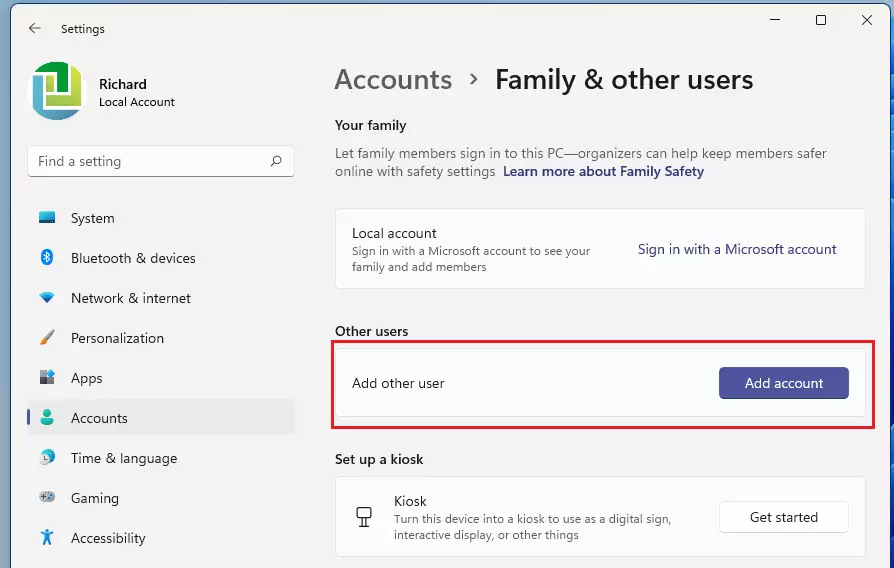
- Open Settings by pressing the Windows key + I on your keyboard.
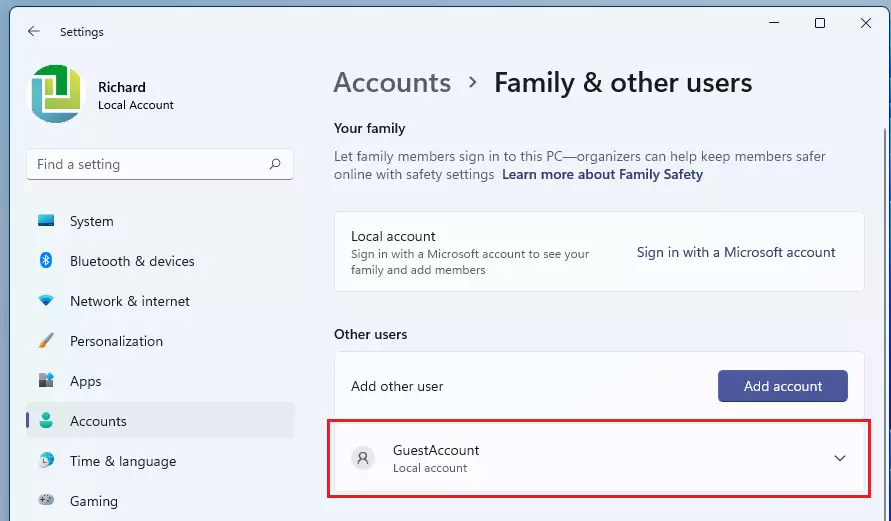
- Click on Accounts in the left menu.
- Select Family & other users.


- Look for the Other users section and click the Add account button. (Requires admin privileges)
- When the Microsoft sign-in window pops up, click I don’t have this person’s sign-in information.
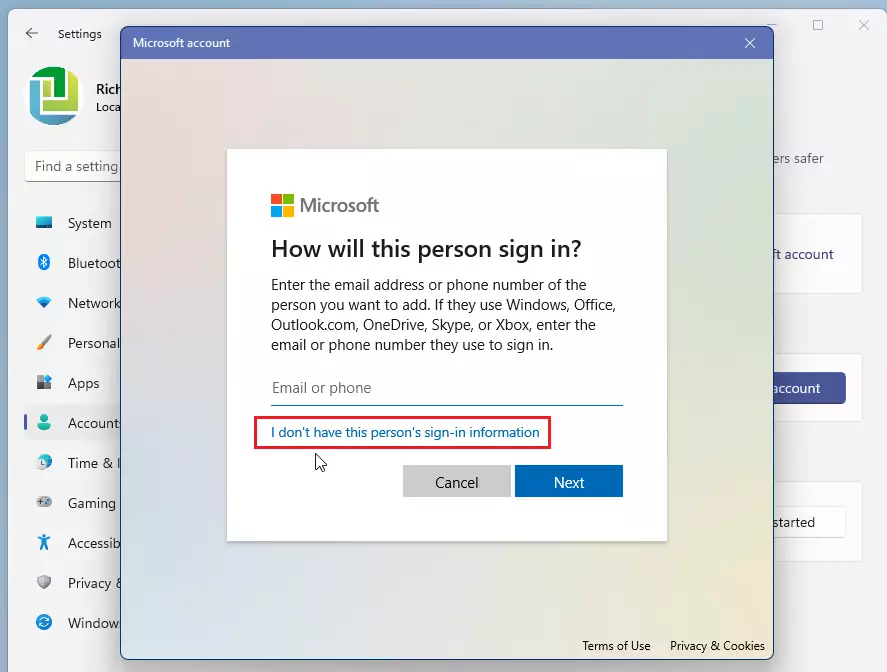
- Click Add a user without a Microsoft account.

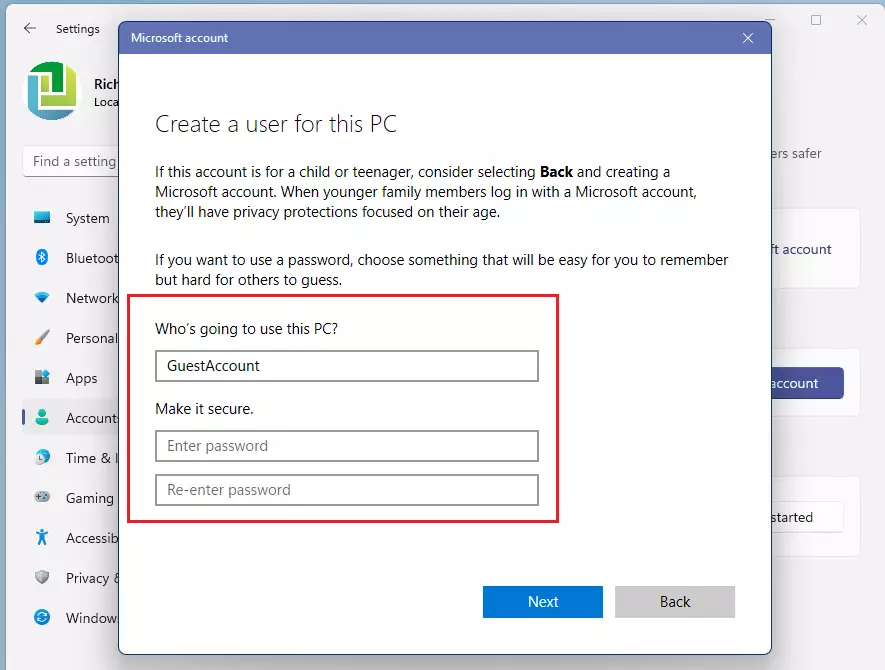
- Type a name for the account (like “GuestUser”). Windows will not let you name it “Guest.”
- Leave the password fields blank to make it easy for guests to sign in.
- Click Next.

Pro-tip: You can quickly switch between users by pressing ⊞ Win+L on your keyboard to lock your screen and choose another user.
Method 2Using Command Prompt
You can use the Command Prompt to create an account quickly. (Requires admin privileges)
- Search for cmd in the Start menu.
- Right-click it and select Run as administrator.
- Type the following command and press Enter:
net user GuestAccount /add /active:yesWarning for 🪟 Windows 11 Home Users
If you use Windows 11 Home, you cannot use the Local Users and Groups tool (lusrmgr.msc). This tool is only available in Pro and Enterprise versions. If you try to run it, you will get an error. Stick to the Settings app method mentioned above for the best results.
How to Delete the Guest Account
When you are finished with the guest account, you should remove it to save space and keep your PC clean. Go to Settings > Accounts > Other users. Find the account you created, click the arrow next to it, and select Remove. This will delete the account and all files saved in that user’s folder.
Summary
While Windows 11 lacks a native guest account, creating a local standard user account is a perfect alternative. It keeps your private files secure and prevents guests from changing your system settings. By using the steps above, you can safely share your computer with anyone.
Why was the guest account feature removed in 🪟 Windows 11?
Microsoft removed the dedicated guest account to push users toward using individual Microsoft accounts. This change helps with security and cloud syncing. However, you can still replicate the guest experience by creating a local standard user account that has limited permissions and no access to your personal files.
Can I use a Microsoft account for a guest user?
It is not recommended. A Microsoft account is tied to personal data, email, and cloud storage. If you use one for a guest, they might accidentally sync their data to your PC or access your personal information. Always use a local account for guests to ensure complete privacy and security.
Was this guide helpful?

About the Author
Richard
Tech Writer, IT Professional
Richard, a writer for Geek Rewind, is a tech enthusiast who loves breaking down complex IT topics into simple, easy-to-understand ideas. With years of hands-on experience in system administration and enterprise IT operations, he’s developed a knack for offering practical tips and solutions. Richard aims to make technology more accessible and actionable. He's deeply committed to the Geek Rewind community, always ready to answer questions and engage in discussions.


No comments yet — be the first to share your thoughts!