How to Change Your Microsoft Account Primary Alias

- 10 steps
- Includes a restart or sign-out
This guide shows you how to change the main email address you use to sign in to your Microsoft account. This email is known as your primary alias. Before you start, check these three requirements:
- Personal accounts only. This applies to personal Microsoft accounts. It does not apply to work or school accounts managed by an organization. For those, the primary address is set by your organization’s administrator, so ask your IT department.
- Child accounts. If the account belongs to a child in a Microsoft family group, an adult may need to approve the change.
- The new address must already be an alias. It has to be added to the account and verified first. Until then, the Make primary option will not be available for it. The next section explains how to add it.
Sign in to your Microsoft account online, open Sign-in preferences, and select Make primary next to the address you want. The new address must first be added as an alias and verified. Work or school accounts cannot change their primary address, so ask your IT department. The change takes effect on Windows, Xbox and Microsoft 365 after you sign out and back in.
What is a Microsoft Account Alias?
A Microsoft account alias is an extra email address or phone number that connects to your main Microsoft account, letting you use different contact details to sign in.
To add the address you want to make primary, follow these steps from your Microsoft account dashboard, in the section where you manage how you sign in to Microsoft:
- Sign in to your Microsoft account in a browser and open the sign-in settings for your account.
- Select Add email.
- Choose which kind of address to add. You can add an existing email address you already own, or create a brand-new Outlook.com address.
- If you add an existing address, enter it and confirm. Microsoft sends a verification message to that address. Open it and follow the link or enter the code it contains. You should then see the address listed as an alias on your account.
- If you create a new Outlook.com address, enter the name you want and confirm. Pick another name if the one you chose is taken. Once created, the new address appears in the list of aliases.
What is a Primary Alias?
Your primary alias is the main email address Microsoft uses to identify you. It is the address displayed on your Windows PC, Xbox, and Microsoft 365 apps. When you sign in, this is the email you type. You can change this at any time through your account dashboard.
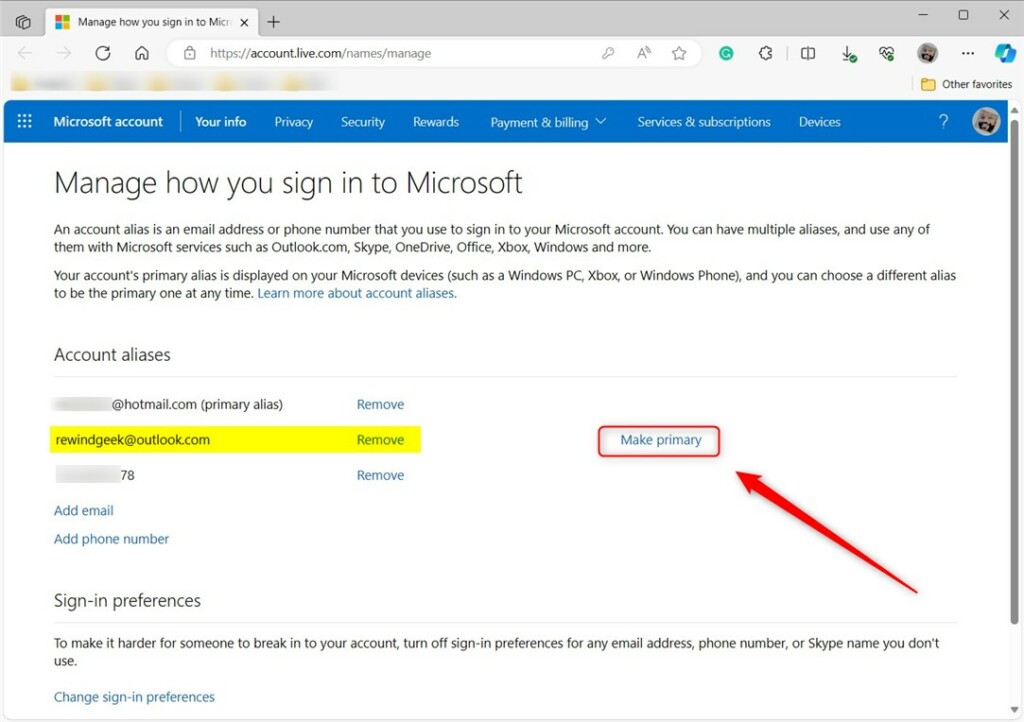
Once the new address is added and verified, select Make primary next to it in your list of aliases. The address you chose should now be marked as primary.
Changing the primary alias changes the address Microsoft displays. It does not lock you out of your other addresses. Any verified alias on the account, including your old primary address, can still be used to sign in with the same password.
Your devices and apps may not update straight away. Windows PCs, Xbox and Microsoft 365 apps can keep showing the old address until you sign out and back in. If the old address still appears, sign out of the app or console, sign in again, and check once more. A full restart is not normally needed.
To undo the change, select Make primary next to your old address. This works as long as it is still listed as an alias on the account.
Why Change Your Primary Alias?
You should change your Microsoft account primary alias if your current email address is old, you want a more professional one, or you’re moving away from an old internet provider’s email. If you are leaving a provider, keep the old address as an alias until you have moved everything over. You can still sign in with it in the meantime.
How to Change Your Primary Alias
You can easily change your Microsoft account primary alias by signing into your account online and choosing a new main email address. Once you’re logged in, you’ll see a list of your current email addresses, also called aliases. Just pick the one you want to be your primary alias and select the ‘Make primary’ option next to it.- Sign in to your Microsoft account management portal.
- On the “Your info” page, open “Account info” (or “Sign-in preferences”), where your email addresses and phone numbers are listed as aliases.
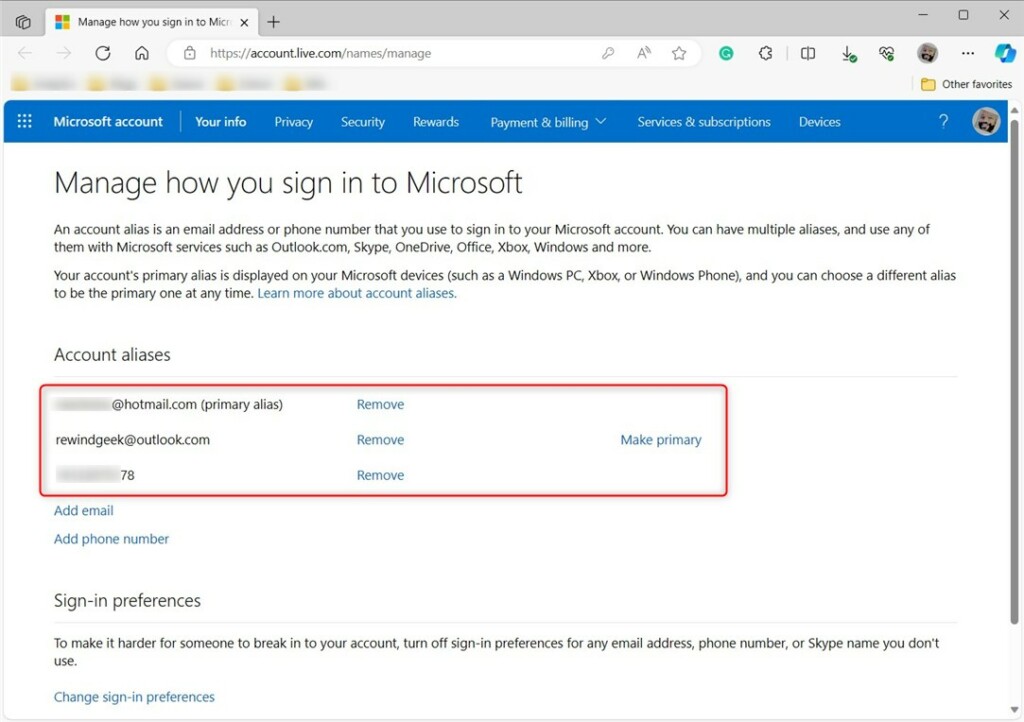
Change account alias for Microsoft account - Find the email address you want to use as your new primary. Click the Make primary link next to it.
Manage how to sign into microsoft make primary - A prompt will appear asking for confirmation. Click Yes to finalize the change.
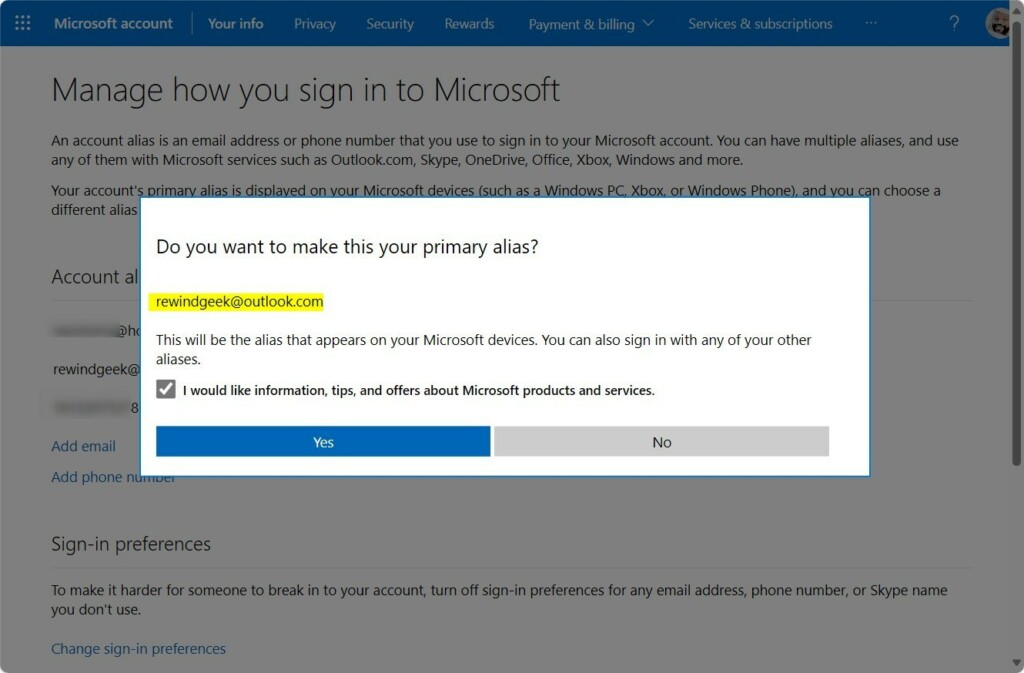
Change alias in Microsoft account confirmation page - Once finished, your new alias will be the main way you sign in to all Microsoft services.
Troubleshooting and Identity Verification
If Microsoft asks for extra verification when you change your alias, it’s a security step to confirm it’s really you, often involving a code sent to your recovery email or phone.
Security Risks and Data Loss
Important Warning: The 30-Day Waiting Period
Microsoft might put a 30-day waiting period on your account after certain changes, like updating security info, to protect you from hackers, but your account still works normally.
Summary
Changing your Microsoft account primary alias is a safe way to update how you sign in, and you won’t lose data if you follow the steps carefully and avoid deleting old Microsoft domain emails.
Have a question about this guide?
Answered by AI from this guide. Good questions may be added to this page — please don't include personal details.
Did this guide fix your problem?

About the Author
Richard
Tech Writer, IT Professional
Richard is a writer at Geek Rewind who turns complex IT tasks into clear, step-by-step guides. He draws on years of hands-on experience in system administration and enterprise IT operations, focusing on Windows, Linux and WordPress: the problems people actually run into, and the fixes that work. His server and WordPress guides come from systems he runs himself. Richard builds and maintains the platform behind Geek Rewind, from its Ubuntu servers and Nginx configuration to its custom WordPress plugins. Many new tutorials start with readers' questions, and he's always glad to answer them in the comments.
No comments yet — be the first to share your thoughts!