What Windows 11 Color Filters Actually Change on Your Display

Color filters in Windows 11 change the colors on your display to help people with color blindness see text and images more clearly. Windows offers six filter settings that shift shades across the whole screen. They include options for red-green and blue-yellow color vision differences.
You turn these tools on from the Settings app. There is nothing to install, and the filters work the same on Windows 11 Home and Pro. They can help you read text on websites and spot game details that normally blend together.
Windows 11 color filters adjust the red, green, and blue values of every pixel on your display to help people with color blindness or light sensitivity see content more clearly. The six filters include Inverted Colors, Grayscale, Red-Green, Blue-Yellow, and Grayscale Inverted options that shift the entire color palette across your screen without changing files or apps.
What Are 🪟 Windows 11 Color Filters?
Color filters are built-in accessibility tools that change the color palette across your entire screen. They are meant for users with color blindness or light sensitivity. When a filter is on, Windows adjusts the red, green, and blue values of every pixel on your display so text and images are easier to tell apart.
A filter does not change the files, the apps, or your display settings. It only changes how the screen output looks while the filter is on. Turn it off and everything goes back to normal.
The color filter works entirely at the software level. The brand of your monitor does not matter, and neither does the type of computer. A desktop and a laptop behave the same way.
You will see it in your web browser, your games, your photo editing apps, and the Windows desktop itself. That is also why it can be a problem for color-critical work. If you edit photos, remember that the filter is changing what you see while it is on.
The Different Types of Color Filters Available
Windows 11 comes with six built-in color filters, and each one is built for a specific visual need. Here is what each filter actually changes on your display:
Inverted Colors
The inverted filter flips every color on your display to its opposite. White becomes black, and bright backgrounds turn dark. It helps people who are sensitive to bright light read web pages and documents in a dark room without straining their eyes.
Be aware that photos and videos look like negatives while this filter is on. Colors in images are inverted too, not just the page backgrounds.
Grayscale
The grayscale filter removes all color from your display. Everything becomes a shade of gray, from pure white to deep black. Windows works out the brightness of each pixel and shows it using only gray tones. This helps users who get distracted by bright colors.
The list also includes a grayscale inverted option. It combines the two effects, so you get gray tones with light and dark swapped.
Red-Green (Deuteranopia and Protanopia)
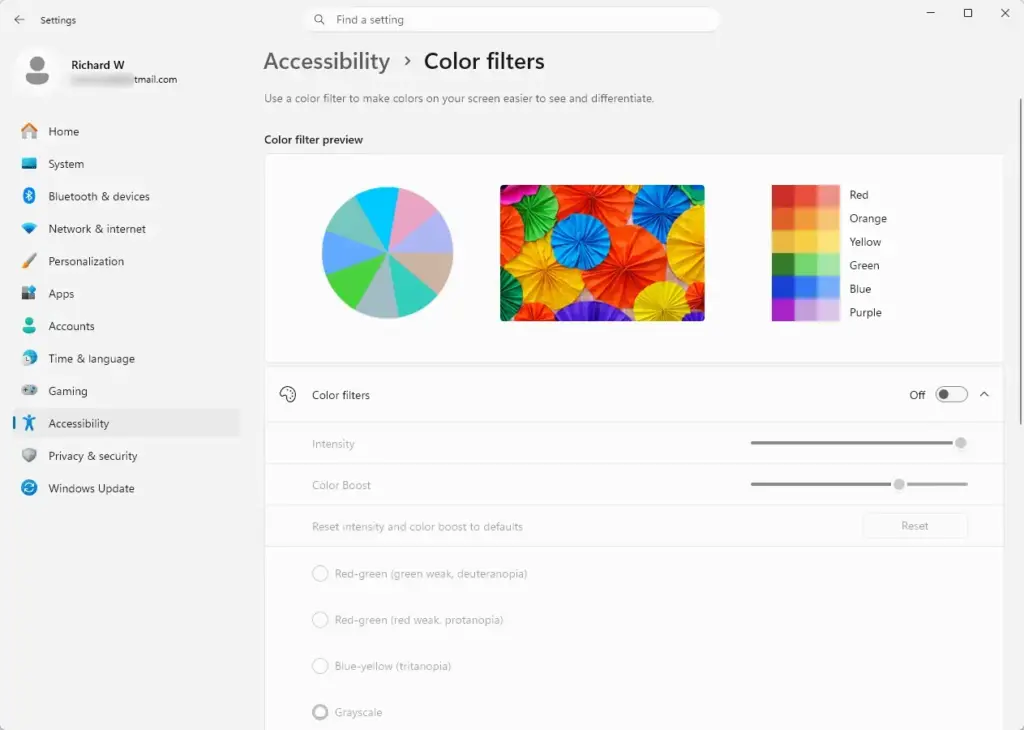
The red-green filters are built for the most common types of color blindness. There are two options in the list: one for green weakness (deuteranopia) and one for red weakness (protanopia). Both adjust the contrast between red and green hues. People who struggle to tell red from green can then separate them more easily on screen.
If you are not sure which one fits, try each in turn and pick the one that makes the content you care about clearer. On current builds of Windows 11, some filters also have an intensity slider. Use it to make the effect stronger or weaker if the default is too much.
Blue-Yellow (Tritanopia)
The blue-yellow filter, known as tritanopia, helps people who struggle to tell blue and yellow tones apart. It shifts the color spectrum on your screen to increase the contrast between these hues. Charts, maps, and interface elements that rely on those colors become easier to read.
Color Filters vs. Screen Tint: What is the Difference?
Color filters and screen tint features serve different purposes, even though people often mix them up. Color filters change the whole color palette for accessibility needs. Screen tint features such as Night light are meant to reduce eye strain by adding a warm glow.
Night light lowers the amount of blue light your monitor gives off. This gives the screen a warm, yellowish look, which helps your eyes relax, especially in the evening. It is a separate setting from color filters, and you can use it on its own.
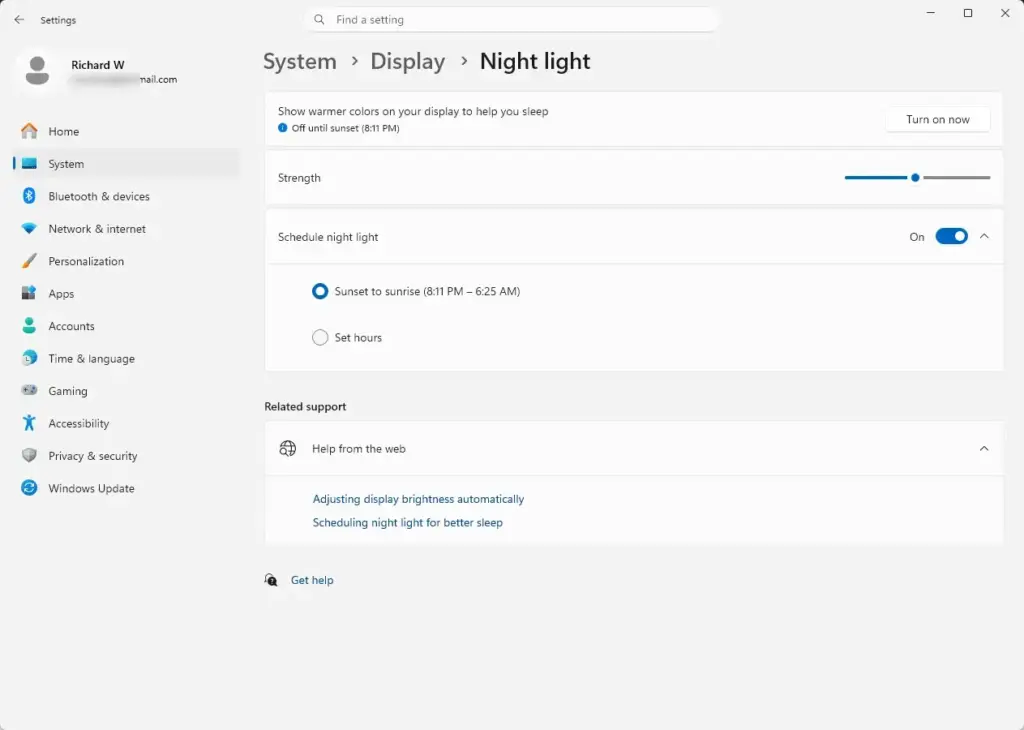
Color filters change how you perceive specific colors on your display. They are primarily accessibility tools for people with vision differences. A filter does change the look of your screen. It is not designed to protect your eyes from blue light fatigue the way Night light or a screen tint does. If eye strain in the evening is your problem, use Night light instead.
How to Turn On and Configure Color Filters in 🪟 Windows 11
You can turn color filters on from the main Settings app whenever you need them. The steps below also let you pick the specific filter you want. No restart is needed, and the change takes effect right away.
- Click the Start button and select Settings (the gear icon), or press the Windows Key + I. The Settings window opens.
- Click Accessibility in the left-hand menu. The accessibility options appear on the right.
- Scroll down on the right side and click Color filters. The Color filters page opens.
- Click the toggle switch next to Color filters to turn it On. The screen changes right away, usually to grayscale, because that is often the default selection.
- Choose the filter you want from the list by clicking the radio button next to it. The screen updates as soon as you click, so you can try each one and compare.
To undo the change, go back to the same page and switch the Color filters toggle to Off.
On the Color filters settings page, check the box that says Keyboard shortcut for color filters. On some builds it appears as a toggle instead. Once it is enabled, press the Windows Key + Ctrl + C at any time to switch your filter on or off. If the shortcut does nothing, make sure that setting is still enabled.
Unique Angle: How Color Filters Impact Screenshots and Video Recording
Color filters do not show up in screenshots or video recordings, because they only change what you see on your physical display. When you capture your screen while a filter is active, the resulting image file stores the normal, unaltered colors.
Take a screenshot while a filter is active and the image will look completely normal. It will not have the grayscale, inverted, or color-blindness correction applied. The filter is applied at the very end of the rendering process, right before the video signal reaches the monitor.
The same rule applies if you record your screen with video capture software. Your recording will show the original, unfiltered colors. This matters if you are a content creator, a graphic designer, or someone who takes screenshots for work. You do not have to worry about accidentally sharing filtered images with people who view your files on their own monitors.
The one exception is a photo of your screen taken with a phone or camera. That captures the physical display, so it will show the filter.
Summary
Color filters modify the red, green, and blue values of every screen pixel to assist users with color blindness and visual sensitivities. They work at the software level on any monitor. They do not affect your saved screenshots or video recordings, and you can turn them off again from the same Settings page.
Have a question about this guide?
Answered by AI from this guide. Good questions may be added to this page — please don't include personal details.
Did this guide fix your problem?

About the Author
Richard
Tech Writer, IT Professional
Richard is a writer at Geek Rewind who turns complex IT tasks into clear, step-by-step guides. He draws on years of hands-on experience in system administration and enterprise IT operations, focusing on Windows, Linux and WordPress: the problems people actually run into, and the fixes that work. His server and WordPress guides come from systems he runs himself. Richard builds and maintains the platform behind Geek Rewind, from its Ubuntu servers and Nginx configuration to its custom WordPress plugins. Many new tutorials start with readers' questions, and he's always glad to answer them in the comments.
No comments yet — be the first to share your thoughts!