What to Do When Windows Security Isolation Fails to Start

Core Isolation is a built-in Windows security feature that creates a safe, virtual memory zone to protect core system processes from harmful software. Inside it, a setting called Memory integrity blocks unverified apps and bad drivers from tampering with your computer’s memory.
When Windows Security isolation fails to start, it usually means an older hardware driver or a leftover piece of software is not compatible with virtualization-based security. Windows then keeps the feature off so your system does not crash or freeze. The usual causes are an old driver, virtualization switched off in the firmware, a missing Windows feature, or damaged system files. This guide works through them in that order, starting with the quickest checks.
When Windows Security isolation fails to start, open Windows Security, click Device security, then Core isolation details, and check whether the Memory integrity toggle is off or shows an error message naming an incompatible driver. Update or uninstall the problem driver from the manufacturer’s website, restart your computer, and turn Memory integrity back on. If the driver persists, manually remove it using Device Manager.
Checking Your Security Settings
Start by checking the exact status of Core Isolation and Memory integrity in Windows Security. This tells you whether the feature is simply off or whether Windows is actively blocking it, and the warning text often names the cause. These steps apply to current Windows 11, and the screens are the same on Home and Pro.
- Click the Start button on your taskbar , type Windows Security, and press Enter. The Windows Security dashboard opens.
- Click Device security on the left side of the window.
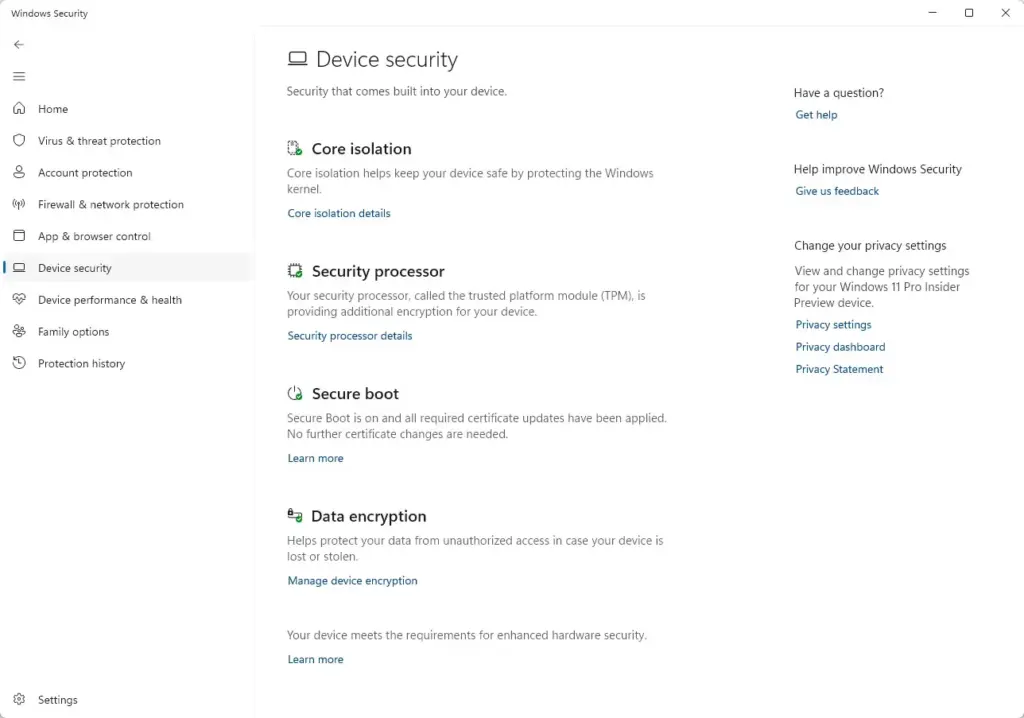
Windows Security › Device security - Find the section titled Core isolation and click the Core isolation details link. If you do not see this section, your device may not support it, or virtualization is off in the firmware (see the BIOS section below).
- Look at the toggle switch for Memory integrity. Note whether it is On or Off, and whether any text appears under it.

If the Memory integrity switch is off and will not stay on, or if an error message appears right underneath it, you have confirmed the failure. If you turn the switch on and Windows reports that something is incompatible, it usually shows a Review incompatible drivers link.
Write down every warning message and driver name on the screen. Those names point directly to the cause, and you will use them in the next sections. Windows may also ask you to restart after you flip the switch. That is normal, and the change only takes effect after the restart.
Finding and Removing Incompatible Drivers
Incompatible drivers are the most common reason Memory integrity will not turn on. They are usually outdated files from printers, graphics cards or storage tools that do not meet modern memory protection rules. Updating or removing them clears the block.
Your Windows Security screen often lists the exact problem driver. Common examples include old security software, storage utilities such as Western Digital tools, and outdated printer software.
To find and update these drivers:
- Open the Core isolation details screen in Windows Security, using the steps from the previous section.
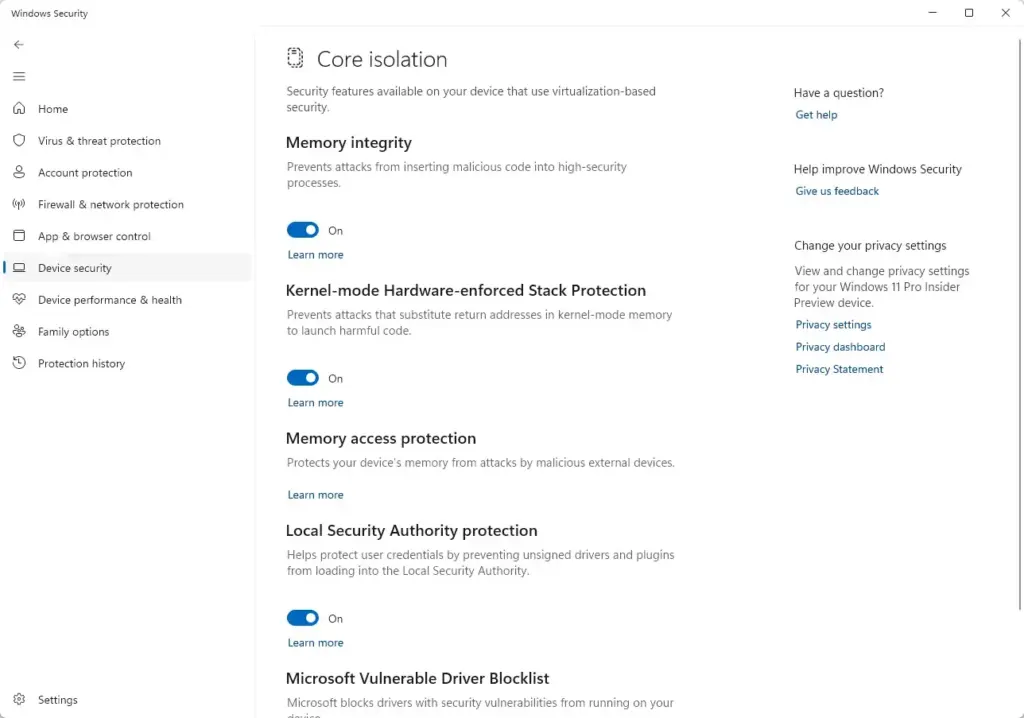
Windows Security › Device security › Core isolation - Try to turn on Memory integrity. If Windows finds a problem, click the Review incompatible drivers link or look for the list of problem files. You should now see a list of driver names.
- Write down the name of each driver causing the issue. A screenshot or a photo of the screen works too.
- Go to the official website of the hardware manufacturer (such as Western Digital, HP, or your printer brand) and download the newest version of their software or driver. If the device is old and no newer driver exists, uninstalling the software or the device is often the only fix.
- Install the updated driver, then restart your computer.
- Return to Core isolation details and switch Memory integrity to On.
Updating your drivers often clears the block immediately, allowing you to turn Memory integrity right back on. If the same driver is still listed after the update, move on to the next section.
How to Force Uninstall Stubborn Problem Drivers
Sometimes a driver stays on the system after you uninstall the program that installed it. These leftovers keep blocking Memory integrity, and standard updates will not remove them. In that case you remove the driver package by hand. You need administrator rights for this.
If the driver belongs to a device you still use, that device may stop working until you reinstall its software. Make a restore point first if you want an easy way back.
- Right-click the Start button and select Terminal (Admin) (or Command Prompt (Admin) if that is what your menu shows). Click Yes if User Account Control asks for permission. This step requires administrator privileges.
- Type the following command to list the third-party drivers on your system, then press Enter:
pnputil /enum-drivers - Scroll through the list and find the published name of the problem driver. It looks like oem12.inf. Match it to the driver name you wrote down earlier, using the provider and original name shown in the list.
- Once you identify the correct file name, type the following command and press Enter, replacing oem12.inf with your actual driver file name:
pnputil /delete-driver oem12.inf /uninstall /force - Check the message that appears. It should confirm the driver package was deleted. If it says the driver is in use, close the related software or restart and try again.
- Restart your computer and try turning on Memory integrity again in Windows Security.

Checking Virtualization Settings in Your Computer BIOS
Core Isolation needs hardware virtualization on the processor. If it is disabled in your BIOS or UEFI firmware, Memory integrity cannot start. Many PCs ship with it on, but some boards, especially older or custom-built ones, have it off. Menu names vary by manufacturer, so treat the names below as a guide.
To check and enable virtualization:
- Save your work and restart your computer.
- As the computer turns back on, press the key required to enter the BIOS or UEFI settings. This key is usually F2, F12, Del, or Esc, depending on your computer brand. If you miss the moment, restart and try again. The key is often shown briefly on the startup logo screen.
- Look through the menus for a setting named Intel Virtualization Technology, Intel VT-x, or AMD-V. It is sometimes listed under CPU Configuration or Security. Some AMD boards call it SVM Mode.
- Change the setting to Enabled.
- Save your changes and exit the BIOS (usually by pressing F10). Your computer restarts normally into Windows.
If you cannot find any virtualization setting, check your manufacturer’s support page for your exact model. Some machines hide it, and a few older processors do not support it at all. To undo the change, go back into the BIOS and set it to Disabled.
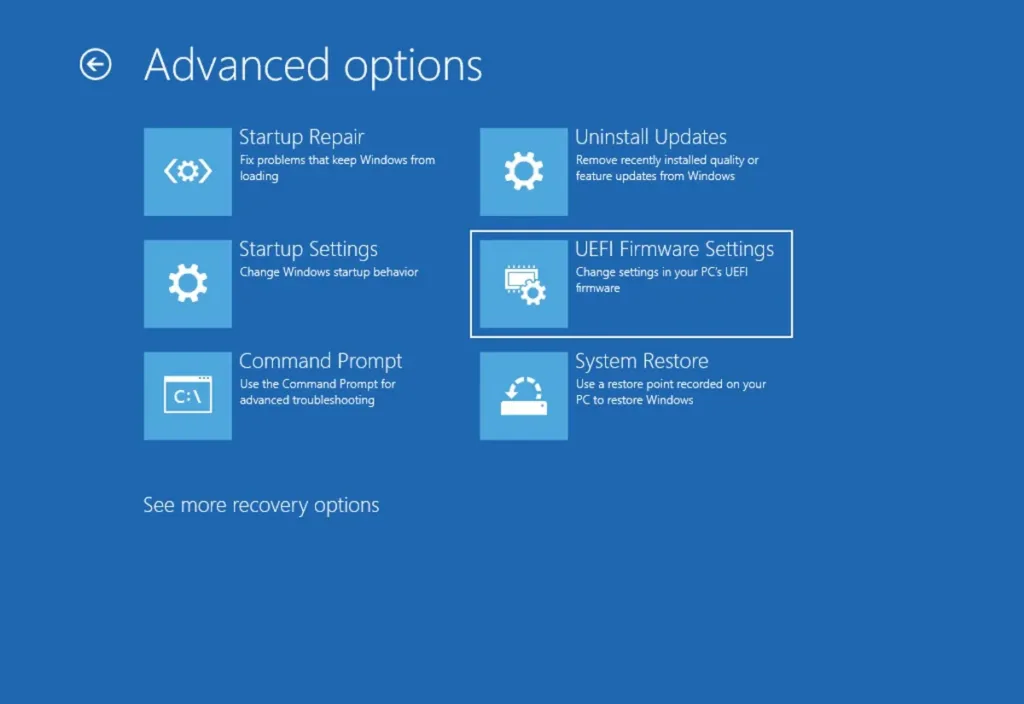
Once you are back in Windows, open Windows Security, go to Device security and Core isolation details, and try turning on Memory integrity again. If it now switches on, restart when prompted to finish the change.
Advanced Fix: Using Windows Features for Virtualization
Windows has optional features that support virtualization and the security layers built on it. If these are turned off or damaged, Core Isolation can fail. You can check them in the classic Windows features dialog. This works on both Home and Pro editions of Windows 11.
- Click the Start button, type Turn Windows features on or off, and press Enter. The Windows Features window opens.
- Scroll down and look for Virtual Machine Platform.
- Check the box next to Virtual Machine Platform.
- Also look for Windows Hypervisor Platform and check its box if it is available.
- Click the OK button. Windows searches for files and applies the changes, and you will see a progress message.
- Restart your computer when prompted.
You do not need the full Hyper-V feature for this fix, and it is only offered on Pro and higher editions. If the boxes are already checked, leave them as they are and move on. To undo this change, clear the boxes and restart.
These platform files give Windows the tools it needs to run security isolation properly. Isolation creates a protected area in memory for vital system programs. If the required components are missing or turned off, isolation stops working, and your system loses that layer of protection against malicious software.
Unique Expert Tip: Fixing Corrupted Security Policies with DISM
Damaged system files can stop Windows Security isolation from starting, often after a failed update or a power outage. Windows includes built-in repair commands that scan the system and restore the files it needs. You need administrator rights to run them.
- Right-click the Start button and select Terminal (Admin) (or Command Prompt (Admin)). This step requires administrator privileges.
- Type the following command and press Enter:
DISM.exe /Online /Cleanup-image /Restorehealth - Wait for the process to reach 100 percent. This may take a few minutes, because it can download clean system files from Microsoft servers. Make sure you are online, and do not close the window even if the progress bar seems stuck for a while.
- Next, type the following command and press Enter:
sfc /scannow - Let the system scan finish. If it finds corrupted files, it repairs them automatically, and a message at the end tells you what it found.
- Restart your computer and check your security settings.
Unique Expert Tip: Addressing Registry Conflicts Without Direct Edits
If a bad configuration is the problem, you do not need to edit the registry by hand. A mistake there can cause bigger problems than the one you started with. Instead, reset the security policies to their defaults using a built-in administrative command in PowerShell.
If you changed security policies on purpose, or your PC is managed by an employer or school, those custom settings may be reset or reapplied by your administrator.
- Click the Start button, type PowerShell, right-click it, and choose Run as administrator. This step requires administrator privileges.
- Type the following command to reset security policies to their default state and press Enter:
secedit /configure /cfg %windir%\inf\defltbase.inf /db defltbase.sdb /verbose - Wait for the command to finish running. It reapplies the original default security settings across your operating system, and you will see the prompt return when it is done.
- Restart your computer to apply the fresh security baseline.
- Open Windows Security and try turning on Memory integrity one more time.
Summary
To fix Windows Security isolation and Memory integrity failures, work through the causes in order: check your settings, remove incompatible drivers, enable hardware virtualization in the BIOS, turn on the virtual machine features, and run the system repair commands. Restart and retest Memory integrity after each fix, so you know which step solved it. If it still will not turn on, the driver list in Core isolation details is the best place to look next.
Have a question about this guide?
Answered by AI from this guide. Good questions may be added to this page — please don't include personal details.
Did this guide fix your problem?

About the Author
Richard
Tech Writer, IT Professional
Richard is a writer at Geek Rewind who turns complex IT tasks into clear, step-by-step guides. He draws on years of hands-on experience in system administration and enterprise IT operations, focusing on Windows, Linux and WordPress: the problems people actually run into, and the fixes that work. His server and WordPress guides come from systems he runs himself. Richard builds and maintains the platform behind Geek Rewind, from its Ubuntu servers and Nginx configuration to its custom WordPress plugins. Many new tutorials start with readers' questions, and he's always glad to answer them in the comments.
No comments yet — be the first to share your thoughts!