What Happens When You Enable Windows 11 Core Isolation

- 12 steps
- Needs administrator rights
- Includes a restart or sign-out
Windows 11 Core Isolation is a built-in security feature that uses hardware virtualization to build a wall around your system memory. The wall blocks malicious code from attacking core Windows processes. Its main setting, Memory Integrity, stops harmful programs from injecting threats into those processes.
Turning this protection on can occasionally block older device drivers or legacy apps. That sometimes causes performance drops or crashes in specific games. Before you turn it on, open the Windows Security app and check that your processor supports hardware virtualization. Memory Integrity can be switched off again at any time, so trying it is low risk.
Enabling Windows 11 Core Isolation builds a hardware-backed virtual wall around your core system memory, so malware cannot tamper with critical Windows processes. Its main setting, Memory Integrity, blocks unsafe drivers and injected code. The trade-off is that older drivers or legacy apps may be blocked, which can cause slowdowns or game crashes.
What Is Core Isolation?
Core Isolation is a built-in Windows 11 security feature. It creates a virtualized environment that protects critical operating system processes from malware and tampering. When you turn it on, Windows separates core system memory from everyday apps, so malicious software cannot reach those vulnerable areas. The extra layer relies on your computer’s processor rather than on a separate program, so it adds protection without installing anything.
Windows uses virtualization technology to carve out a secure, isolated area of memory. Critical security processes run inside that area, cut off from the rest of the operating system and from any regular apps you install. If malware gets onto your computer, it cannot cross that virtual wall to tamper with system controls.
Core Isolation is part of Windows 11 version 21H2 and newer. Its most important part is Memory Integrity, which stops bad programs from getting into low-level driver code. You turn it on in the Windows Security app. It is available in both Windows 11 Home and Pro, as long as your hardware supports it.
What Is Memory Integrity
Memory Integrity is a Core Isolation setting, also known as Hypervisor-Protected Code Integrity (HVCI). It stops malicious programs from using low-level system drivers to take control of your computer. It blocks unsafe drivers from loading into the operating system, so attackers cannot hijack your hardware through them. Think of it as a gatekeeper that checks software every time it tries to talk directly to your Windows system files.
Whenever hardware needs to talk to Windows, or a program runs low-level code, the system uses small programs called drivers. Drivers act as translators between your hardware and your software. Attackers target them because old or poorly written drivers often contain security holes.
Normally, any program can try to change system memory if it has the right permissions. Memory Integrity changes that. It makes sure all code running inside the core kernel is checked and trusted before it touches your memory. If a program tries to inject bad code into system memory, Memory Integrity blocks it right away.
Kernel-mode Hardware-enforced Stack Protection
Kernel-mode Hardware-enforced Stack Protection is a security feature that uses your computer’s processor to stop attackers from pushing malicious instructions into system memory. It guards against a common attack method known as a buffer overflow, which stops unauthorized code from running. Because the protection is enforced by hardware, it catches threats before they can damage your operating system or steal your personal information.
The feature uses special capabilities built into your processor to stop buffer overflows. In this kind of attack, a hacker pushes bad code onto the processor’s memory stack in place of normal commands. Stack Protection watches the stack closely. If it sees an unauthorized change, it stops the process immediately.
This feature needs a fairly recent processor that supports it. If your hardware does not, the option will not appear or cannot be turned on in Windows Security. That does not mean anything is wrong with your PC.
Other Key Device Security Features in 🪟 Windows 11
Windows 11 has other device security features besides Core Isolation, including memory access protection and security processor settings. They all live inside the Windows Security app, under Device security. They work together to protect your computer from both software threats and external hardware attacks. They lock down your computer’s components so unauthorized devices and malicious programs cannot get around your main login screen.
Which of these items you see depends on your Windows build, your hardware and your edition of Windows. Some may be missing on older PCs.
- Memory access protection: This feature works with hardware input and output memory management units to protect your system from external hardware attacks, such as malicious devices plugged into your ports.
- Firmware protection: This helps protect the low-level firmware that starts up your computer before Windows even loads. It ensures that your startup instructions have not been tampered with.
- Local Security Authority (LSA) protection: LSA is the part of Windows that verifies your identity when you log in. LSA protection prevents unauthorized code from reading or tampering with your login credentials and password hashes.
- Credential Guard: This uses virtualization-based security to isolate secrets like network login credentials, so unauthorized software cannot steal them even if your computer gets infected with malware. It is mainly aimed at business and managed environments, so you may not see it on a typical home PC.
- Microsoft vulnerable driver blocklist: This dynamic list contains known driver files that have security vulnerabilities. Windows blocks these dangerous drivers from loading on your computer, stopping attackers from exploiting old software holes.
Why Is Core Isolation Off by Default on Some Computers?
Core Isolation is turned off by default on some computers because it needs hardware virtualization features in your processor, and those features must be enabled in the BIOS first. If your hardware does not support them, or has them turned off, Windows keeps Core Isolation disabled to prevent boot errors and crashes. Check your computer manufacturer’s settings before you try to turn it on.
The feature needs hardware virtualization to be on in your BIOS or UEFI settings. If your processor lacks this support, or if virtualization is switched off in firmware, Windows 11 cannot turn on Core Isolation. The setting has different names on different machines. It is often listed as Intel Virtualization Technology (VT-x) or AMD-V / SVM Mode. If you need to change it, restart the PC, enter the BIOS or UEFI setup, enable the option, then save and exit.
An older printer, an older graphics card, or specialized audio equipment with outdated driver software may stop working properly once Memory Integrity is on. To keep your PC from crashing or leaving hardware unusable, Windows sometimes leaves the feature off after a clean installation until you update your drivers.
If the Memory integrity switch is greyed out, the usual causes are missing hardware support, virtualization turned off in firmware, or a device managed by an organization whose policy controls the setting.
How to Check and Enable Core Isolation in 🪟 Windows 11
You can check whether Core Isolation is running, or turn it on yourself, in the Windows Security app. The steps below show how to check your status and switch on Memory Integrity.
Step-by-Step Guide to Enabling Memory Integrity
- Click the Start button or press the Win on your keyboard. The Start menu opens with a search box .
- Type Windows Security into the search box and click the app when it appears in the results. The Windows Security window opens.
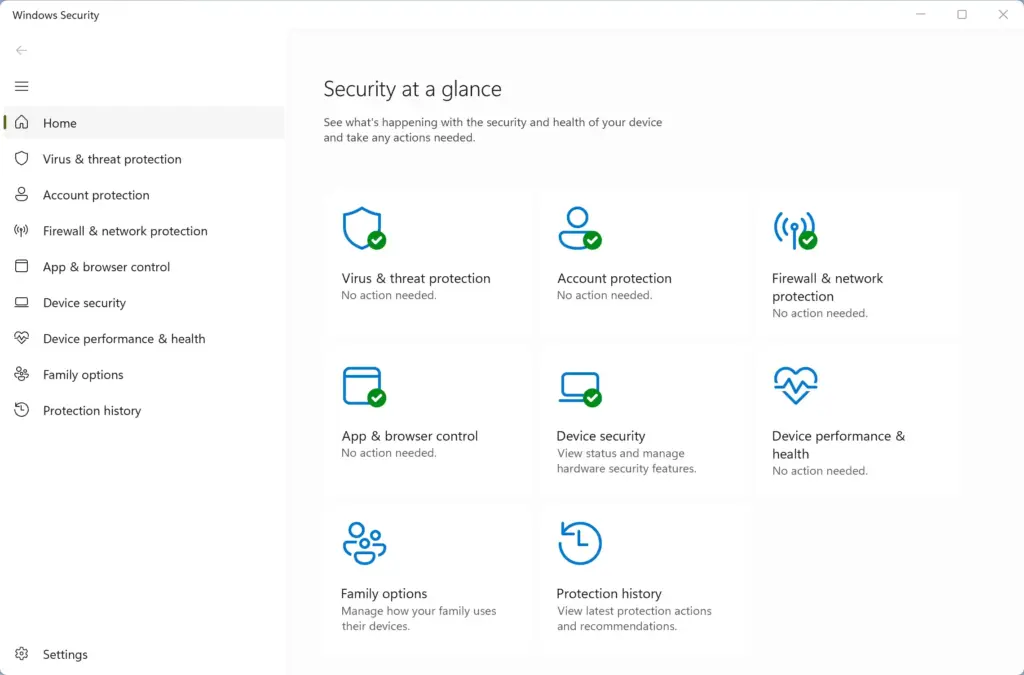
Windows Security - In the Windows Security home window, click Device security in the left-hand menu.
- Under the Core isolation section, click Core isolation details. A page opens with the Memory integrity switch.
- Find the switch labeled Memory integrity. It shows either On or Off.
- Click the switch to turn it On. This step requires administrator privileges, so you may see a confirmation prompt asking you to allow the app to make changes to your device. Click Yes if it appears. If Windows finds an incompatible driver, it shows a message instead of turning the switch on. See the driver sections below.
- Restart your computer when Windows prompts you to finish applying the changes. The setting only takes full effect after the restart.
In short, you open Windows Security, go to Device security, open the Core isolation details screen and flip the main toggle on. To undo it later, follow the same path, set Memory integrity to Off and restart.
What Happens If Core Isolation Fails to Turn On?
Core Isolation fails to turn on when Windows detects a driver that is not compatible with Memory Integrity. Windows blocks the setting and lists the driver files causing the conflict so you can deal with them. You cannot use the feature until you update or remove the driver that is blocking it.
Windows usually shows a link, often labeled Review incompatible drivers, that lists the specific driver files causing the problem. These files typically end in .sys. For example, an old printer driver or an outdated gaming utility may use an old file format that does not meet modern security standards. Write down the file names before you close the window.
How to Fix Incompatible Drivers and Enable Protection
To fix the problem, identify the driver file listed in Windows Security and either update or remove it. You can download the newest version from the official hardware manufacturer’s website, or remove the old driver entirely. Once the conflicts are cleared, Windows can turn on Memory Integrity.
- Note the name of the problematic driver file listed in the Windows Security app.
- Open your web browser and search for the driver name, or go to the official website of the hardware maker, such as your printer or motherboard manufacturer.
- Download and install the newest available driver for that device. Modern drivers are written to meet Memory Integrity requirements. Restart if the installer asks you to.
- If you no longer use the device that goes with the old driver, remove the driver from your system. Device Manager is the simplest tool. Right-click the device, choose Uninstall device, and tick Attempt to remove the driver for this device if that box is offered. Specialized cleanup tools also work, but use them carefully.
- Go back to Windows Security, open Core isolation details, and try turning Memory integrity on again. If another driver is listed, repeat these steps for it.
Unique Expert Insight: The Performance Impact of Core Isolation
Core Isolation causes a small performance drop, typically less than 3 percent on most modern computers. Older hardware without dedicated virtualization support might run slightly slower. That small loss is usually worth the security gain against advanced malware and system attacks. Everyday apps and games keep running normally while the protection works in the background.
The cost exists because Core Isolation uses virtualization to run security processes in a separate memory space, which takes a small amount of system resources. Older hardware lacking dedicated virtualization support may see a slight dip in processing speed.
On modern processors, including recent generations of Intel and AMD chips, the processor handles most of the virtualization work itself. For most everyday users, gamers and office workers, the effect of turning on Memory Integrity goes unnoticed. If a particular game does stutter or crash after you enable it, switch Memory integrity off, restart, and test again to confirm it is the cause.
Summary
Windows 11 Core Isolation protects your computer by building a virtual wall around your operating system and memory. Turning on Memory Integrity keeps your data safer from advanced threats. Older drivers may occasionally block the setup, but you can update or remove them, and you can turn the setting off again if it causes trouble.
Have a question about this guide?
Answered by AI from this guide. Good questions may be added to this page — please don't include personal details.
Did this guide fix your problem?

About the Author
Richard
Tech Writer, IT Professional
Richard is a writer at Geek Rewind who turns complex IT tasks into clear, step-by-step guides. He draws on years of hands-on experience in system administration and enterprise IT operations, focusing on Windows, Linux and WordPress: the problems people actually run into, and the fixes that work. His server and WordPress guides come from systems he runs himself. Richard builds and maintains the platform behind Geek Rewind, from its Ubuntu servers and Nginx configuration to its custom WordPress plugins. Many new tutorials start with readers' questions, and he's always glad to answer them in the comments.
No comments yet — be the first to share your thoughts!