How to Check Windows Security Protection Status in Settings

Windows Security is the built-in antivirus and security app in Windows 10 and 11. It shows whether your PC is protected against malware, viruses and other threats. The dashboard reports on real-time protection, the firewall and device security, so you can see at a glance whether each one is running.
This guide covers the Settings route, a PowerShell check, each protection setting and a few ways to check when something looks wrong. Menu names below are for current Windows 11. Windows 10 looks slightly different, and I note where it matters.
Open Settings , select Privacy & security, click Windows Security, then click Open Windows Security. In the Windows Security dashboard, select Virus & threat protection to see real-time protection status, scan results and threat history. A green check mark means that protection is active.
Use the Windows Security app to check the status of Microsoft Defender Antivirus
The quickest check is the Windows Security app. It tells you whether Microsoft Defender Antivirus is running and whether your virus definitions are up to date. It needs no extra software, and it flags a problem as soon as your PC needs attention.
- Press the Win+I to open Settings.

Windows 11 Start menu with Settings gear icon highlighted. - Select Privacy & security from the left-hand menu.

- Click Windows Security.
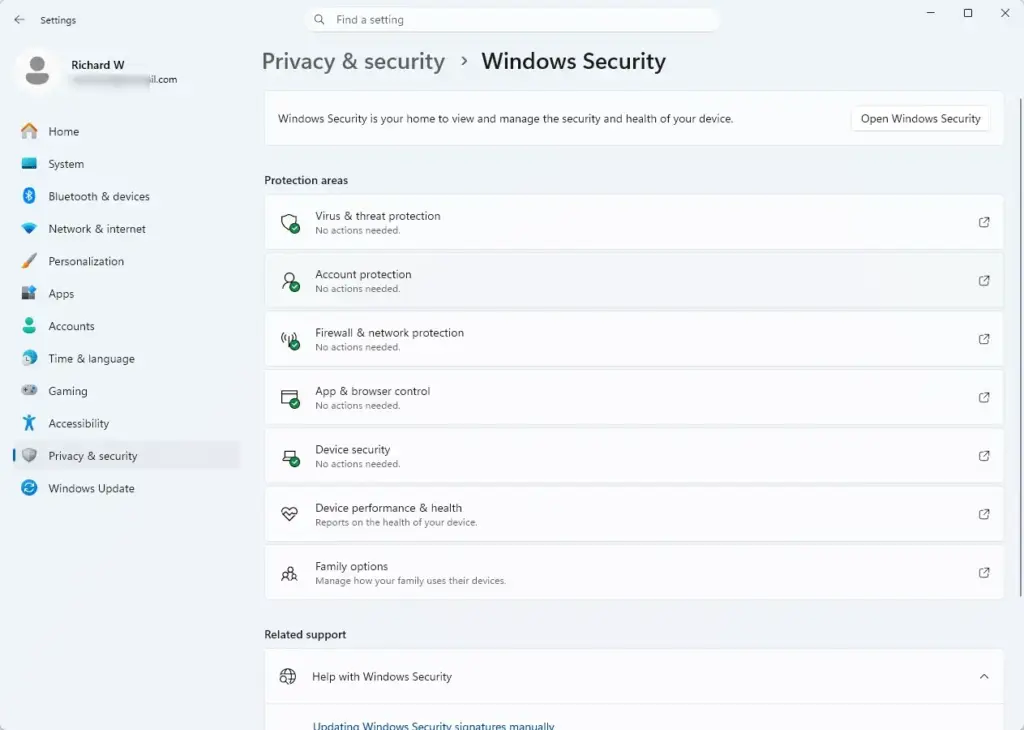
Settings › Privacy & security › Windows Security - Click the Open Windows Security button. The Windows Security dashboard opens in its own window.
- Click Virus & threat protection to see the current scan status, threat history and the active protection toggles.
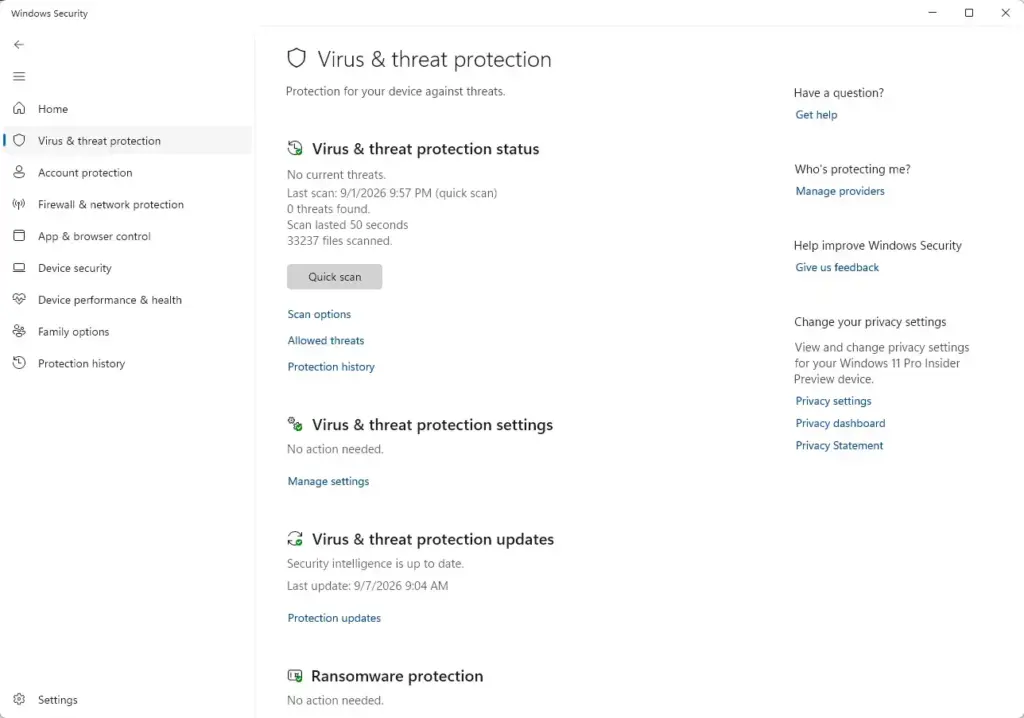
Windows Security › Virus & threat protection
A green check mark on a tile means that area is fine. A yellow warning means Windows wants you to do something. A red mark means that protection is off or has failed. If you run a third-party antivirus, Defender usually switches itself off and this page names the other product instead. That is normal, not a fault.
Use PowerShell to check the status of Microsoft Defender Antivirus
PowerShell gives you a detailed report on Microsoft Defender Antivirus and its background services without clicking through menus. It is also handy if the Windows Security app won’t open.
- Press the Win, type PowerShell, right-click Windows PowerShell and select Run as administrator. Click Yes if the User Account Control prompt appears.
- Type the command Get-MpComputerStatus and press Enter. A long list of properties appears.
- Find AntivirusEnabled, RealTimeProtectionEnabled and AntispywareEnabled in the output. Each one should show True.
If these show False and you have another antivirus installed, that is expected, because Defender steps aside for it. If you have no other antivirus, switch real-time protection back on in Windows Security. The command only reads status and changes nothing on your PC.
Current threats
The current threats area of Windows Security lists active malware alerts, quarantine details and any files that need action from you. Windows puts suspicious items here so you can review them. You can restore files that are safe or remove dangerous ones permanently.
If it lists items, open each one and read the file name and the action offered before you choose. Only restore a file if you are sure where it came from.
Scan options
Windows Security lets you run a manual scan whenever you want one. Open Virus & threat protection, then click Scan options to choose from these:
- Quick scan checks the folders where malware most often hides. It is fast and fine for a routine check.
- Full scan checks every file and running program. It can take a long time, so run it when you don't need the PC.
- Custom scan checks only the folder or drive you pick.
- Microsoft Defender Antivirus (offline scan) restarts the PC and scans before Windows loads. It can remove stubborn malware that hides while Windows is running. Save your work first, because the PC restarts straight away.
Allowed threats
The allowed threats section lists items that Windows flagged as malicious but that you chose to permit. Check this list now and then. Make sure no harmful software still has an exception that bypasses real-time protection.
You can find it under Current threats in Virus & threat protection. If you see something you don't recognize, remove it from the list so Windows treats it as a threat again, then run a scan.
Virus & threat protection settings
The settings in this part control how Windows handles incoming files and possible exploits. To reach them, open Virus & threat protection and click Manage settings under Virus & threat protection settings. Changing a toggle needs an administrator account, and you may see a User Account Control prompt.
Real-time protection
It scans downloads and running programs the moment they touch your machine. Keep this toggle on so new malware is caught before it can run or change system files.
If you switch it off, Windows turns it back on after a short while. That is by design. A toggle that is greyed out or turns itself off often means another antivirus is in charge or a policy is managing the setting.
Dev Drive protection
Dev Drive protection applies lighter, performance-focused scanning rules to developer volumes used for building and compiling code. It balances heavy file activity against the need for security checks.
This option only appears on recent versions of Windows 11, and it only matters if you have set up a Dev Drive. If you don't see it, your Windows version doesn't include it or you have no Dev Drive. You don't need to do anything.
Cloud-delivered protection
Cloud-delivered protection sends diagnostic data to Microsoft's cloud services, which helps identify brand-new malware almost instantly. With it on, your PC gets the latest threat intelligence gathered worldwide.
Automatic sample submission
Automatic sample submission uploads suspicious files to cloud analysis servers. This helps identify unknown threats and improves protection for everyone. Windows may ask you before it sends a file, or it may send files without asking, depending on how you set it.
Be careful if your files may hold private or confidential data. In that case, choose the option that asks first, or turn the setting off.
Tamper protection
Tamper protection stops unauthorized apps and malicious scripts from changing core security settings, turning off real-time monitoring or editing critical defense files. It keeps your security settings locked against modification.
On a new Windows 11 install it is normally on. If you can't change it, your PC may be managed by an organization that controls the setting. If you turn it off to make a legitimate change, turn it back on afterward.
Controlled folder access
Controlled folder access protects your important folders from changes by rogue applications and ransomware. If a trusted program is blocked from saving to a protected folder, add it to the allowed apps list so it can modify those folders.
When Windows blocks an app, you usually get a notification. Use that as your cue to add the program only if you trust it.
Exclusions
The exclusions list names files, folders, file types and processes that Windows ignores during scans. Add an item here only when legitimate software triggers false positives or has performance conflicts with scanning.
Every exclusion is a blind spot, so keep the list short. To review it, open Manage settings, scroll to Exclusions and click Add or remove exclusions. Remove any entry you don't recognize or no longer need.
Virus & threat protection updates
Security definitions need regular updates so Windows can recognize newly created malware and zero-day vulnerabilities. You can check the date and version of your current definitions and start a download by hand. This makes sure your database matches the latest releases.
- Open Windows Security and click Virus & threat protection.
- Scroll to Virus & threat protection updates and click Protection updates. The page shows the version and when it was last updated.
- Click Check for updates. Windows downloads any new definitions and shows the new date when it finishes.
Definitions normally arrive through Windows Update. If the check fails, make sure the PC is online and that Windows Update isn't stuck.
Ransomware protection
Ransomware protection shields your irreplaceable files from being encrypted and held for ransom. To open it, go to Virus & threat protection and click Manage ransomware protection. It has two parts: controlled folder access and data recovery.
Controlled folder access
Controlled folder access is your main barrier here. It restricts write access to standard user folders, so only authorized applications can change your documents, pictures and desktop files while it is on.
It is often off by default. Turn it on with its toggle, then check the list of protected folders and add any others you want covered. If it blocks a program you use, allow that app through the feature rather than turning the whole thing off.
Ransomware data recovery
Ransomware data recovery works with cloud storage such as OneDrive. If an encryption attack gets through, you can recover your files from the cloud. You can set up and manage the backup sync from this panel, so your data stays recoverable.
If OneDrive isn't set up, the panel offers to set it up. It is worth doing, because a cloud copy is a backup that ransomware on your PC can't easily reach. If you already use OneDrive, the panel shows the account and a link to manage it.
Web Protection and SmartScreen Verification
Check your web protection and SmartScreen settings so Microsoft Edge blocks malicious websites and phishing links before they load. These filters add a layer of defense against dangerous downloads and fraudulent pages.
- Open Microsoft Edge, click the three dots in the top-right corner and select Settings.
- Click Privacy, search, and services in the left sidebar.
- Scroll down to the Security section and check that the toggle for Microsoft Defender SmartScreen is on.
- Open the Windows Security app and click App & browser control. Confirm that reputation-based protection and the exploit protection settings are enabled across the operating system.
If any of these are off, switch them back on unless you know why they were turned off. On a work PC, an administrator may have set them through policy.
Verify System Security via Registry Policies
The Windows Registry can hold values that override your security center notifications and core protection features. Checking them confirms your local controls work without outside interference. This check is read-only, so look but don't change anything unless you know what a value does.
- Press the Windows key + R to open the Run dialog box.
- Type regedit and press Enter to open the Registry Editor. Click Yes at the User Account Control prompt.
- Navigate to the following location:
HKEY_LOCAL_MACHINE\SOFTWARE\Microsoft\Windows Defender Security Center\Settings - Look at the DWORD values in the right-hand pane. They show any custom configuration applied to your security dashboard notifications and options.
If the key doesn't exist, nothing is overriding those settings at that location, and that is normal on many PCs. If you do edit a value, first export the key with File Export so you can undo the change.
If this didn't work
If the security dashboard keeps showing errors or wrong statuses, corrupted system files may be the cause. The System File Checker tool scans protected system files and replaces damaged ones, which can restore the security app to normal. Open Command Prompt as an administrator, then run the command in the next block.
sfc /scannow
That command scans for corrupted system files and replaces them automatically. Follow these steps when it runs:
- Wait until the scan reaches 100 percent and reports its result. Don't close the window early, because the scan can take several minutes.
- Restart your computer.
- Open the Windows Security app again and confirm that the protection statuses now display correctly.
If the tool reports that it found corrupt files it could not repair, or the errors come back after the restart, the system image itself may need repair.
Have a question about this guide?
Answered by AI from this guide. Good questions may be added to this page — please don't include personal details.
Did this guide fix your problem?

About the Author
Richard
Tech Writer, IT Professional
Richard is a writer at Geek Rewind who turns complex IT tasks into clear, step-by-step guides. He draws on years of hands-on experience in system administration and enterprise IT operations, focusing on Windows, Linux and WordPress: the problems people actually run into, and the fixes that work. His server and WordPress guides come from systems he runs himself. Richard builds and maintains the platform behind Geek Rewind, from its Ubuntu servers and Nginx configuration to its custom WordPress plugins. Many new tutorials start with readers' questions, and he's always glad to answer them in the comments.
No comments yet — be the first to share your thoughts!