Use Secure Print On a Windows 11 Printer

Secure print keeps your document waiting in the printer until you type a PIN on the printer’s control panel . That way, nobody else can grab your pages from the tray. Windows 11 has no secure print switch of its own, so you turn it on through the printer driver (the software that lets Windows talk to the printer).
To use it, pick a secure job type in the driver and set a PIN when you send the print job. The printer then holds the job until the PIN is entered at the printer. The steps below show how to send a single job as secure, how to release it at the printer, and how to make secure print the default for every job.
If the option is missing or greyed out, the driver or the printer itself is usually the reason. The last part of this guide explains why that happens and what to check.
Secure print holds your job at the printer until you enter a PIN at its control panel . Windows 11 has no secure print switch, so you turn it on in the printer’s driver: open Printing preferences from the print dialog, choose a Job Type such as Secure Print, then set a PIN. The option is often missing when Windows uses a generic driver.
What Secure Print Does on 🪟 Windows 11
Secure print goes by several names, including PIN print, private print, locked print and confidential print. The name depends on the manufacturer. Either way, it changes where your job waits. Normal jobs print as soon as the printer receives them. The printer, or a print management system, stores a secure print job until you sign in at the device. Confirming who you are usually means a PIN, and sometimes a badge or a sign-in.
Two points affect how you use it:
- The feature belongs to the printer and its driver, not to Windows. The label, the PIN rules and the release menu change between manufacturers and models.
- Secure print holds a job. It does not necessarily encrypt it. Treat it as protection against someone picking up your pages, not as a guarantee about the data in transit.
Before You Start
Check these four things first. They explain most of the cases where secure print does not appear.
- Check these four things first: - The printer supports held jobs. Some models need internal storage, extra memory or a hard disk. - The printer is installed with the manufacturer's driver, not a generic Microsoft one. - Windows protected print mode is off. Troubleshooting covers this below. - If your organisation uses a print management system, use that system's client or queue instead., and some have the feature switched off until an administrator enables it.
- The printer is installed with the manufacturer's driver, not a generic Microsoft one.
- Windows protected print mode is off. This is covered in the troubleshooting section below.
- If your organisation uses a print management system (a server that holds jobs until you release them at any printer), use that system's client or queue instead. Its steps replace the ones here.
Check That Your Printer Supports Secure Print
Open the driver's settings once to see whether a secure option exists. This takes a minute and tells you which of the later sections applies to you.
Find Out Which Driver the Printer Uses
The driver name shows whether Windows is using the manufacturer's software or a generic class driver. Generic drivers rarely include secure print.
- Open Settings and go to Settings Bluetooth & devices Printers & scanners
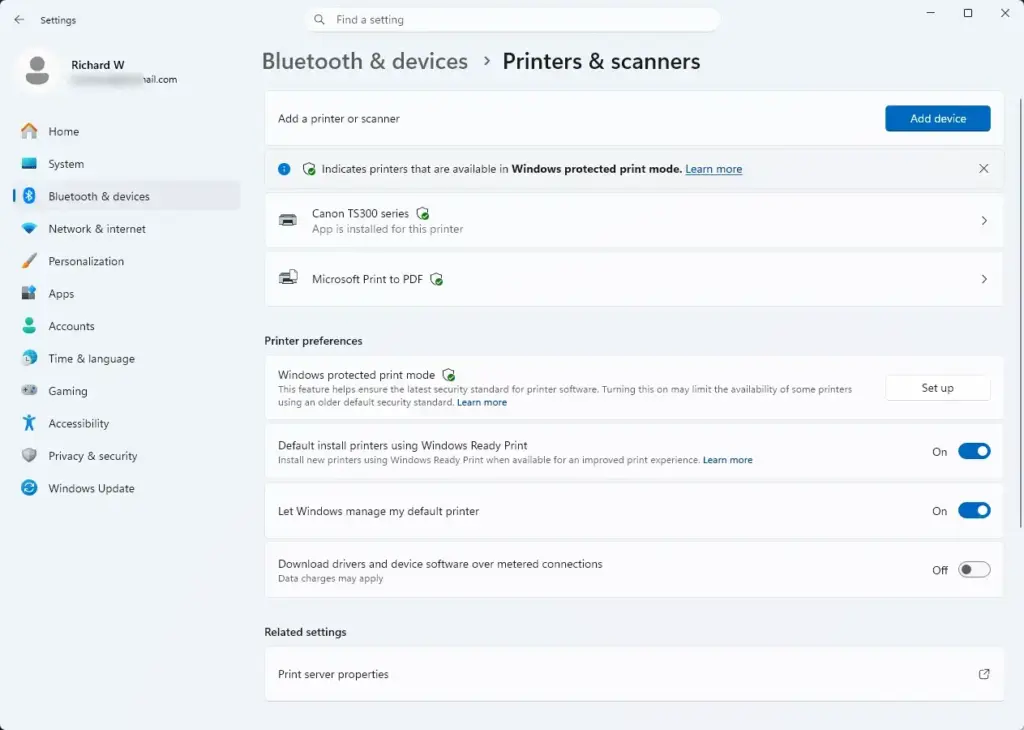
Settings › Bluetooth › Printers - Select your printer from the list. The printer's page opens.
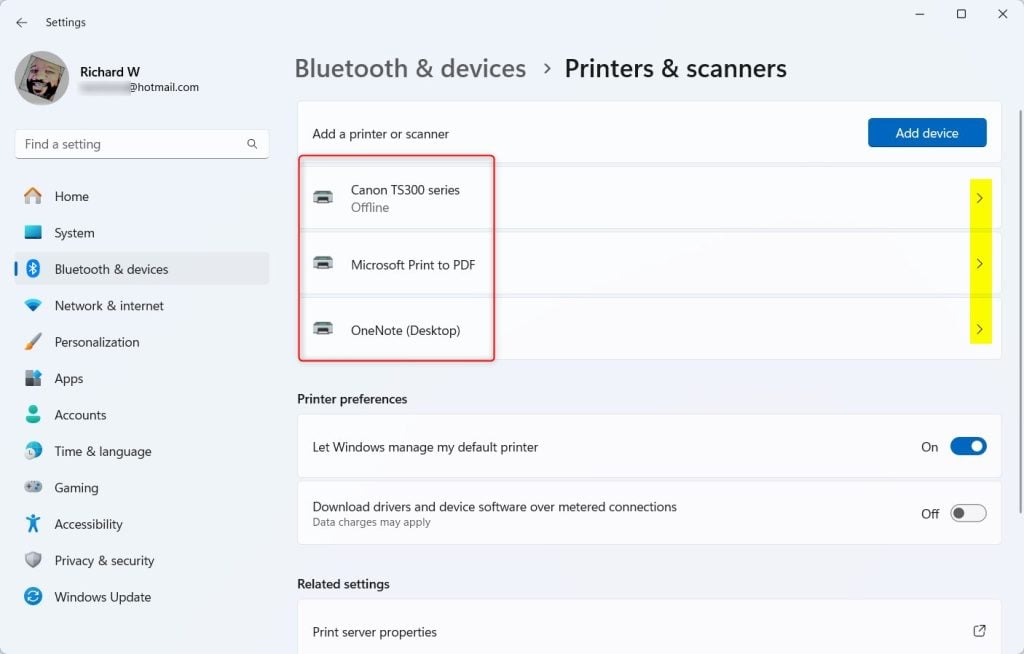
- Select Printer properties. A classic dialog box opens.
- Open the Advanced tab. The Driver box shows the driver name.
If the name contains the manufacturer and model, such as the brand followed by your printer model, you have the manufacturer's driver. If it reads Microsoft IPP Class Driver or contains the words "Class Driver" or "Generic", Windows is using a built-in driver. See the section on missing options below before you continue.
Look for the Secure Print Setting
- Close the Advanced dialog, then go back to the printer's page in Settings.
- Select Printing preferences. The driver's own settings window opens.
- Look through the tabs for a setting named Job Type, Job Storage, Secure Print, Private Print, Locked Print, Confidential Print or Personal Job. The setting is often on a tab named Job Storage, Advanced, Output or Printing Shortcuts.
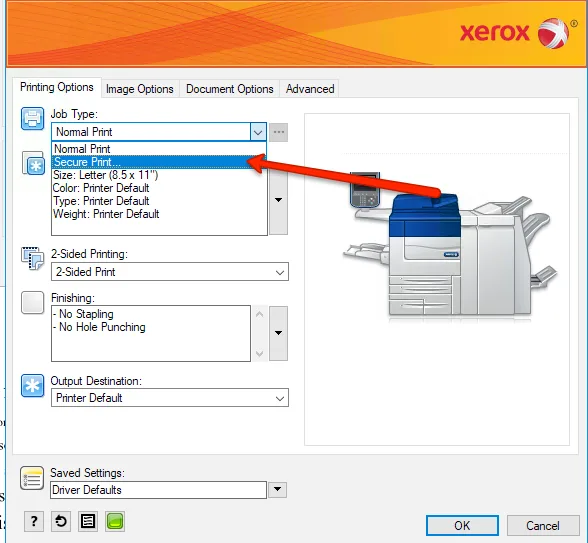
If you find one of these, the printer and driver support secure print. Close the window with Cancel for now, and continue with the next section.
Send One Job as a Secure Print Job
Use this method when you want to protect a single document. It changes nothing for later jobs.
- Open the document you want to print.
- Press Ctrl+P to open the print dialog.
- Select your printer in the printer list.
- Open the driver's settings from the print dialog. The button depends on the app:
- In classic dialogs, such as the one in Notepad, select Preferences or Properties.
- In Microsoft Word, select Printer Properties under the printer name.
- In Microsoft Edge, press Ctrl+Shift+P to switch to the system print dialog, then select Preferences or Properties. Edge's own print panel does not show driver options.
The driver's settings window opens.
- Find the job type setting you located earlier, and choose the secure option, for example Secure Print, Private Print or Personal Job.
- Enter a PIN when the driver asks for one. Pick a PIN that you will remember, but that others will not guess. Many drivers accept digits only and enforce a length range, and they show a message if your PIN does not meet it.
- Select OK to close the driver's settings.
- Select Print.
The job appears briefly in the print queue (the list of jobs waiting to print), then leaves it. That is normal. Windows considers the job delivered once the printer has it, and the printer now holds it. Do not send it again. Printing it a second time stores a duplicate on the printer.
Release the Job at the Printer
The job stays on the printer until you release it. The steps differ for every model, but the pattern is the same.
- Go to the printer and wake its control panel.
- Open the menu for held jobs. Typical names are Secure Print, Private Print, Job Storage, Print Jobs or Stored Jobs.
- Select your user name. The printer lists held jobs by the name of the Windows account that sent them, so look for USERNAME as it appears on your PC.
- Enter the PIN you set in the driver.
- Select the job, or select the option to print all of your jobs, then confirm.
Many printers delete the job after printing, and some keep it until you remove it or until a time limit passes. Check the driver's settings page or the printer's manual to see how long held jobs stay on the printer. If you forget the PIN, you usually cannot recover it. Delete the held job at the printer and print again with a new PIN.
Make Secure Print the Default for a Printer
Set secure print as the default if every job you send to this printer should be held. You then enter a PIN each time, or the driver prompts you for one, depending on the model.
Set It for Your Own Account
Printing preferences apply to your Windows account only. This does not need administrator rights.
- Open Settings and go to Settings Bluetooth & devices Printers & scanners
- Select your printer.
- Select Printing preferences.
- Change the job type to the secure option, as in the earlier section.
- Select Apply, then OK.
Your next print job to this printer starts with the secure option already selected. Some apps remember their own settings and override the default, so check the driver's settings window the first time you print from each app.
Set It for Every User on the PC
This step requires administrator privileges. Printing defaults apply to every account on the computer, so confirm with other users before you change them.
- Open Settings and go to Settings Bluetooth & devices Printers & scanners
- Select your printer, then select Printer properties.
- Open the Advanced tab.
- Select Printing Defaults. The driver's settings window opens.
- Choose the secure job type, and set any other options the driver offers.
- Select OK, then OK again to close Printer properties.
If Windows asks for permission, approve the prompt. If the Printing Defaults button is missing or greyed out, you are not signed in with an administrator account, or your organisation controls the printer's settings.
If the Secure Print Option Is Missing or Greyed Out
This is the most common problem. Find your case below.
The Printer Uses a Generic Microsoft Driver
Windows 11 installs a built-in driver for many network printers when you add them. This generic driver, which Microsoft calls a class driver, covers basic printing only. These drivers cover basic printing and leave out vendor features such as secure print. You can switch to the manufacturer's driver.
- Download the driver package for your exact printer model from the manufacturer's support site.
- This step requires administrator privileges. Run the installer, and follow its prompts. If the installer offers a choice between a full package and a basic driver, choose the one that lists the printer's advanced features.
- Open Settings Bluetooth & devices Printers & scanners and select your printer.
- Select Printer properties, then open the Advanced tab.
- Open the Driver list and select the manufacturer's driver. If it is not listed, select New Driver and follow the wizard to point Windows at the installed driver.
- Select Apply.
Open Printing preferences again. The secure options should now appear. If the installer created a new printer entry rather than replacing the old one, use that new entry for secure jobs and remove the old one.
Windows Protected Print Mode Is On
Windows protected print mode (a mode that limits printing to Microsoft's built-in printing software) blocks manufacturer drivers. When it is on, driver features such as secure print are not available. It exists on recent Windows 11 builds. The setting's location and label can differ between Windows 11 builds, so look for a setting with that name on the Printers & scanners page, so check the Printers & scanners page in Settings for a setting with that name.
If the mode is on and your organisation manages it, you cannot turn it off yourself. Ask your IT team whether secure print can be provided another way, for example through a print management system. Administrators who manage the mode through policy (settings that an organisation applies to its PCs) can look under HKEY_LOCAL_MACHINE\SOFTWARE\Policies\Microsoft\Windows NT\Printers\WPP. This article does not list value names for that key. [Registry method: to be verified]
The Printer Needs Storage or the Feature Is Off
A driver can show a secure option that the printer cannot honour. Some models need an internal drive or memory upgrade before they can hold jobs, and others hide the feature until it is enabled on the printer's panel or web page. If the driver shows the option but jobs print immediately without asking for a PIN, check the printer's manual for the setting that enables held jobs, or ask whoever manages the printer.
The App's Print Dialog Hides Driver Options
Some apps show a simplified print panel with no link to the driver. Use the system print dialog instead. In Edge, press Ctrl+Shift+P. In other apps, look for Print using system dialog, or print from a classic app such as Notepad. You can also set secure print as the default, as described above, so the app does not need to show the option.
If the Job Never Prints at the Printer
Check these causes in order.
- You are looking at the wrong user name. The printer lists jobs under the Windows account that sent them. If you print from a work account on one PC and a personal account on another, the names differ.
- The job expired. Some printers delete held jobs after a time limit or after a restart. Print the job again.
- You sent the job more than once. The panel may list several copies. Print the one you want and delete the rest.
- The PIN was rejected. Re-enter it carefully. If it still fails, delete the job at the printer and resend it with a new PIN.
How to Turn Secure Print Off
To stop holding jobs, reverse the setting you changed.
- Open Settings Bluetooth & devices Printers & scanners and select your printer.
- Select Printing preferences.
- Change the job type back to the normal option, which is often named Normal, Standard or Print Now.
- Select Apply, then OK.
If you set a printing default for all users, this step requires administrator privileges. Open Printer properties, go to the Advanced tab, select Printing Defaults, and change the job type back there. Jobs that are already held on the printer stay there until you release or delete them at the control panel.
What to Do Next
Send a short test page with secure print on, then release it at the printer to confirm the PIN works before you rely on it for a sensitive document. If the secure option is still missing after you install the manufacturer's driver, check the support page for your exact printer model to see whether that model supports held jobs at all. A driver change can reset your printing preferences, so check the job type again after you update or reinstall one.
Have a question about this guide?
Answered by AI from this guide. Good questions may be added to this page — please don't include personal details.
Did this guide fix your problem?

About the Author
Richard
Tech Writer, IT Professional
Richard is a writer at Geek Rewind who turns complex IT tasks into clear, step-by-step guides. He draws on years of hands-on experience in system administration and enterprise IT operations, focusing on Windows, Linux and WordPress: the problems people actually run into, and the fixes that work. His server and WordPress guides come from systems he runs himself. Richard builds and maintains the platform behind Geek Rewind, from its Ubuntu servers and Nginx configuration to its custom WordPress plugins. Many new tutorials start with readers' questions, and he's always glad to answer them in the comments.
No comments yet — be the first to share your thoughts!