How to Allow or Block Microsoft Family Safety Accounts on Windows 11

Microsoft Family Safety is a built-in parental control tool on Windows 11. It lets you block or allow specific child accounts from signing in to your computer. You can also use it to manage screen time, set app limits, and keep a child off the desktop entirely, all from the Settings app.
Open Settings Accounts Family, click the family member’s name, then click Allow sign in or Block sign in to control their access. The change takes effect immediately without restarting your PC.
What is Microsoft Family Safety?
Microsoft Family Safety is a free tool for monitoring screen time, setting app boundaries, and reviewing weekly activity reports across Windows 11 devices. It works through a family group tied to Microsoft accounts. The adult who creates the group is the organizer, and the children or other members are added to it. Because the group lives on your Microsoft account and not on one PC, the same people appear in Settings on any Windows 11 computer where you sign in.
How to Allow a Family Member to Sign Into 🪟 Windows 11
Allowing a family member to sign in to Windows 11 starts in the Settings app, under your account options. Once a household member is allowed, they can use your PC with their own Microsoft account sign-in details and get their own desktop, files and settings. The steps below walk through it.
You need to be signed in with an administrator account. The person you want to allow must already be in your family group. Your PC needs an internet connection so it can read the group from your Microsoft account. If a family member is missing from the list, add them first through the Family option in Settings or on the Microsoft Family Safety website.
- Open Windows Settings : click the Start menu and choose Settings, or press the Win+I on your keyboard. The Settings window opens.
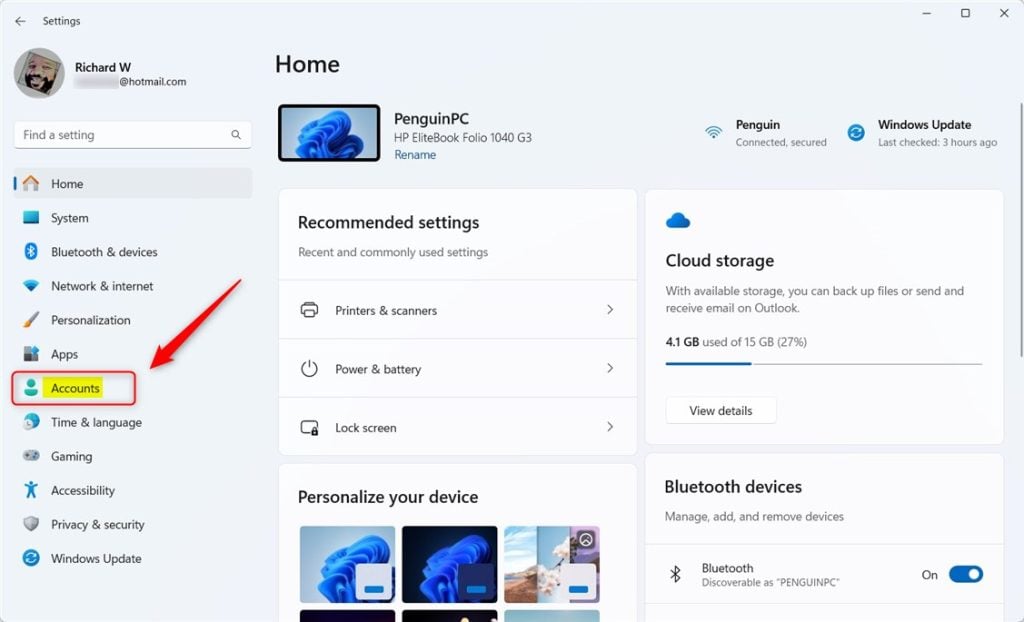
- In the Settings window, click Accounts on the left side. The account options for your PC appear on the right.
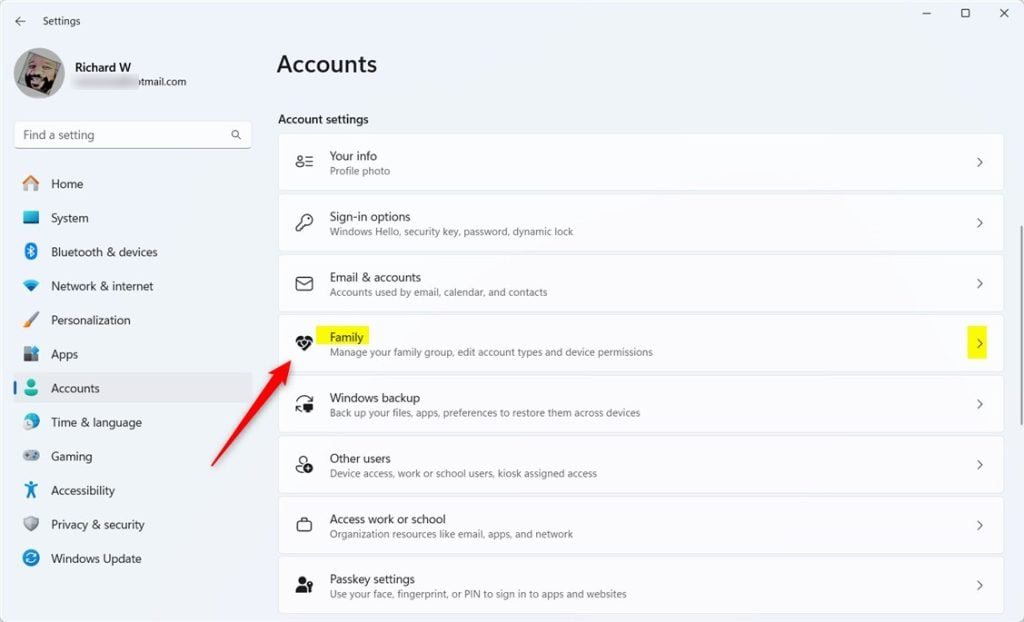
- On the right, find and click the Family option. You should now see your family group and the people in it.
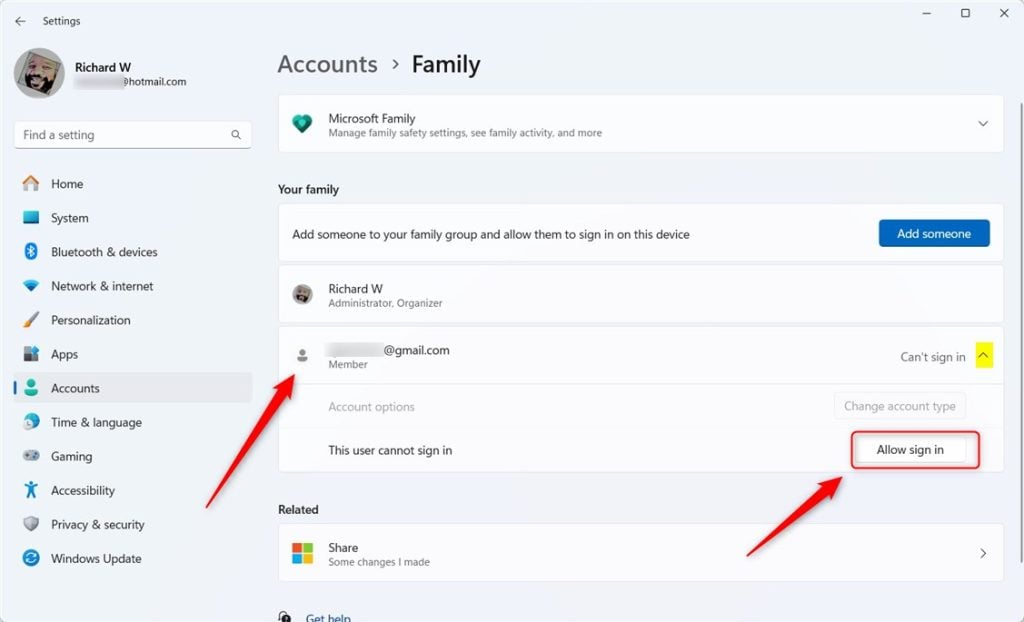
- Look at the list of family members added to your group, then click the name of the member you want to allow. Their details expand and show the options available for that person.
- Click the Allow sign in button. Windows asks you to confirm. If the button is missing, that person may already be allowed, so look for a Block sign in button instead. Labels can vary a little between Windows 11 builds.
- When the confirmation box pops up, click Allow to finish. The member's name should now show that they can sign in.
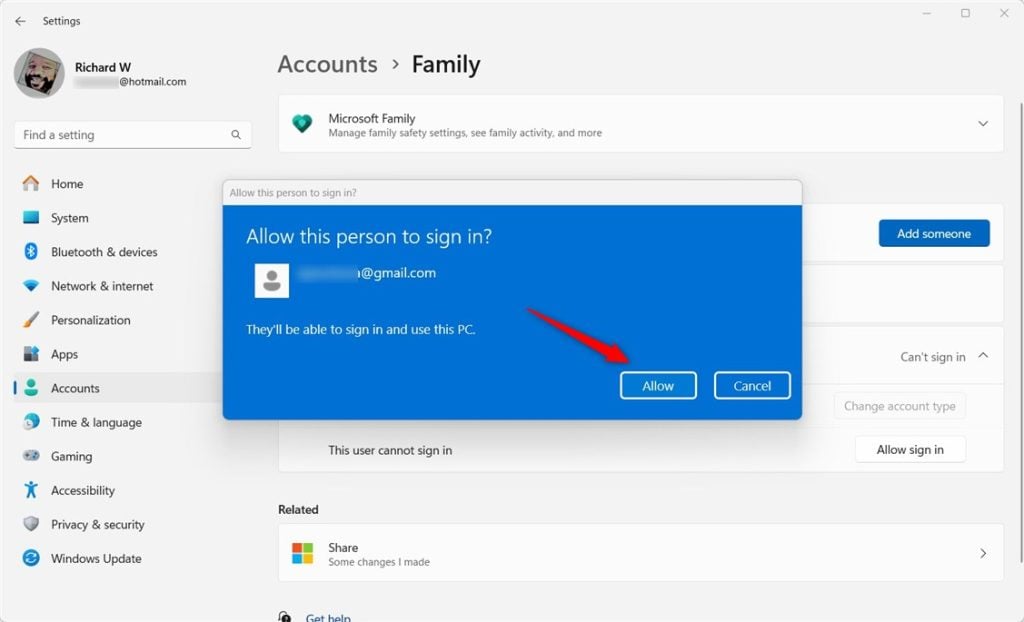
The family member can sign in right away once allowed. You do not need to restart the PC. They will see their account on the sign-in screen, or can choose it from the account list there.
Also keep in mind that the account type decides what they can do after signing in. A standard account can use apps and change its own settings, but cannot install system-wide changes. An administrator account can change anything on the PC. Accounts can be switched between the two roles in the Accounts section of Settings. For a child, standard is almost always the right choice.
How to Block a Family Member from Signing Into 🪟 Windows 11
Blocking a family member from signing in to Windows 11 stops them from using your computer through their Microsoft account. You do this in the Settings app by turning off sign-in access for the person you choose. The change takes effect straight away, and the account stays in your family group, so you can allow it again whenever you like.
It only stops new sign-ins on this PC. If they are already signed in when you block them, expect the restriction to apply the next time they try to sign in, so make sure they have saved their work and signed out first.
- Go back to Settings Accounts Family, as shown above. You should see your family list again.
- Click the name of the family member you want to block.
- Click the Block sign in button.
- Confirm your choice when asked. The member's entry should now show that sign-in is blocked.
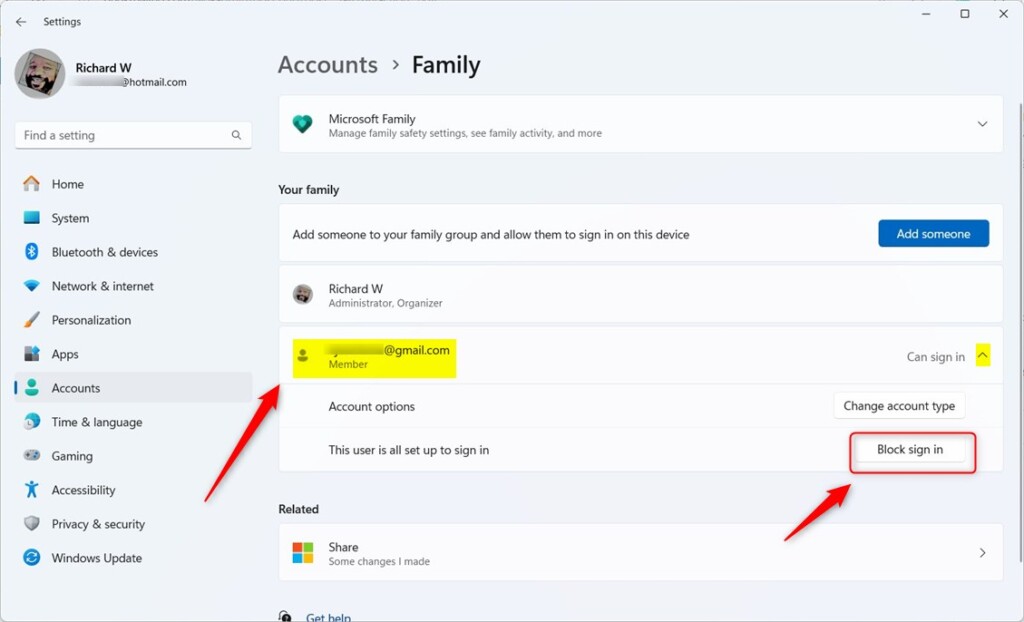
Microsoft Family Safety restrictions stop specific profiles from accessing the Windows 11 environment. After you block an account, only the people you have left allowed can sign in. To undo the block, repeat the allow steps earlier in this guide and click Allow sign in for that person.
Summary
- Microsoft Family Safety lets parents control their kids' computer use on Windows 11, including screen time, app limits and activity reports.
- You manage family accounts through the Windows Settings app, under Accounts Family.
- Allowing or blocking sign-in helps keep your family's computer use safe and secure, and you can reverse either choice at any time.
Managing Windows 11 Family Safety gives you control over how household accounts use your computer. You can use the Settings app to allow or block sign-in access for family members whenever you need to. That keeps the PC safe and secure for everyone in the house, and nothing about the change is permanent.
Was this guide helpful?

About the Author
Richard
Tech Writer, IT Professional
Richard is a writer at Geek Rewind who turns complex IT tasks into clear, step-by-step guides. He draws on years of hands-on experience in system administration and enterprise IT operations, focusing on Windows, Linux and WordPress: the problems people actually run into, and the fixes that work. His server and WordPress guides come from systems he runs himself. Richard builds and maintains the platform behind Geek Rewind, from its Ubuntu servers and Nginx configuration to its custom WordPress plugins. Many new tutorials start with readers' questions, and he's always glad to answer them in the comments.



No comments yet — be the first to share your thoughts!