Install OpenSSH Server in Windows 11 with PowerShell

- 15 steps
- Needs administrator rights
There is no separate OpenSSH Windows 11 download. OpenSSH Server is an optional Windows feature, and one PowerShell command, Add-WindowsCapability, downloads and installs it from Windows Update.
OpenSSH Server lets another computer sign in to this PC over SSH (Secure Shell, an encrypted protocol for remote command-line access). It works on Windows 11 Home, Pro, Enterprise and Education, and it does not need a restart. The steps below install the server, start it, check the firewall port and test a connection.
There is no separate OpenSSH download for Windows 11. You install OpenSSH Server as an optional feature from an elevated PowerShell window by running Add-WindowsCapability -Online -Name OpenSSH.Server~~~~0.0.1.0, which fetches it from Windows Update. Then start the sshd service with Start-Service sshd.
What You Need Before You Install
The PC also needs an internet connection. Windows treats OpenSSH Server as a Feature on Demand, meaning an optional component that Windows fetches from Windows Update when you add it. Windows stores nothing on the PC until you run the install command.
You do not need to change the PowerShell execution policy (the setting that controls whether scripts can run). Every command here is a single cmdlet (a built-in PowerShell command) typed at the prompt, not a script. If you later want to run scripts, see How to Change PowerShell Execution Policies in Windows 11.
The OpenSSH Client, which provides the ssh command, is normally installed already on Windows 11. Step 2 below shows whether it is present on your PC.
Install OpenSSH Server in 🪟 Windows 11 with PowerShell
Work through these steps in order. Each one says what it does before you run it.
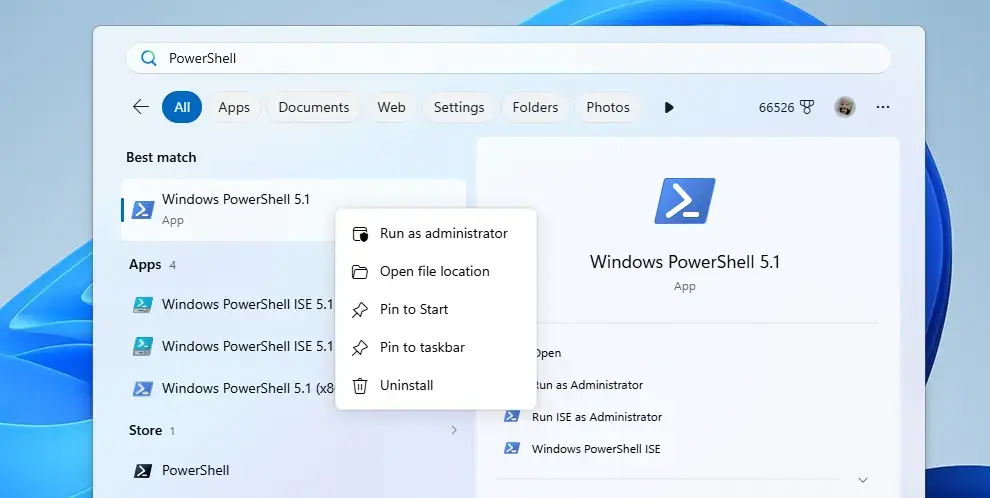
- Open PowerShell as administrator. This step requires administrator privileges. Select Start, type PowerShell, right-click Windows PowerShell and choose Run as administrator. Click Yes at the User Account Control prompt. The title bar now reads Administrator: Windows PowerShell. If you need other ways to launch it, see How to Open PowerShell in Windows 11.
PowerShell - Check which OpenSSH features are installed. This shows whether the server is already on the PC, so you do not install it twice. Paste the command below and press Enter.PowerShell
Get-WindowsCapability -Online | Where-Object Name -like 'OpenSSH*'PowerShell lists two entries. OpenSSH.Client~~~~0.0.1.0 usually shows State : Installed. OpenSSH.Server~~~~0.0.1.0 shows State : NotPresent on a PC that has never had it. If the server already shows Installed, skip to step 4.
- Install OpenSSH Server. This command downloads the server from Windows Update and installs it.PowerShell
Add-WindowsCapability -Online -Name OpenSSH.Server~~~~0.0.1.0A progress bar appears for a short time. When it finishes, PowerShell prints Online : True and RestartNeeded : False. No restart is required. If the command fails, see the troubleshooting section below.
- Start the sshd service. The sshd service is the background program that listens for incoming SSH connections. Installing the feature does not start it.PowerShell
Start-Service sshdThe command prints nothing when it works. You get your prompt back.
- Set sshd to start automatically. Without this, the server stops listening after every restart and you have to start it by hand.PowerShell
Set-Service -Name sshd -StartupType 'Automatic'Again, no output means success.
- Check the firewall rule for SSH. A firewall rule is a Windows Defender Firewall setting that allows traffic through a specific port. SSH uses TCP port 22 (a numbered channel that network traffic uses to reach a service). The install command normally creates a firewall rule for it.PowerShell
Get-NetFirewallRule -Name 'OpenSSH-Server-In-TCP' | Select-Object Name, EnabledIf the output shows Enabled as True, skip to step 8. If PowerShell reports that no rule was found, continue with step 7.
- Create the firewall rule if it is missing. This allows inbound connections on port 22.PowerShell
New-NetFirewallRule -Name 'OpenSSH-Server-In-TCP' -DisplayName 'OpenSSH Server (sshd)' -Enabled True -Direction Inbound -Protocol TCP -Action Allow -LocalPort 22PowerShell prints the details of the new rule, including Enabled : True.
- Confirm the server is listening. This proves sshd is running and listening on port 22.PowerShell
Get-NetTCPConnection -State Listen -LocalPort 22You should see at least one line with LocalPort 22 and State Listen. If you get an error that no matching connection exists, run the start command from step 4 again, then run
Get-Service sshdand check that Status reads Running. - Find the IP address of the PC. The other computer needs this address to reach the server.PowerShell
Get-NetIPAddress -AddressFamily IPv4 | Select-Object IPAddress, InterfaceAliasIgnore 127.0.0.1 (the PC talking to itself) and any address starting with 169.254 (a sign the adapter has no real connection). The remaining address, for example 192.0.2.10, belongs to your network adapter.
- Sign in from another computer. Open a terminal on a second PC, Mac or Linux machine on the same network. Run the command below. Replace USERNAME with the Windows account name and 192.0.2.10 with the address from step 9.Code
ssh USERNAME@192.0.2.10The first time you connect, the client shows a message about the authenticity of the host and asks Are you sure you want to continue connecting. Type yes and press Enter. Then enter the account password. A command prompt for the Windows PC appears.
- Close the session when you finish. Type exit and press Enter. The terminal returns to the local machine. The server keeps running and accepts the next connection.
Test the Connection Before Using Another Computer
If you only have one PC to hand, test the server against itself. Open a normal PowerShell window and run ssh USERNAME@localhost. Accept the fingerprint prompt, enter your password and you land in a new session on the same machine. This confirms the service and the sign-in work, although it does not test the firewall rule, because the traffic never leaves the PC.
The fingerprint prompt appears once per server. It shows the host key fingerprint, a short code that identifies the server. The client saves it, and later connections to the same address skip the question.
If the fingerprint changes later, the client warns you. That warning is worth reading, because it can mean the server was reinstalled or something is intercepting the connection.
A few sign-in details trip people up:
- The password is the account password. A Windows Hello PIN does not work over SSH.
- Accounts with no password usually cannot sign in over the network. Set a password first.
- Microsoft account sign-in over SSH can behave differently from a local account. If the password is rejected, create a local account to confirm the server itself works.
Install OpenSSH Server from Settings Instead
The Settings app installs the same feature, which helps if you prefer a graphical route. It does not start the service or touch the firewall, so you still need steps 4 to 8 above afterwards. Settings labels can differ between Windows 11 builds.
- Open Settings System Optional features.
- Select View features next to Add an optional feature.
- Type OpenSSH Server in the search box and tick the box next to it.
- Select Next, then select Install.
The feature appears in the Installed features list when the download finishes.
Fix Problems with the Install or the Connection
The install command fails
If Add-WindowsCapability reports an elevation or access denied error, the window is not running as administrator. Close it and repeat step 1.
If it stops with a download error such as 0x800f0954, Windows cannot reach the source for optional features. This is common on work PCs that take updates from a WSUS server (an internal Windows Update server run by an IT department) or have a policy controlling update sources. Home users should check the internet connection and run Windows Update first. On a managed PC, ask your IT team to allow Features on Demand downloads (the optional components Windows fetches from Windows Update), because the Settings route uses the same source.
Start-Service cannot find sshd
An error saying no service with the name sshd exists means the feature is not installed. Run the check in step 2 again. If the server still shows NotPresent, repeat step 3 and read the error it prints.
The connection times out
A timeout means the connection requests never reach the server. Check that the firewall rule in step 6 shows Enabled as True, that the IP address is correct, and that both computers are on the same network. A third-party antivirus suite with its own firewall can also block port 22, and Windows Defender Firewall settings do not control that.
The connection is refused
This message means the PC answered, but nothing is listening on port 22. Run Get-Service sshd in an administrator PowerShell window. If Status reads Stopped, run Start-Service sshd again.
Permission denied
This points to the wrong account name or password. Check the spelling of USERNAME and try again. The account names under 📁C:\
Keep OpenSSH Server Limited to Your Own Network
The firewall rule from the installer allows connections from any address. On a home or office network, narrow it to the local subnet (the range of addresses on your own network) with this command in an administrator PowerShell window:
Set-NetFirewallRule -Name 'OpenSSH-Server-In-TCP' -RemoteAddress LocalSubnet-RemoteAddress Any. Do not forward port 22 on your router to this PC unless you have a reason and a plan for strong passwords or other protection. Servers open to the internet get automated sign-in attempts within hours.Disable or Remove OpenSSH Server
To stop the server from accepting connections without uninstalling it, run these two commands in an administrator PowerShell window. The files stay on the PC, and you can switch the server back on later.
Stop-Service sshdSet-Service -Name sshd -StartupType 'Disabled'To turn it back on, run Set-Service -Name sshd -StartupType 'Automatic' followed by Start-Service sshd.
To remove the feature completely, delete the firewall rule and then uninstall the capability. If the first command says it finds no rule, nothing needs removing.
Remove-NetFirewallRule -Name 'OpenSSH-Server-In-TCP'Remove-WindowsCapability -Online -Name OpenSSH.Server~~~~0.0.1.0Run the check from step 2 again afterwards. The server should show NotPresent.
What to Do Next
With the server running, you can open a remote command line on this PC from any machine on your network and run the same PowerShell commands you use locally. If you also want to reach shared folders from the machines you manage, Map Network Drives with PowerShell in Windows 11 is the closest related task. Keep the commands in the section on removing the server to hand in case you ever need to switch it off quickly.
Have a question about this guide?
Answered by AI from this guide. Good questions may be added to this page — please don't include personal details.
Did this guide fix your problem?

About the Author
Richard
Tech Writer, IT Professional
Richard is a writer at Geek Rewind who turns complex IT tasks into clear, step-by-step guides. He draws on years of hands-on experience in system administration and enterprise IT operations, focusing on Windows, Linux and WordPress: the problems people actually run into, and the fixes that work. His server and WordPress guides come from systems he runs himself. Richard builds and maintains the platform behind Geek Rewind, from its Ubuntu servers and Nginx configuration to its custom WordPress plugins. Many new tutorials start with readers' questions, and he's always glad to answer them in the comments.
No comments yet — be the first to share your thoughts!