How to Enable or Disable Transparency Effects in Windows 11

Transparency effects in Windows 11 add a see-through blur to the Start menu , taskbar, and app windows. They are on by default on all Windows 11 builds, which gives the desktop a modern look.
Turning them off can help older PCs run a little faster, and text is easier to read against solid backgrounds. The setting is in the Settings app, and it works the same on Windows 11 Home and Pro.
Open Settings , go to Personalization Colors, find the Transparency effects switch, and set it to On or Off. The change applies immediately to the Start menu , taskbar, and windows without requiring a restart.
How To Turn Transparency Effects On or Off
There are three ways to change transparency effects. The first two use the Settings app and give the same result. The third uses the Registry and is for PCs where the normal switch is missing or locked.
Option 1Using Personalization Settings
This is the quickest route and the one most people need.
- Press Win+I on your keyboard to open Settings .
- Click Personalization in the left menu. The personalization options appear on the right.
- Click Colors.
- Find the Transparency effects switch and set it to On or Off. The Start menu , taskbar, and open windows change right away. No restart is needed.
- Close Settings when you’re done.
You don’t need any advanced tools for this. To undo the change, go back to the same page and flip the switch again.
If the Personalization pages are greyed out or show a message about activation, Windows probably isn’t activated yet. On a work PC, a policy set by your administrator can also lock these options. In both cases, the Registry method below may be your only option, and it can be blocked by policy too.
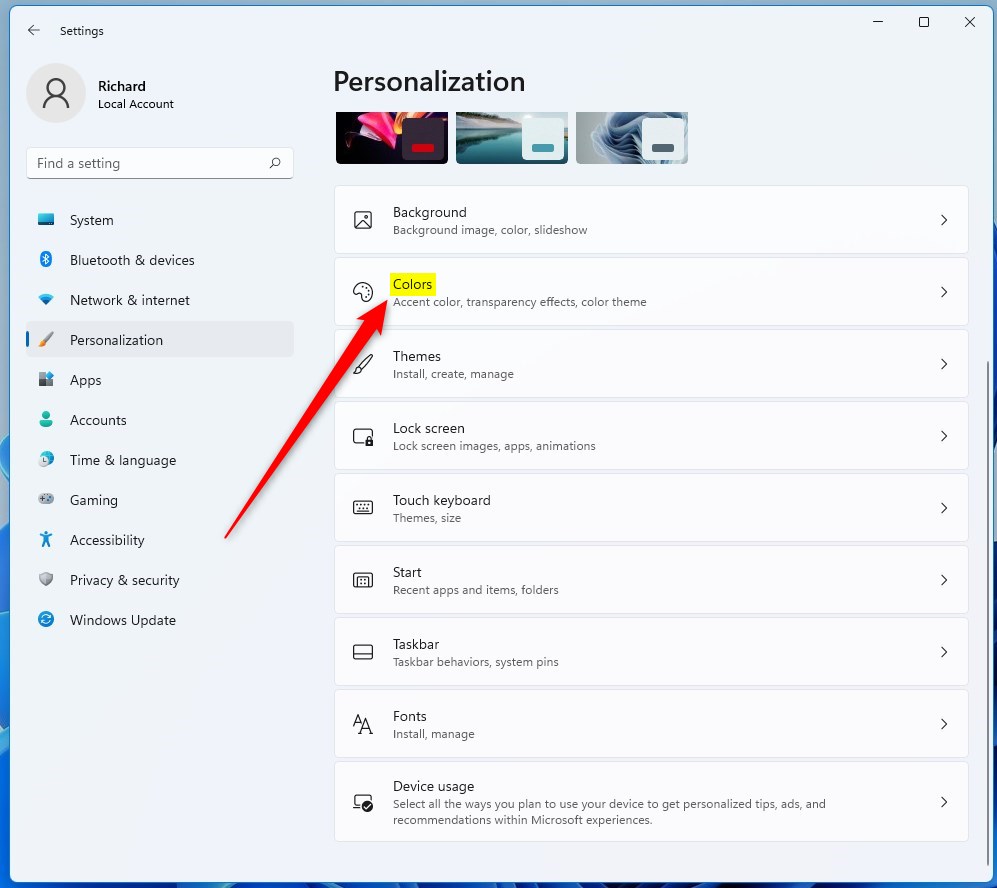
With transparency off, the Start menu and taskbar show solid colors instead of a blur. Switching it back on restores the blur.
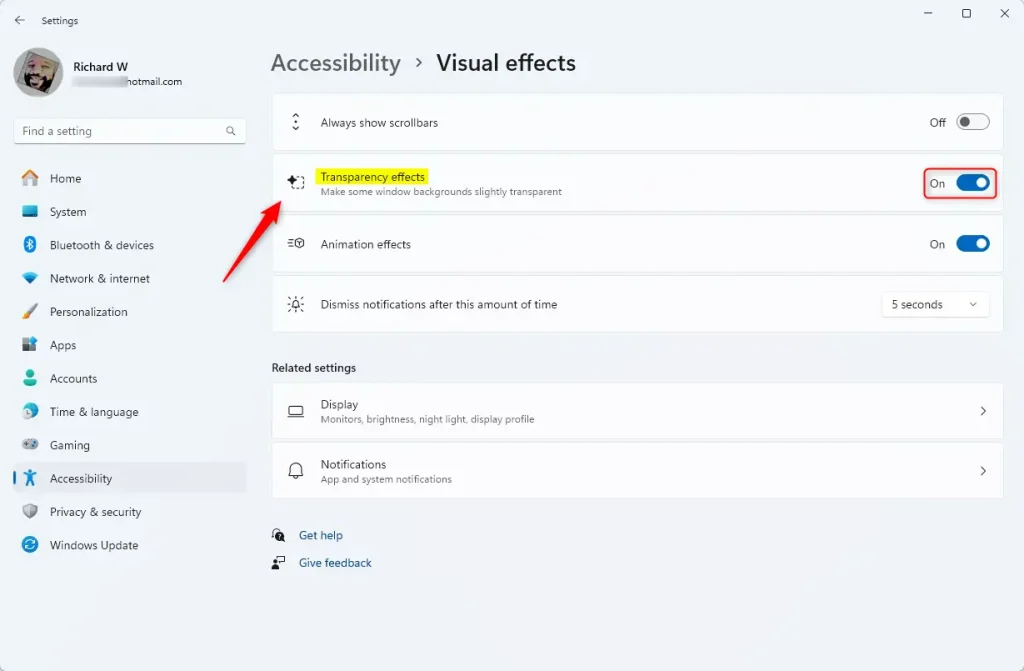
The same switch appears in a second place, under Accessibility. It controls the same setting, so changing it in one place changes it in the other.
Option 2Using Accessibility Settings
- Press Win + I to open Settings.
- Click Accessibility on the left side.
- Click Visual effects on the right.
- Set the Transparency effects switch to On or Off. The change applies immediately.
- Close Settings when finished.
You can open Visual effects settings directly here: Open Visual Effects Settings
The same page also holds other motion settings, such as animation effects. This makes it a good place to go if you want a calmer, less distracting desktop.
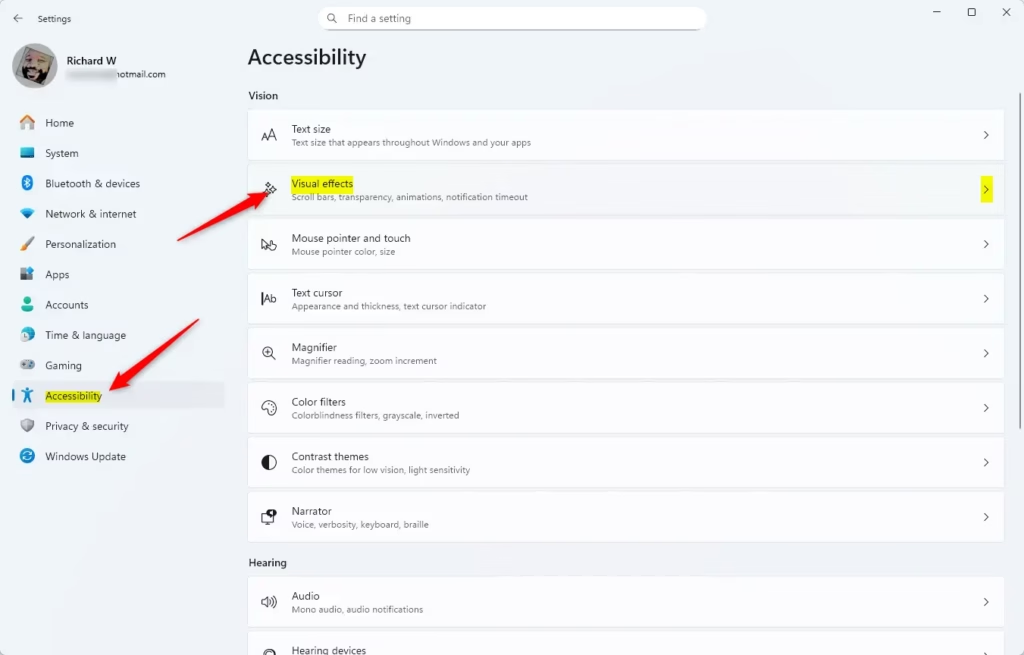
If the switch doesn't match what you see on screen, check whether a High Contrast theme is active. High Contrast turns transparency off automatically, so the effect stays off until you switch back to a normal theme.
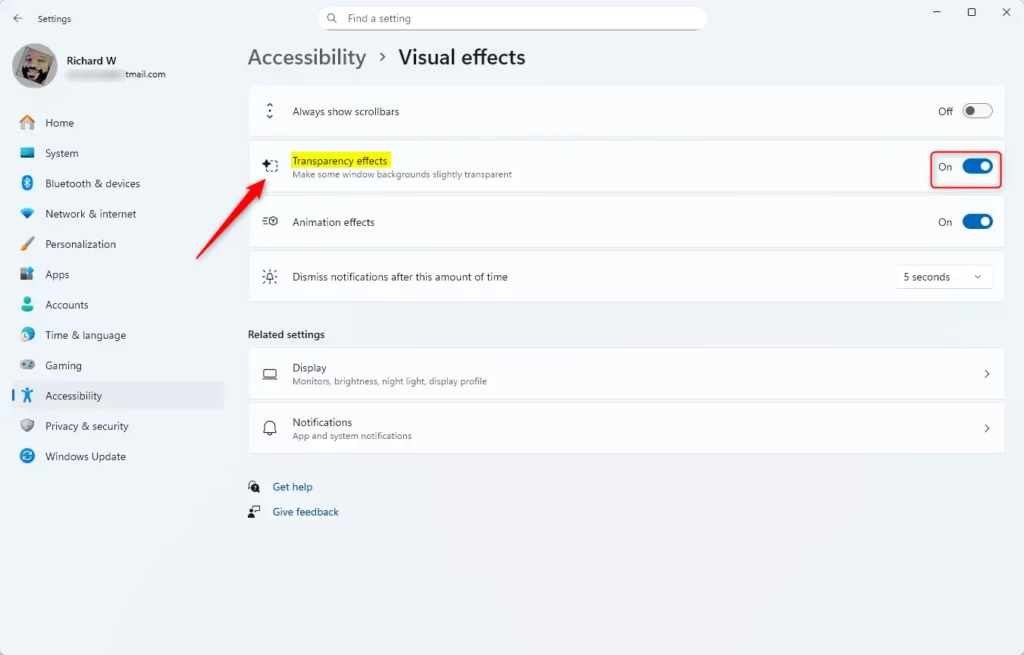
You don't need to restart after using either Settings method. If the switch is missing or you can't change it, use the Registry method below.
Option 3Using the Registry Editor (Advanced)
Registry Editor is a database that stores low-level settings for Windows and apps. It lets you control transparency effects when the standard menu is locked or unavailable. You run a quick command to turn the feature on or off manually.
To Turn On Transparency Effects (Default):
reg add "HKEY_CURRENT_USER\Software\Microsoft\Windows\CurrentVersion\Themes\Personalize" /v EnableTransparency /t REG_DWORD /d 1 /fTo Turn Off Transparency Effects:
reg add "HKEY_CURRENT_USER\Software\Microsoft\Windows\CurrentVersion\Themes\Personalize" /v EnableTransparency /t REG_DWORD /d 0 /fIf the change doesn't show up straight away, sign out of Windows and sign back in. If that doesn't help, restart the PC. To undo it, run the other command.
Making incorrect changes can cause problems with your PC. It's a good idea to back up the Registry and create a restore point before making changes. %%SC0%%
Summary
- Personalize your PC: Transparency effects give Windows 11 a modern, polished look. Turn them off for a plainer, more solid style.
- Easy to change: You can turn transparency on or off in Settings, under Personalization or Accessibility, or through the Registry. Settings changes apply instantly and need no restart.
- Accessibility friendly: You can disable transparency if it's hard for you to see or causes distractions.
- High Contrast mode: If you use High Contrast for better visibility, transparency effects will be turned off automatically.
Windows 11 transparency effects give your desktop a modern look, but you can turn them off if you find them distracting or hard to read through. Managing this setting helps you balance visual style with better screen contrast and visibility.
Why are transparency effects not working on 🪟 Windows 11?
Transparency effects may be disabled in Settings, or your graphics driver might not support them. Open Settings Personalization Colors and check that the Transparency effects switch is set to On. If it's already on but you see no effect, update your display driver through Device Manager.
How do I disable transparency?
Open Settings and press Win + I. Go to Personalization Colors. Find the Transparency effects switch and toggle it to Off. The blur effect on your Start menu, taskbar, and windows disappears immediately without needing a restart.
What are Windows transparency effects?
Transparency effects add a frosted-glass blur to the Start menu, taskbar, and app windows in Windows 11. They're on by default and give the desktop a modern appearance. Turning them off can help older computers run faster and makes text easier to read on solid backgrounds.
How to make 🪟 Windows 11 transparent?
Press Win + I to open Settings. Click Personalization, then Colors. Turn the Transparency effects switch to On. The Start menu, taskbar, and window borders will immediately show the frosted-glass blur effect. No restart is required.
Was this guide helpful?

About the Author
Richard
Tech Writer, IT Professional
Richard is a writer at Geek Rewind who turns complex IT tasks into clear, step-by-step guides. He draws on years of hands-on experience in system administration and enterprise IT operations, focusing on Windows, Linux and WordPress: the problems people actually run into, and the fixes that work. His server and WordPress guides come from systems he runs himself. Richard builds and maintains the platform behind Geek Rewind, from its Ubuntu servers and Nginx configuration to its custom WordPress plugins. Many new tutorials start with readers' questions, and he's always glad to answer them in the comments.



No comments yet — be the first to share your thoughts!