How to Enable or Disable DNR in Windows 11

Discovery of Network-designated Resolvers (DNR) is a Windows 11 networking feature. It lets your PC learn from the network it is connected to which encrypted DNS servers it can use, instead of you typing their addresses in by hand. When your PC finds one, it can send its DNS lookups over an encrypted connection. That makes it harder for other devices on the network path to read which sites you look up.
You do not need extra software to turn it on or off. The switch is a single Registry value, and the steps below walk through it.
Enable or disable DNR in Windows 11 by editing the Registry Editor. Navigate to 🗝️HKEY_LOCAL_MACHINESYSTEMCurrentControlSetServicesDnscacheParameters, find or create the EnableDnr DWORD value, and set it to 1 to enable or 0 to disable, then restart your computer.
What is DNR?
DNR (Discovery of Network-designated Resolvers) sends your DNS requests through protected channels, so ordinary internet use is more private. The network has to advertise an encrypted resolver for this to work. If yours does not, the setting has nothing to discover and your PC keeps using regular DNS.
Encrypted DNS does not make you invisible. Whoever runs the DNS server you end up using can still see your lookups. Your ISP can still see which IP addresses you connect to. Treat DNR as one privacy improvement, not a complete one.
To test unreleased features you need to join the Windows Insider Preview program. Membership gives you early builds before they reach the public. On a regular, non-Insider build, changing this value is unlikely to do anything.
How to Turn On DNR in 🪟 Windows 11
If you are in the Windows Insider Preview program, you can apply the steps below. You need an administrator account. Registry Editor works the same on Windows 11 Home and Pro.
Step 1Open the Registry Editor
First, open Registry Editor:
- Press
Windows + Ron your keyboard. The Run box opens in the lower-left corner of the screen. - Type
regeditand press Enter. - ⚠️ Admin Required: If a User Account Control message asks for permission, click Yes. If you are on a standard account, Windows asks for administrator credentials instead.
Registry Editor should now be open, with a folder tree on the left and values on the right. You can also open it by pressing the Windows key, typing regedit, and pressing Enter.
Before you change anything, back up the Registry. In Registry Editor, click File Export, choose a location, and save the file. If something goes wrong, double-click that file to restore the saved settings.
Step 2Go to the DNS Cache Location
- Navigate to this location in Registry Editor. You can expand the folders in the left pane, or paste the path into the address bar at the top of the window:
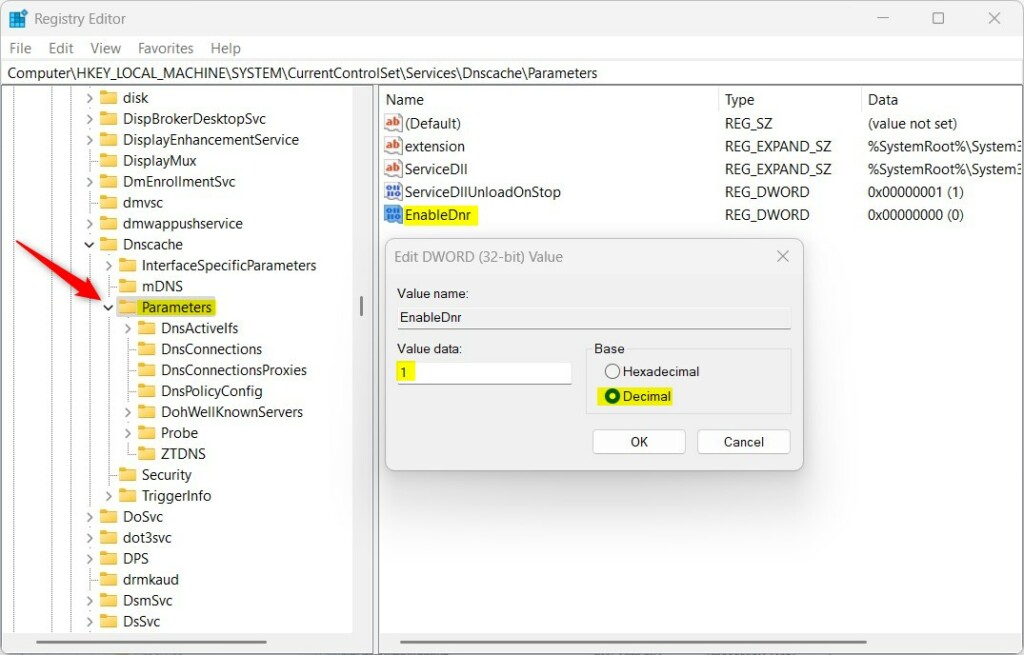
Computer\HKEY_LOCAL_MACHINE\SYSTEM\CurrentControlSet\Services\Dnscache\Parameters
When you reach the right key, its values appear in the right pane. The path starts under HKEY_LOCAL_MACHINE\SYSTEM\CurrentControlSet\Services\Dnscache\Parameters. If a folder along the way does not exist, check that you typed the path exactly.
Step 3Find or Create the EnableDnr Setting
The setting is a value called EnableDnr. Setting it to 1 turns DNR on, and setting it to 0 turns it off. Registry Editor is a tool for changing advanced system settings, so edit only the value named here.
- Look for
EnableDnrin the right pane. - Double-click it. An Edit dialog opens with a Value data box.
- To turn on DNR, change the value to
1. - To turn DNR off, change the value to
0. - Click OK. The right pane now shows the new number next to the value name.
If EnableDnr is missing: That is normal on many builds, because the value is not created by default. Add it yourself:
- Right-click an empty space in the right pane.
- Choose
New → DWORD (32-bit) Value. A new value appears with its name highlighted, ready to edit. - Name it
EnableDnrand press Enter. - Double-click the new value and set its data to
1to enable DNR. - Click OK.
To undo the change later, return to the same value and set it to the off number. You can also restore the .reg file you exported earlier.
Step 4Restart Your Computer
- Close Registry Editor.
- Restart your computer to apply the changes. Registry changes like this are usually read at startup, so the setting will not take effect until you do.
After the restart, DNR is on or off according to the value you set.
Windows 11 supports encrypted DNS using DNS-over-HTTPS (DoH). DoH hides your DNS lookups from anyone watching the connection, which protects the names of the sites you visit. DNR adds the discovery step. The network tells your PC which encrypted resolver to use, so you do not have to configure one manually.
More About DNR
In short, DNR (Discovery of Network-designated Resolvers) encrypts your DNS traffic by automatically finding a secure DNS server for your current connection. It relies on modern standards such as DoH (DNS over HTTPS). Right now it is available only on Windows Insider Preview builds.
To get it, you must be enrolled in the Windows Insider Preview program. If you are not enrolled yet, this guide explains how: How to Get Windows 11 Insider Preview. Keep in mind that Insider builds can be less stable than the public release, so avoid testing them on your only working PC.
Helpful Links and References
Summary
DNR helps your PC automatically find and use secure DNS servers, which improves your online privacy by encrypting your DNS requests. On Windows Insider Preview builds, you can manage it by editing one value in the Windows Registry and restarting.
- DNR helps your PC find and use secure DNS servers automatically.
- It improves your privacy by encrypting DNS requests, though your DNS provider and ISP can still see some activity.
- It is only available in Windows 11 Insider Preview builds for now.
- You turn DNR on or off with the EnableDnr value in the Windows Registry, then restart your PC.
- Export a Registry backup first. If you are in the Insider program and want more private DNS, turning on DNR is a reasonable step.
Have a question about this guide?
Answered by AI from this guide. Good questions may be added to this page — please don't include personal details.
Did this guide fix your problem?

About the Author
Richard
Tech Writer, IT Professional
Richard is a writer at Geek Rewind who turns complex IT tasks into clear, step-by-step guides. He draws on years of hands-on experience in system administration and enterprise IT operations, focusing on Windows, Linux and WordPress: the problems people actually run into, and the fixes that work. His server and WordPress guides come from systems he runs himself. Richard builds and maintains the platform behind Geek Rewind, from its Ubuntu servers and Nginx configuration to its custom WordPress plugins. Many new tutorials start with readers' questions, and he's always glad to answer them in the comments.
No comments yet — be the first to share your thoughts!