How to Turn On DNS over HTTPS (DoH) in Windows 11

- 9 steps
- Needs administrator rights
DNS over HTTPS (DoH) in Windows 11 hides the web addresses you look up from your internet provider and anyone else watching your network. It does this by encrypting the lookup requests. Windows 11 includes this setting in the normal network menus, so you do not need extra software. It works on both Home and Pro editions. Windows 11 version 21H2 and newer versions have it, though the wording of the menu options changed slightly between releases.
Every website address you type goes through the Domain Name System (DNS), which acts like a phone book and turns names into numeric IP addresses. Standard DNS requests travel in plain text, so anyone on the path can read them. DoH wraps those requests in the same kind of encryption your browser uses for secure sites, which keeps the lookups private.
Open Settings Network & internet, select your connection (Wi-Fi or Ethernet), click Edit next to DNS server assignment, change from Automatic to Manual, turn on IPv4 or IPv6, then enter DoH-supporting DNS addresses like 1.1.1.1. The change takes effect immediately without restart.
What is DNS over HTTPS (DoH)?
DNS over HTTPS (DoH) is a security feature that encrypts your DNS lookups. Normally, the request that asks “where is this website?” travels in plain text, and your internet provider, a public Wi-Fi operator or anyone else on the network can read it. DNS over HTTPS on Windows 11 sends these lookups inside an encrypted HTTPS connection instead. Outsiders can no longer see which websites you ask for, and they cannot easily alter the answers on the way back.
One limit to keep in mind: DoH protects the lookup, not the whole connection. Your provider can still see the IP address you connect to, so DoH adds privacy but does not make you anonymous.
DNS over HTTPS (DoH) encrypts internet address lookups. The request goes through a secure connection, much like your browser connects securely to a website. This keeps your lookups out of view of anyone who has no business reading them.
Many ISP-provided servers do not, which is why the steps below have you pick a public provider that does.
How to Turn On DNS over HTTPS in 🪟 Windows 11
You can turn on DNS over HTTPS in Windows 11 from the Settings app, using the properties page of your network connection. In short: open Settings, go to Network & internet, pick Wi-Fi or Ethernet to match your connection, open that connection’s properties, find DNS server assignment, and change it to a provider that supports encryption.
You may need to be signed in with an administrator account, or enter administrator credentials when prompted, to save DNS changes. The change takes effect straight away and does not need a restart.
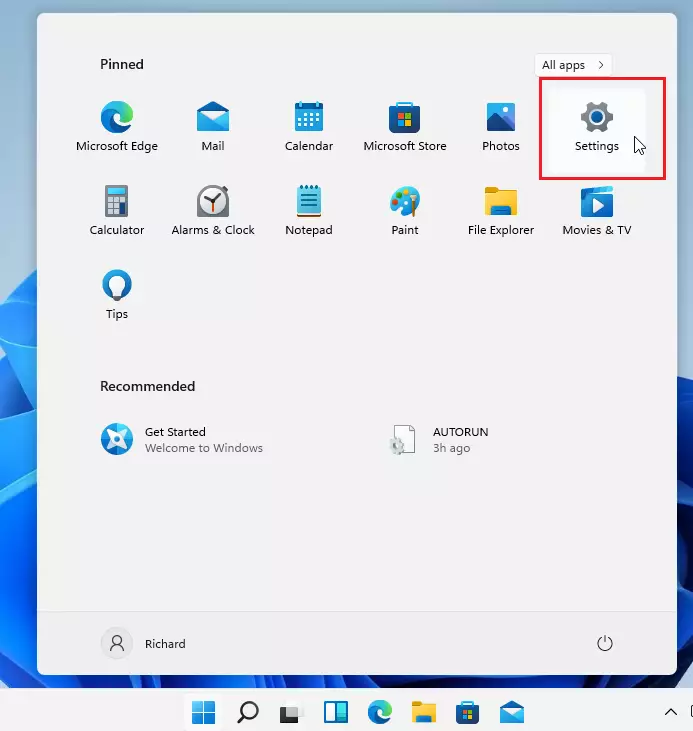
- Open Settings : Click the Start button (Windows logo) at the bottom of your screen, then click the Settings gear icon. You can also press the Win and I together. The Settings window should open with a list of categories on the left.
- Go to Network settings: In the Settings window, click Network & internet in the left menu. The right side should now show your connections, such as Wi-Fi and Ethernet, with the one in use marked as connected.
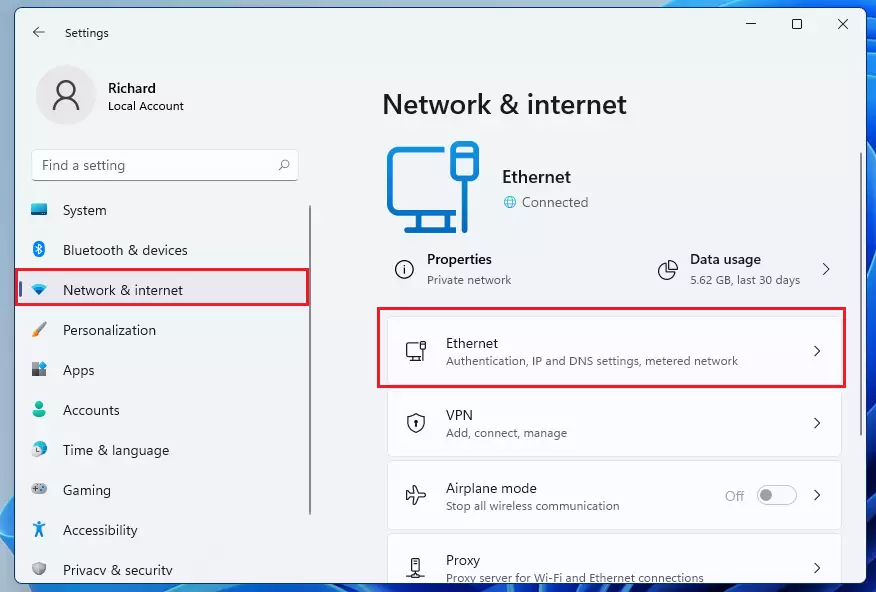
- Choose your connection: Click the connection you are using right now. If you have a wired connection, click Ethernet. If you use wireless, click Wi-Fi instead. On Wi-Fi , open the properties page for the network you are connected to. If you do not see Ethernet at all, you are not using a wired connection. Pick the one marked as connected.
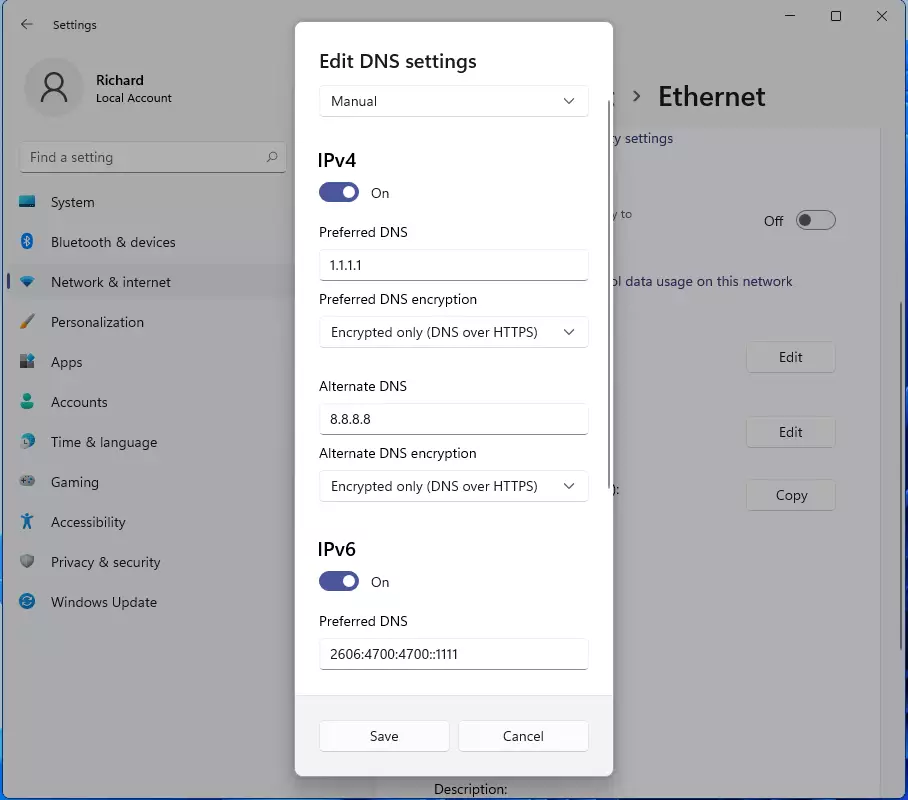
- Find DNS settings: Scroll down the properties page until you see DNS server assignment. Click the Edit button next to it. A window titled Edit DNS settings should open. If you see no Edit button, make sure you are on the properties page of the connection and not the main Wi-Fi or Ethernet list.
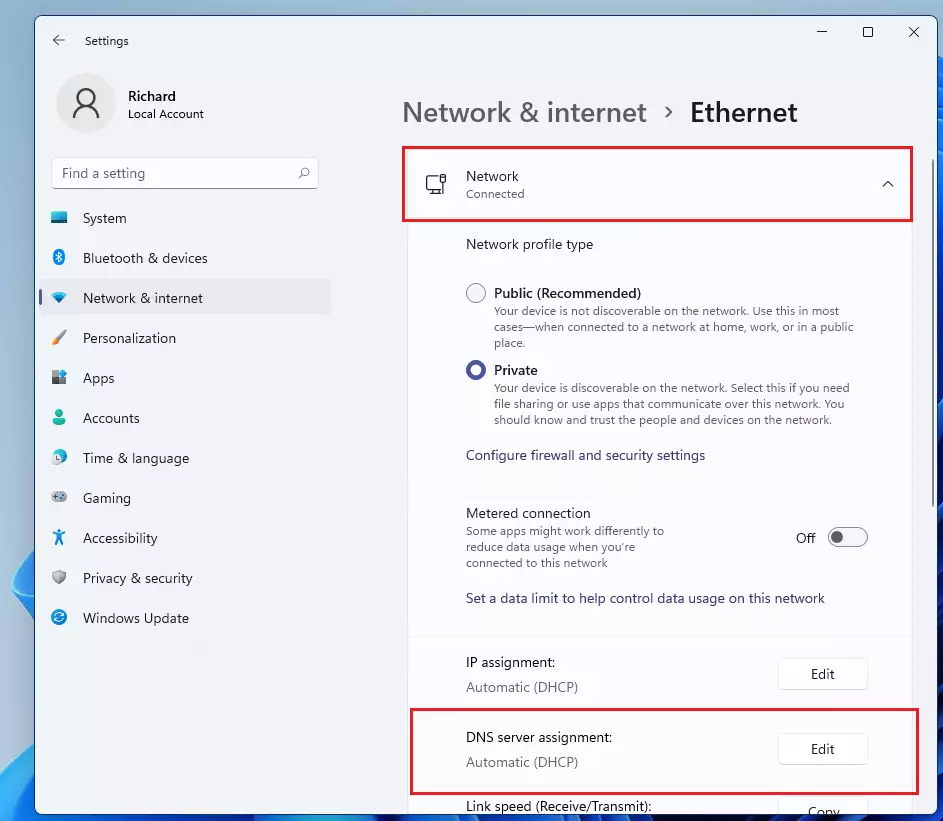
- Change to manual: In the Edit DNS settings window, click the dropdown menu. Change it from Automatic (DHCP) to Manual. Switches for IPv4 and IPv6 should appear below it.
- Turn on IPv4 or IPv6: Turn on the switch for IPv4 or IPv6. You can turn on both if you want. Most home networks use IPv4, so if you are unsure, start with that one. Once a switch is on, boxes for the DNS addresses appear.
- Add DNS addresses: Type in the DNS addresses you want to use, one in the preferred box and a second one in the alternate box if you wish. See the list below for popular choices. Check each address carefully. A typo here is the most common reason the connection stops resolving names later.
- Enable encryption: Under Encryption, select Encrypted only (DNS over HTTPS). Windows recognises well-known providers such as Cloudflare, Google and Quad9 and fills in the DoH setting for them. With this option, Windows refuses to fall back to unencrypted DNS. If the server you typed does not support DoH, websites will not load. In that case, check the address, or pick the “encrypted preferred” option if your build shows one.
- Save your changes: Click Save to apply the settings . The window closes and the properties page should now list your DNS servers. Open a website to confirm that pages still load. To undo this later, return to Edit and switch the dropdown back to Automatic (DHCP).
Popular DNS Servers You Can Use
Popular DNS servers for Windows 11 include trusted providers such as Cloudflare, Google Public DNS and Quad9. All three support DNS over HTTPS and offer fast, reliable connections. Using one of them instead of your internet provider’s default servers often makes page loading a little quicker, though results vary by location.
The main differences are policy rather than speed. Quad9, for example, blocks known malicious domains, while Cloudflare and Google do not do that by default. Read each provider’s privacy policy and choose the one you are comfortable with.
| DNS Provider | Type | Primary DNS | Secondary DNS |
|---|---|---|---|
| Google Public DNS (IPv4) | IPv4 | 8.8.8.8 | 8.8.4.4 |
| Cloudflare (IPv4) | IPv4 | 1.1.1.1 | 1.0.0.1 |
| Quad9 (IPv4) | IPv4 | 9.9.9.9 | 149.112.112.112 |
| Google Public DNS (IPv6) | IPv6 | 2001:4860:4860::8888 | 2001:4860:4860::8844 |
| Cloudflare (IPv6) | IPv6 | 2606:4700:4700::1111 | 2606:4700:4700::1001 |
| Quad9 (IPv6) | IPv6 | 2620:fe::fe | 2620:fe::fe:9 |
After saving your changes, your DNS configuration should match this layout. In current builds of Windows 11, each DNS server that is using DoH is marked as encrypted next to its address on the connection’s properties page:
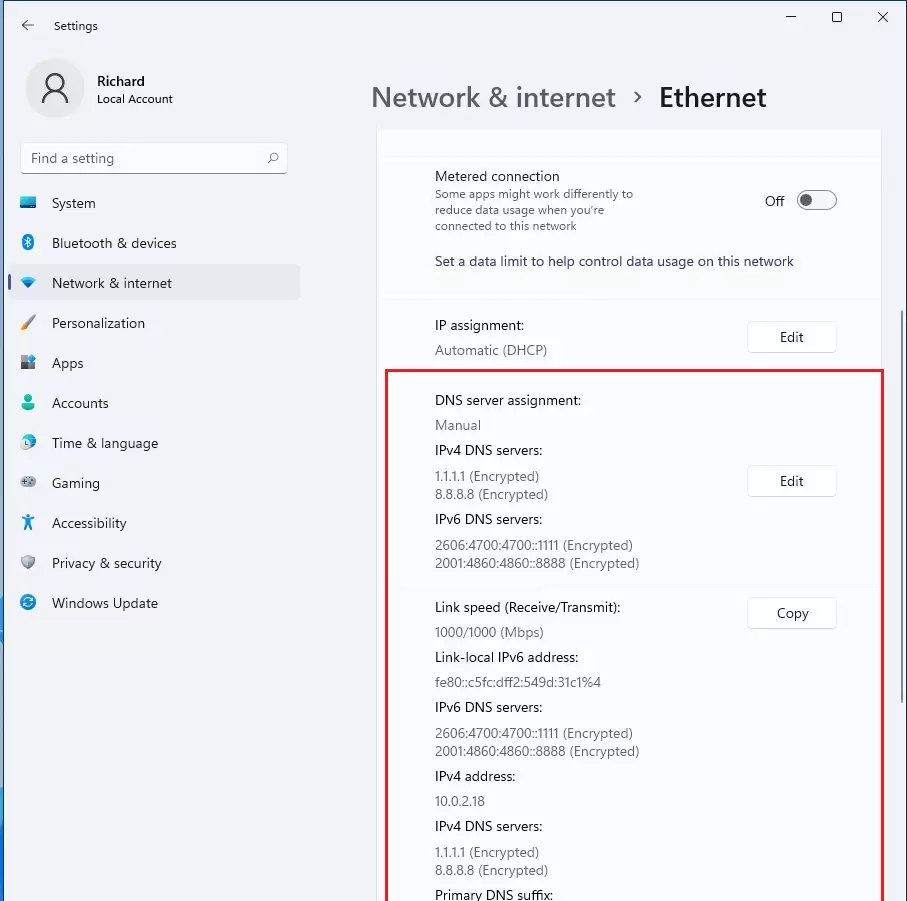
If you switch between Wi-Fi and Ethernet, or use several adapters, repeat these steps for each active connection. Otherwise the connection you did not change keeps sending plain DNS requests, which defeats the purpose.
Summary
- Turning on DNS over HTTPS (DoH) makes your web browsing more private and secure.
- It stops others on the network from spying on or tampering with your DNS lookups.
- You can choose from trusted DNS services like Google, Cloudflare or Quad9.
- The setup is quick. You do it right inside Windows 11's Network settings, and no restart is needed.
- Remember to update every network connection you use for full protection.
- If you want to learn more about DNS over HTTPS, check out this simple Cloudflare explanation page.
Turning on DNS over HTTPS in Windows 11 is a quick way to protect your lookups from prying eyes. The process takes about two minutes in your network settings and works with major providers like Cloudflare, Google and Quad9. Once it is enabled on each connection you use, your DNS lookups stay encrypted. If anything stops loading, switch the dropdown back to Automatic (DHCP) to return to the default setup.
Have a question about this guide?
Answered by AI from this guide. Good questions may be added to this page — please don't include personal details.
Did this guide fix your problem?

About the Author
Richard
Tech Writer, IT Professional
Richard is a writer at Geek Rewind who turns complex IT tasks into clear, step-by-step guides. He draws on years of hands-on experience in system administration and enterprise IT operations, focusing on Windows, Linux and WordPress: the problems people actually run into, and the fixes that work. His server and WordPress guides come from systems he runs himself. Richard builds and maintains the platform behind Geek Rewind, from its Ubuntu servers and Nginx configuration to its custom WordPress plugins. Many new tutorials start with readers' questions, and he's always glad to answer them in the comments.
No comments yet — be the first to share your thoughts!