How to Change Primary Account in Outlook on Windows 11


In New Outlook on Windows 11, change your primary account under Settings Accounts Email accounts: click Manage on the account, then Set as primary account and Continue. Outlook restarts and applies the change. In Classic Outlook, you must create a new profile in the Mail control panel and add the account first, after backing up your.pst files.
Prerequisites
To change primary account in Outlook on Windows 11, the steps depend on which version you run. In the New Outlook, you set it under Settings Accounts Email accounts In Classic Outlook, you create a new profile and add the account you want as primary first. Before you start, gather your account passwords and back up your data files. You also need administrator access.
- A stable internet connection.
- Your email account passwords. You will sign in again if you create a new profile.
- A backup of your data files (.pst or .ost). Copy them somewhere safe before you touch any profile.
- Administrative access to your computer for profile changes.
Why change your primary account?
Your primary account acts as the main identity for Outlook, managing your calendar, contacts, and privacy settings. Consider changing it if you have a new main email address or need to switch your default identity for work or personal use.
Not sure which version you have? The New Outlook uses a Settings gear icon in the top right corner. Classic Outlook has the older File menu. Use the matching method below.
What happens when you are done?
Once finished, Outlook will restart. The new account becomes your primary one. Your old emails will remain, but your calendar and contacts will now sync with the new primary account settings.
In Classic Outlook, the old profile still exists, so you can set it as the default again in the Mail control panel .
How to change the primary account in New Outlook
In the New Outlook on Windows 11, you change your primary account in the app’s settings. You do not need a new profile. The path is Settings Accounts Email accounts, then Manage on the account you want. The steps are below.
- Open the Outlook app on Windows 11.

- Click the Settings gear icon in the top right corner. A settings window opens.

- Go to Accounts and select Email accounts. You should see every account you have added.
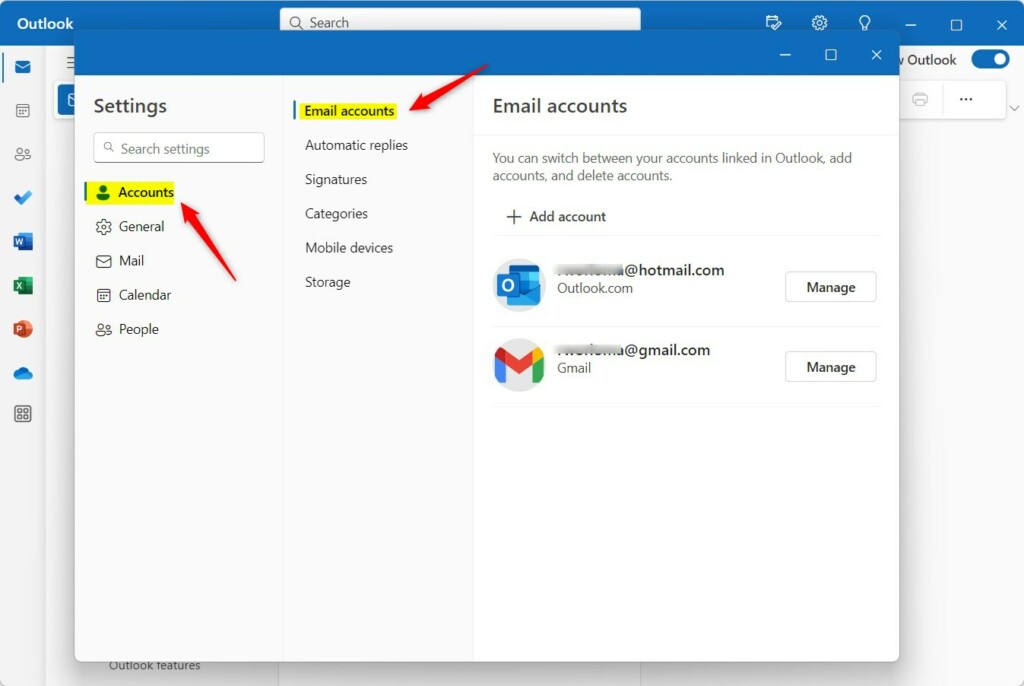
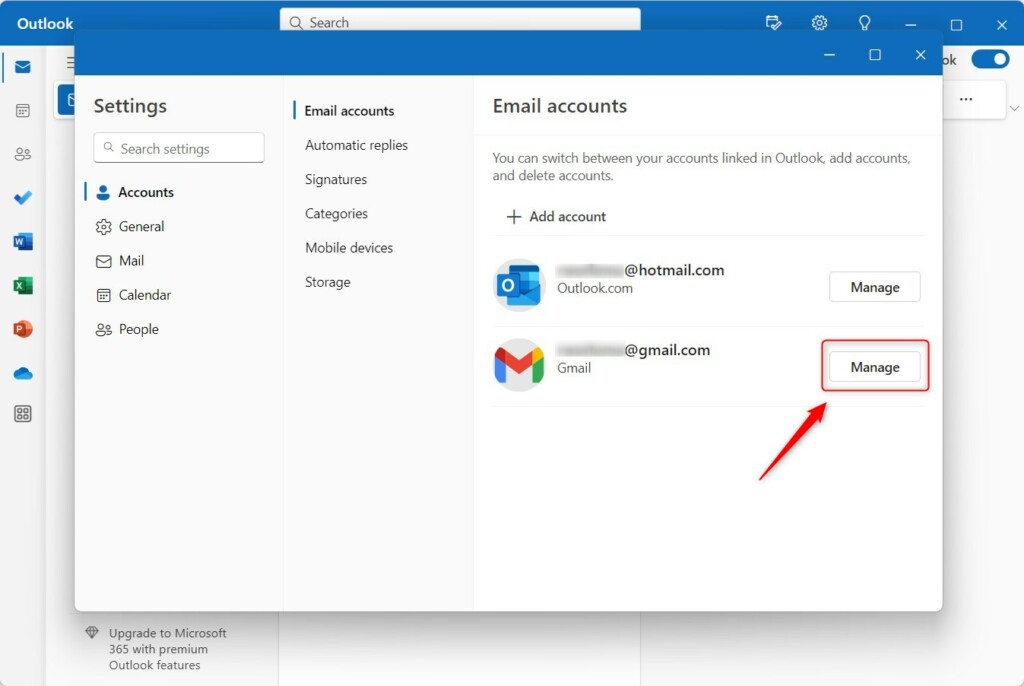
- Find your desired account and click Manage.
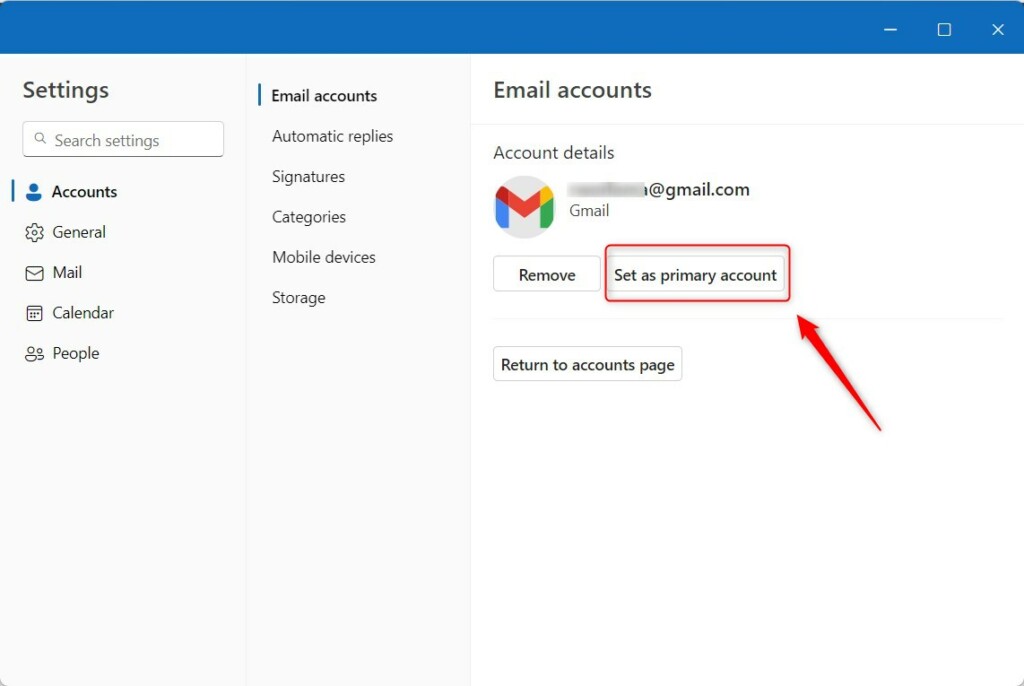
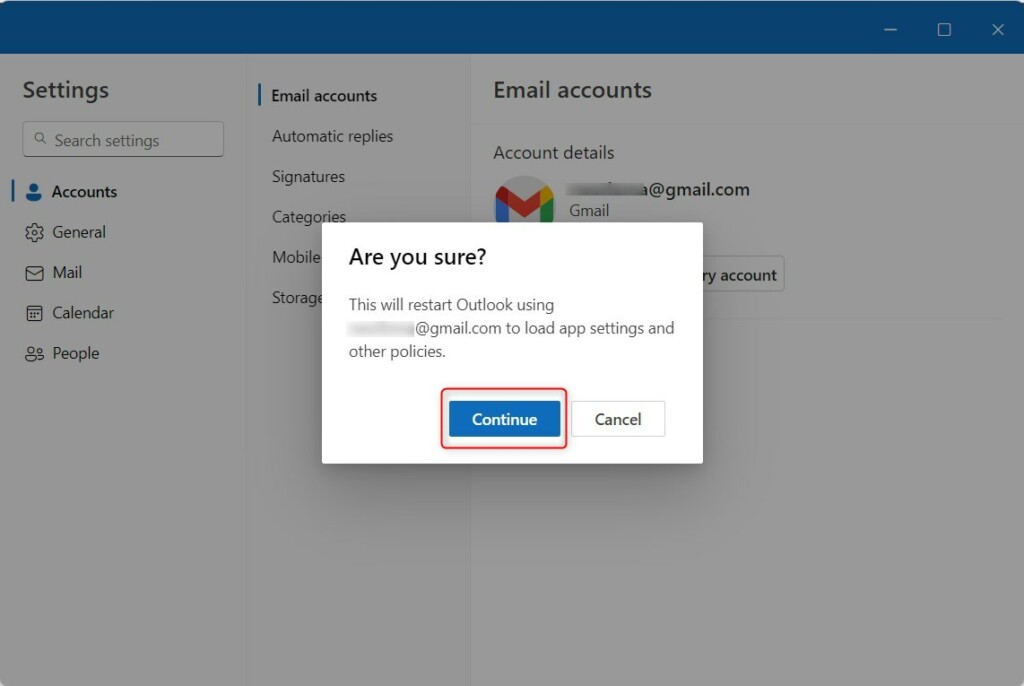
- Click Set as primary account and confirm by clicking Continue.
If you do not see this option, check that you are in the New Outlook and not Classic. Also check that the Outlook app is up to date.
- Wait while the app restarts to apply the changes. When it reopens, the account you chose is the primary one.
How to change the primary account in Classic Outlook
Classic Outlook has no single switch for this. Changing your primary account means creating a new Outlook profile, with the account you want as primary added first. Close Outlook before you begin. You will do the rest in the Mail control panel, which is why you need admin access.
- Close Outlook completely. Check that it is not still running in the background.
- Open the Control Panel and search for Mail. Open the Mail item (it is often called the Mail applet).
- Click Show Profiles and then Add to create a new profile. Give it a name you will recognize.
- Add your new email account to the profile first. Outlook automatically makes the first account added to the profile the primary one. This lets you manage all your emails from a single main inbox. You can add your other accounts after it.
- Set the new profile as the default within the Mail control panel. Then start Outlook and confirm it opens with the new profile.
Your old profile stays on the computer until you remove it. If something looks wrong, you can switch back to it.
Summary
To change your primary account in Outlook, the method depends on whether you're using the New or Classic version. In the New Outlook, use Settings Accounts Email accounts and click Set as primary account. In Classic Outlook, create a new profile with your preferred account added first, then make that profile the default. Back up your data files before you start either way.
Have a question about this guide?
Answered by AI from this guide. Good questions may be added to this page — please don't include personal details.
Did this guide fix your problem?

About the Author
Richard
Tech Writer, IT Professional
Richard is a writer at Geek Rewind who turns complex IT tasks into clear, step-by-step guides. He draws on years of hands-on experience in system administration and enterprise IT operations, focusing on Windows, Linux and WordPress: the problems people actually run into, and the fixes that work. His server and WordPress guides come from systems he runs himself. Richard builds and maintains the platform behind Geek Rewind, from its Ubuntu servers and Nginx configuration to its custom WordPress plugins. Many new tutorials start with readers' questions, and he's always glad to answer them in the comments.
[…] a new window for a message, language translations, turning text predictions on or off, switch primary account, sharing a calendar, changing language, date and time format, public a calendar, show week […]
[…] a new window for a message, language translations, turning text predictions on or off, switch primary account, sharing a calendar, changing language, date, and time format, public a calendar, show week […]
[…] a new window for a message, language translations, turning text predictions on or off, switch primary account, sharing a calendar, changing language, date, and time format, showing week numbers in Outlook […]
[…] new window for a message, language translations, turning text predictions on or off, switch primary account, sharing a calendar, changing language, date and time format, public a […]
[…] opening a new window for a message, language translations, turning text predictions on or off, switch primary account, sharing a calendar, changing language, date and time format, and publishing a […]