How to Add or Remove the Sleep Button in Windows 11

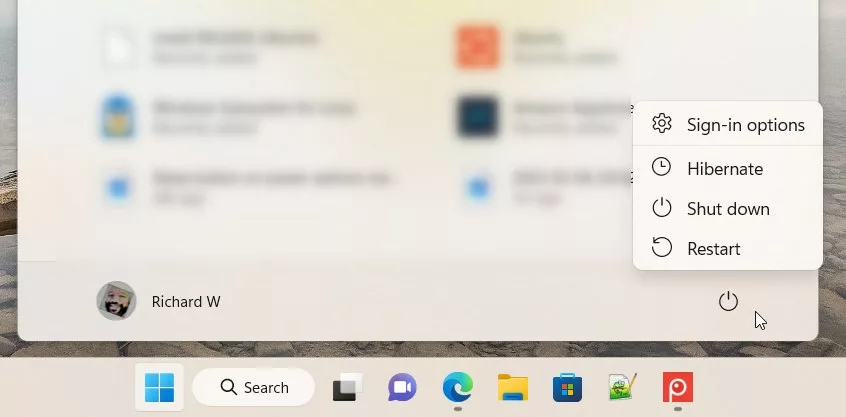
The Sleep button in Windows 11 puts your computer into a low-power state to save electricity while keeping your open apps open. It appears in the Start menu power options, next to Shut down and Restart. You can control whether it shows up on your PC.
Hiding the Sleep button stops you from clicking it by mistake. Adding it back gives you a fast way to rest your machine. The easiest way to switch it on or off is the classic Control Panel , and it takes a couple of minutes. This guide also covers the Registry Editor and the Local Group Policy Editor for cases where Control Panel is not enough.
Open Control Panel , click Hardware and Sound, then Power Options. Select Choose what the power buttons do, click Change settings that are currently unavailable, then check the Sleep box to show it or uncheck to hide it. Click Save changes to apply the setting immediately.
Add or Remove the Sleep Button Using Control Panel
The first method uses Control Panel to change your power options. It lets you choose whether Sleep appears in the power menu when you click Start . It works on both Windows 11 Home and Pro, and you need an administrator account (or the administrator’s password) to save the change. You do not need to restart afterwards.
- Open Control Panel . Click the Start menu button, type Control Panel , and press Enter. The Control Panel window should open. Learn how to open Control Panel
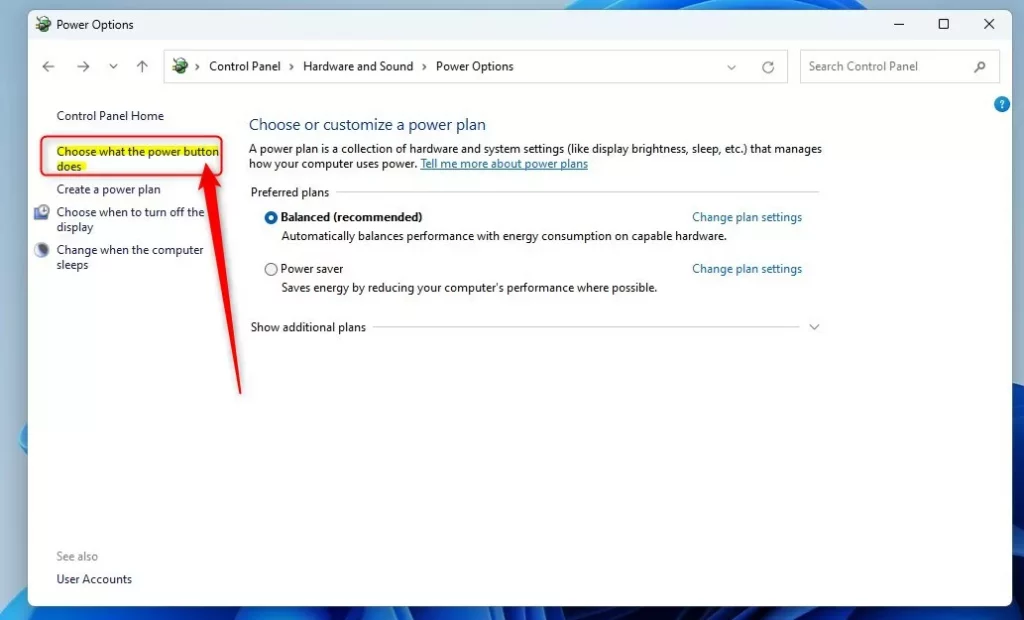
- Inside Control Panel , click Hardware and Sound, then select Power Options. If Control Panel is set to show large or small icons instead of categories, you will not see Hardware and Sound. In that case, click Power Options directly.
- Click Choose what the power buttons do on the left side. The System Settings window opens, with a Shutdown settings section near the bottom. The checkboxes there are greyed out for now. That is normal and is fixed in the next step.
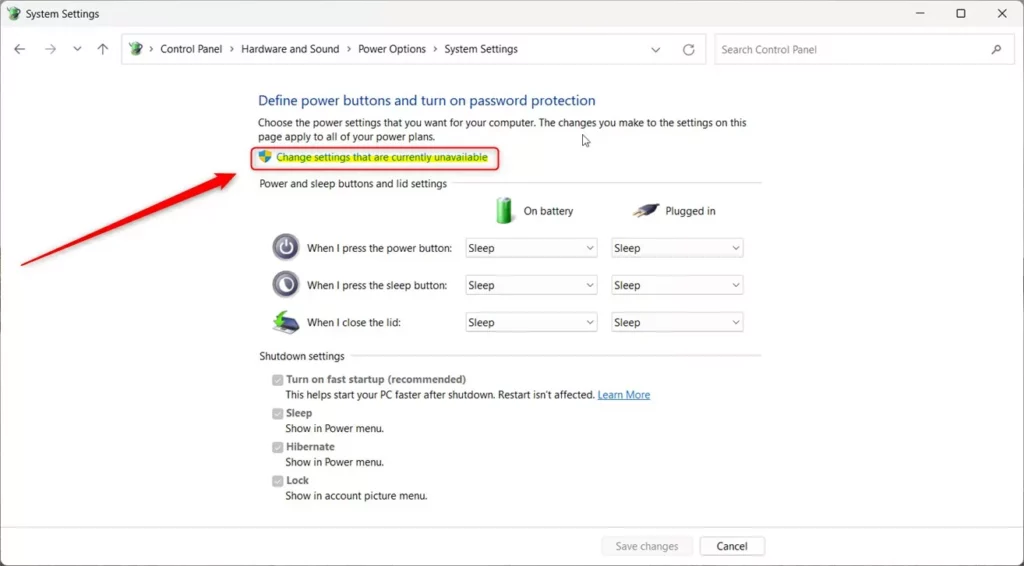
- Click Change settings that are currently unavailable near the top. If you are signed in with a standard account, Windows asks for administrator credentials. Once you confirm, the checkboxes under Shutdown settings are no longer greyed out. If they stay greyed out, you are not running with administrator rights.
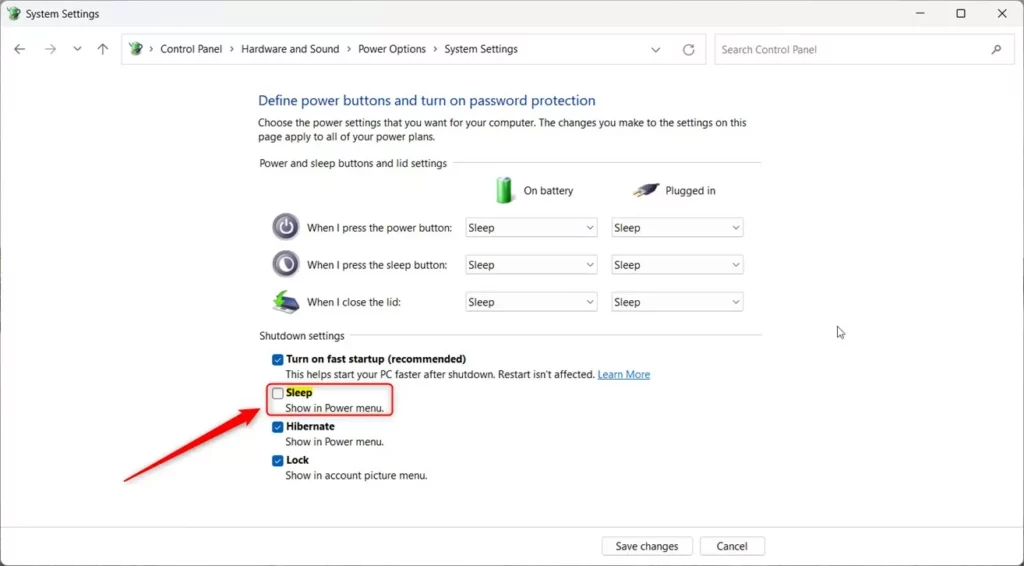
- Under Shutdown settings, check the Sleep box to show the Sleep button, or uncheck it to hide the button. If the Sleep box is missing entirely, your PC or its drivers may not support sleep, or sleep may be turned off by your system configuration.
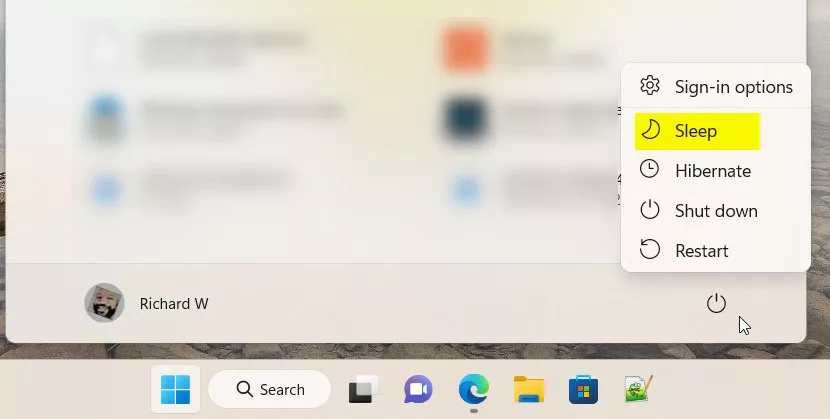
- Click Save changes to apply your settings. The change takes effect straight away. Open Start and click the Power icon to confirm that Sleep is now listed or gone. To undo the change, repeat these steps and set the box back the way it was.
Show or Hide Sleep Button Using Windows Registry Editor
You can also show or hide the Sleep button by editing a value in the Registry Editor. Use this method when the Control Panel option does not work for you, or when you prefer to manage the power menu directly through system settings. It works on Home and Pro editions.
Follow these steps exactly and back up your registry first. In Registry Editor, you can do this by clicking File, then Export, choosing All as the export range, and saving the file somewhere safe. To restore it later, double-click that file.
- [ADMIN REQUIRED] Open the Registry Editor by typing
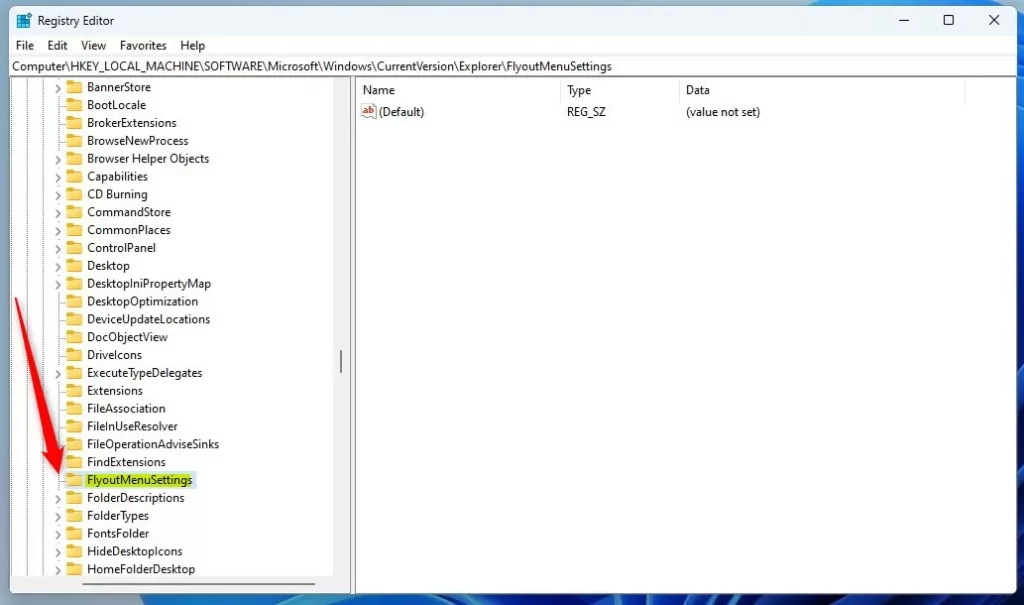
regeditin the Start menu and pressing Enter. Click Yes if User Account Control asks for permission. The Registry Editor window should open, with a folder tree on the left. - Navigate to this folder path:
HKEY_LOCAL_MACHINE\SOFTWARE\Microsoft\Windows\CurrentVersion\Explorer\FlyoutMenuSettings. You can expand each folder in the left pane, one level at a time. - If FlyoutMenuSettings does not exist, right-click on Explorer, choose New Key, and name it FlyoutMenuSettings. The new key should appear under Explorer. If it already exists, skip this step.
- Select FlyoutMenuSettings, then right-click an empty area on the right side, select New DWORD (32-bit) Value, and name it ShowSleepOption. If the value is already there, skip to the next step.
- Double-click ShowSleepOption and type one of these numbers in the Value data box:
- 1 - Show the Sleep button
- 0 - Hide the Sleep button
- Click OK, close the Registry Editor, and restart your computer. After you sign back in, open Start and click the Power icon to check the result. To undo the change, open the same value and switch it between 1 and 0, or restore the registry backup you exported earlier.
Use Local Group Policy Editor to Manage Sleep Button
This tool lets administrators hide or show the Sleep option for user accounts on a computer, and it is useful when you want the setting to stay fixed. Windows 11 Home does not include the Local Group Policy Editor, so Home users should use Control Panel or the registry method instead.
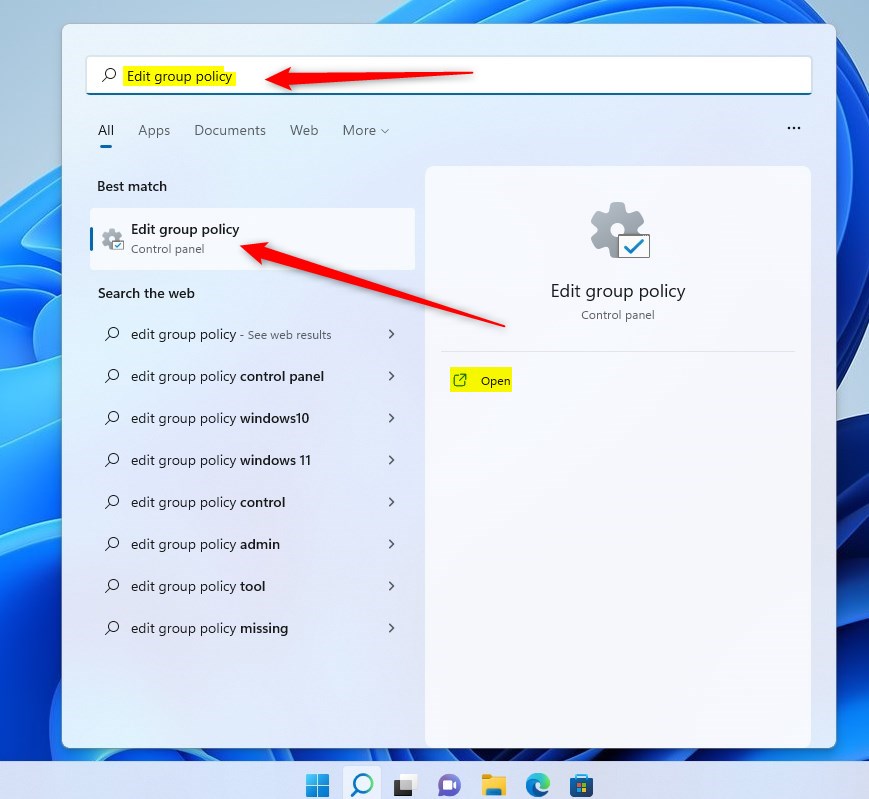
- [ADMIN REQUIRED] Click the Start menu and type Edit group policy, then open the Edit group policy app. The Local Group Policy Editor window should open. If the app does not appear in the search results, you are probably on Windows 11 Home.
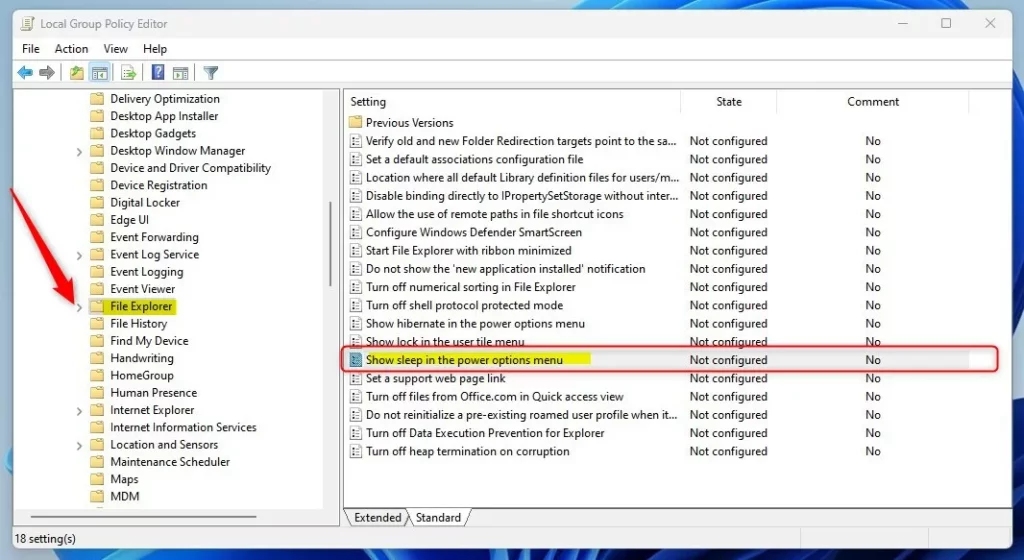
- In the left panel, go to:
Computer Configuration > Administrative Templates > Windows Components > File Explorer. Expand each folder by clicking the arrow next to it, then select the final folder so its settings are listed on the right. - In the right panel, find and double-click Show sleep in the power options menu. A settings window for that policy opens.
- Choose one of these options:
- Not Configured (default) – Sleep button will show.
- Enabled – Sleep button will show.
- Disabled – Sleep button will be hidden.
- Click OK, close the window, and restart your PC for changes to take effect. To undo the change later, open the same policy again and set it back to Not Configured.
What Does This Look Like?
Summary
You have several ways to add or remove the Sleep button in Windows 11, so you can set the power menu up the way you want. Control Panel is the easiest method and works on every edition. The Registry Editor and the Group Policy Editor are better when you need more control, such as keeping the setting fixed across accounts on Pro or Enterprise. Whichever method you use, open the Start menu power options afterwards to confirm that the Sleep button shows or hides as you intended.
Was this guide helpful?
0% of readers found this helpful (1 votes)

About the Author
Richard
Tech Writer, IT Professional
Richard is a writer at Geek Rewind who turns complex IT tasks into clear, step-by-step guides. He draws on years of hands-on experience in system administration and enterprise IT operations, focusing on Windows, Linux and WordPress: the problems people actually run into, and the fixes that work. His server and WordPress guides come from systems he runs himself. Richard builds and maintains the platform behind Geek Rewind, from its Ubuntu servers and Nginx configuration to its custom WordPress plugins. Many new tutorials start with readers' questions, and he's always glad to answer them in the comments.



No comments yet — be the first to share your thoughts!