How to Map Shared Folders in VirtualBox on Windows 11


Shared folders in VirtualBox let you open and move files between your main computer (the host) and a Windows 11 virtual machine (the guest) without a USB drive or cloud storage.
The feature creates a direct bridge between your physical PC and the guest operating system, giving you fast access to up to 4 terabytes of local storage across both environments. Large files such as ISO images, backups and project folders move without any upload or download step.
Open VirtualBox, select your Windows 11 virtual machine, click Settings Shared Folders Add new folder, enter the host folder path, type a folder name, set a drive letter like G:, check Auto-mount, then click OK. Start the VM and the shared folder appears in File Explorer .
How to map a folder in a VirtualBox VM on 🪟 Windows 11
The guest needs Guest Additions installed first. These are extra drivers that improve performance and integration, and shared folders do not work without them.
Here is how to do it, step by step.
Before you start
- Install Guest Additions on the virtual machine and restart the guest afterwards. This post shows you how to install VirtualBox on Windows 11.
- Create the folder you want to share on the host, or decide which existing folder to use.
- Shut the virtual machine down if it is running. The steps are simpler and the change applies cleanly at the next boot.
Open the shared folder settings
- Open VirtualBox on the host computer.
- Select your Windows 11 virtual machine in the list on the left.
- Click Settings, in the toolbar. You can also right-click the machine and select Settings. The machine's settings window opens.
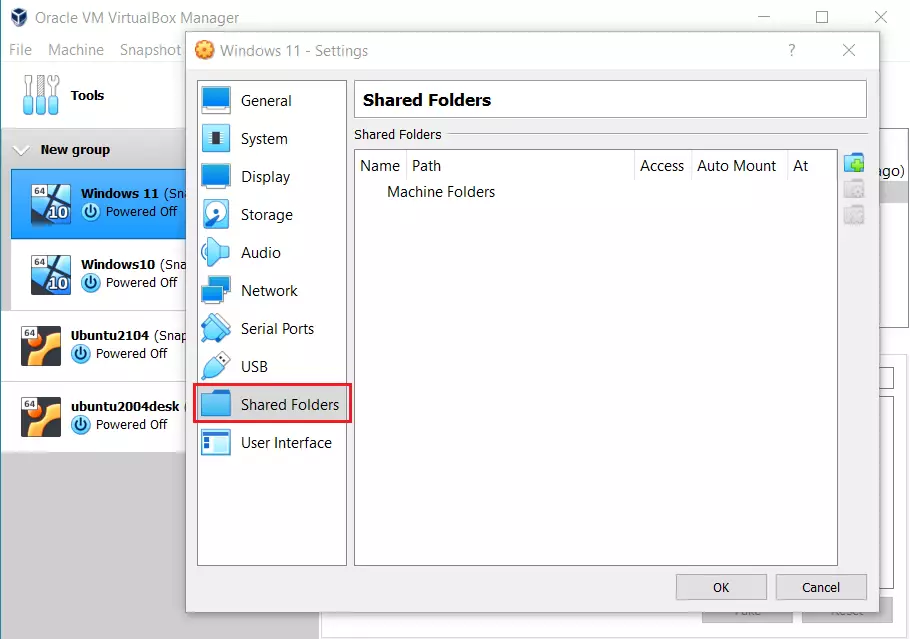
- In the settings window, click Shared Folders. You should see a list of shared folders, which is empty if you have never added one.
Add the folder
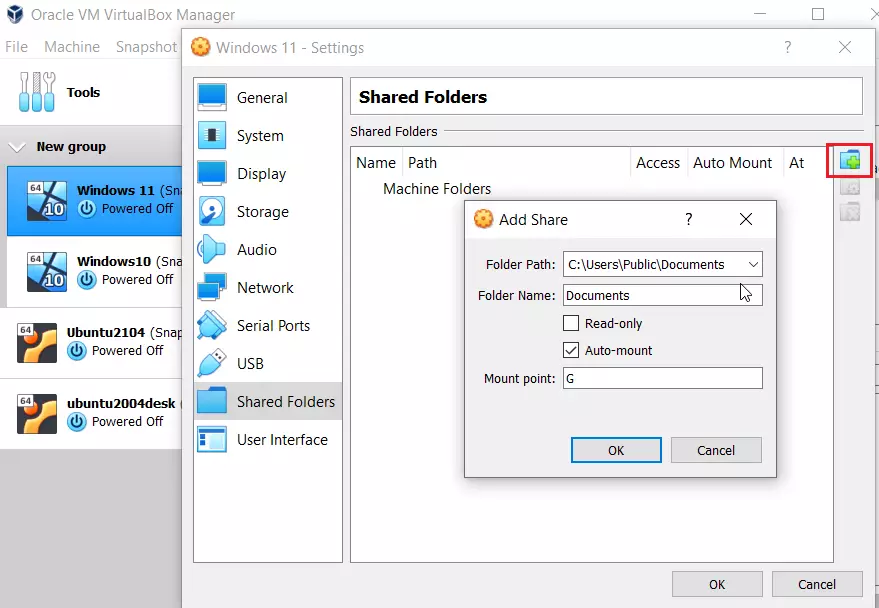
- In the Shared Folders window, click the Add new folder button (the green plus icon). The dialog for adding a share opens.
- In the Folder Path field, enter the path of the local folder you want to share with the virtual machine. Alternatively, click the down-arrow and select Other to browse for the folder. Select it and confirm, and the path fills in for you.
- Type a name in the Folder Name field, or accept the default. VirtualBox fills in the name of the folder you picked.
- Decide on Read-only. This checkbox is optional. When it is checked, the virtual machine cannot save files to the shared folder. It is a good choice if the guest only needs to read your files, since it protects the originals on the host.
- Decide on Auto-mount. This checkbox is optional. When it is checked, the shared folder connects (mounts) automatically every time the virtual machine starts. Without it, you have to connect the folder by hand each time.
- In the Mount point field, choose the drive letter the shared folder will use inside the virtual machine. Pick a letter that is not already taken by a disk or optical drive in the guest. For this tutorial, we select G:
Otherwise the folder may disappear from the configuration when the virtual machine shuts down.
Save and start the virtual machine
- Click OK in the add dialog to save the share.
- Click OK again in the settings window to close it.
- Start the virtual machine and log in to Windows 11.
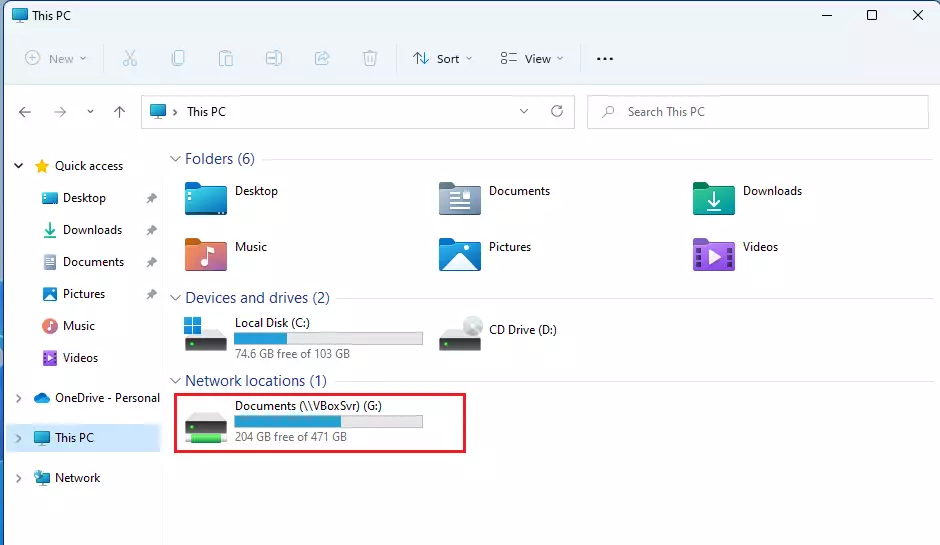
After you log in, open File Explorer. You should see a mapped folder with the G: drive letter in the Windows virtual machine.
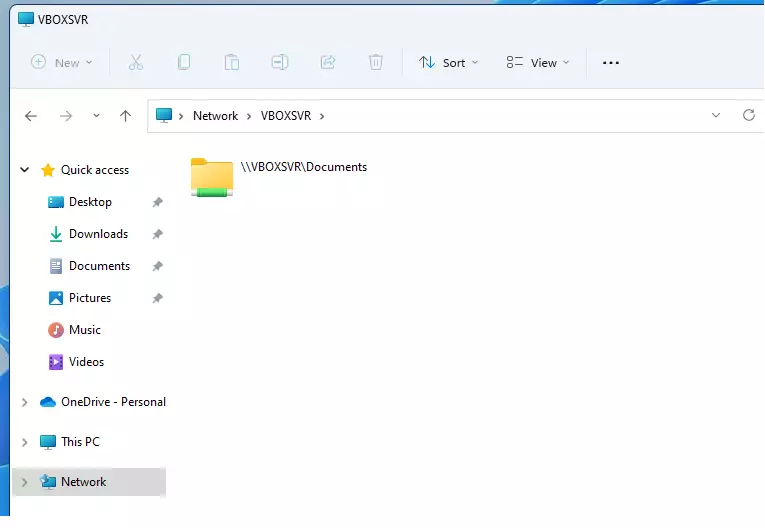
If you have turned on Network discovery and Public folder sharing, you will also be able to see the mapped folder in the network folder under \\VBOXSRV\
Whatever you have in the shared folder on the host machine will be accessible from the guest machine. Files you save there from the guest appear on the host straight away, unless you checked Read-only.
If the folder does not appear
- Check that Guest Additions are installed and that you restarted the guest afterwards.
- Check that the drive letter is not already in use inside the virtual machine. If it is, pick another letter.
- Check that Auto-mount was ticked. If it was not, edit the share and tick it, then restart the virtual machine.
To undo it: shut down the virtual machine, open Settings Shared Folders again, select the share and click the red minus icon to remove it. This only removes the link. The files stay in the folder on the host.
That should do it!
Conclusion:
- VirtualBox's shared folder feature simplifies transferring large files between hosts and guest machines.
- The setup process involves installing VirtualBox guest tools, configuring shared folders in the settings, and rebooting the virtual machine.
- Users can customize folder permissions, such as read-only access and automatic mounting upon startup.
- Mapped folders appear as drive letters in the guest OS, ensuring easy accessibility.
- Ensuring network discovery is enabled enhances the visibility of shared folders across the network.
VirtualBox shared folders simplify transferring large files between host and guest machines.
Was this guide helpful?

About the Author
Richard
Tech Writer, IT Professional
Richard is a writer at Geek Rewind who turns complex IT tasks into clear, step-by-step guides. He draws on years of hands-on experience in system administration and enterprise IT operations, focusing on Windows, Linux and WordPress: the problems people actually run into, and the fixes that work. His server and WordPress guides come from systems he runs himself. Richard builds and maintains the platform behind Geek Rewind, from its Ubuntu servers and Nginx configuration to its custom WordPress plugins. Many new tutorials start with readers' questions, and he's always glad to answer them in the comments.

No comments yet — be the first to share your thoughts!