How to Enable or Disable Network Discovery in Windows 11

Network Discovery in Windows 11 is a built-in network setting that controls whether your PC can see other computers and printers on your local network, and whether they can see it. Windows 11 keeps this feature off on public networks to protect your data from strangers.
Turn Network Discovery on when you connect to a trusted home or office network. You can do it through Settings under Network & internet, or through the classic Control Panel . Leave it off on public Wi-Fi at places like coffee shops and hotels. Both methods are covered below, along with a command-line option and the SMB 1.0 feature for older devices.
Press Win+I to open Settings , go to Network & internet, click Advanced network settings, then Advanced sharing settings. Under Private networks, turn on the switches for Network discovery and File and printer sharing. Other devices on your network will then appear in File Explorer .
What is Network Discovery?
Network Discovery is a setting that lets your Windows 11 PC find and connect to other devices on your local network, such as shared folders and network printers. When it is on, your computer can see nearby devices and they can see it. That makes sharing files at home or in a small office much easier.
Discovery only lets devices see each other. To actually open a shared folder or use a shared printer, file and printer sharing must be on as well. That is why the steps below turn on both.
Windows turns on Network Discovery for a Private network, such as your home Wi-Fi . When you first connect to a new network, Windows may ask whether you want other devices to find your PC, and your answer sets the profile. On Public networks, such as cafes or airports, discovery stays off to keep your PC safe.
If discovery doesn’t work on your home network, check the profile first. Open Settings, go to Network & internet, open your Wi-Fi or Ethernet connection’s properties, and look at Network profile type. If it says Public network, switch it to Private network. Only do this on networks you trust.
How to Enable Network Discovery in 🪟 Windows 11 (Using Settings)
To enable Network Discovery with the Settings app, press the Windows key + I, go to Network & internet, click Advanced network settings, open Advanced sharing settings, and turn on the switch for private networks. Your computer can then spot other printers and shared PCs on your Wi-Fi.
These steps apply to Windows 11 Home and Pro. You may need an administrator account, and Windows may show a User Account Control prompt. If a switch is greyed out or flips back off, the network may be set to Public, or a required service may be stopped. Windows also needs its firewall rules for Network Discovery to be allowed. To undo the change, return to the same page and turn the switches off.
- Click the Start button and select Settings, or press Windows key + I on your keyboard. The Settings window opens.
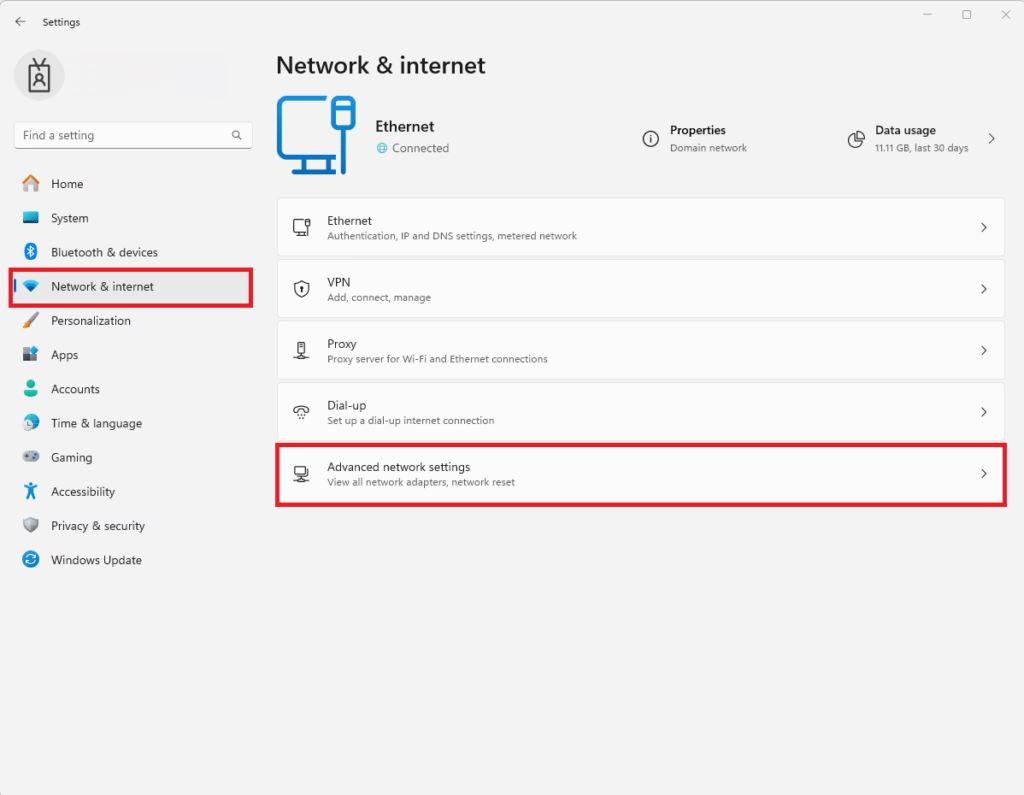
- In Settings, click Network & internet in the left-hand list. The connection status for your Wi-Fi or Ethernet appears on the right.
- Scroll down and click Advanced network settings.
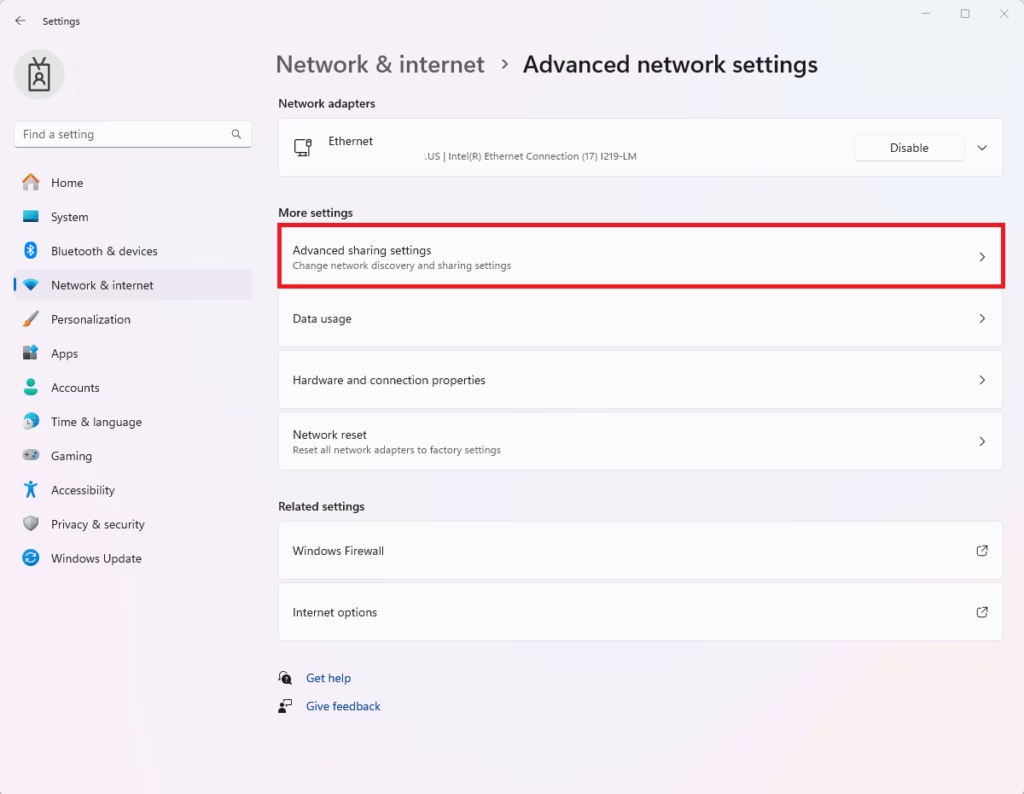
- Under More settings, click Advanced sharing settings. A page opens with one section per network profile.
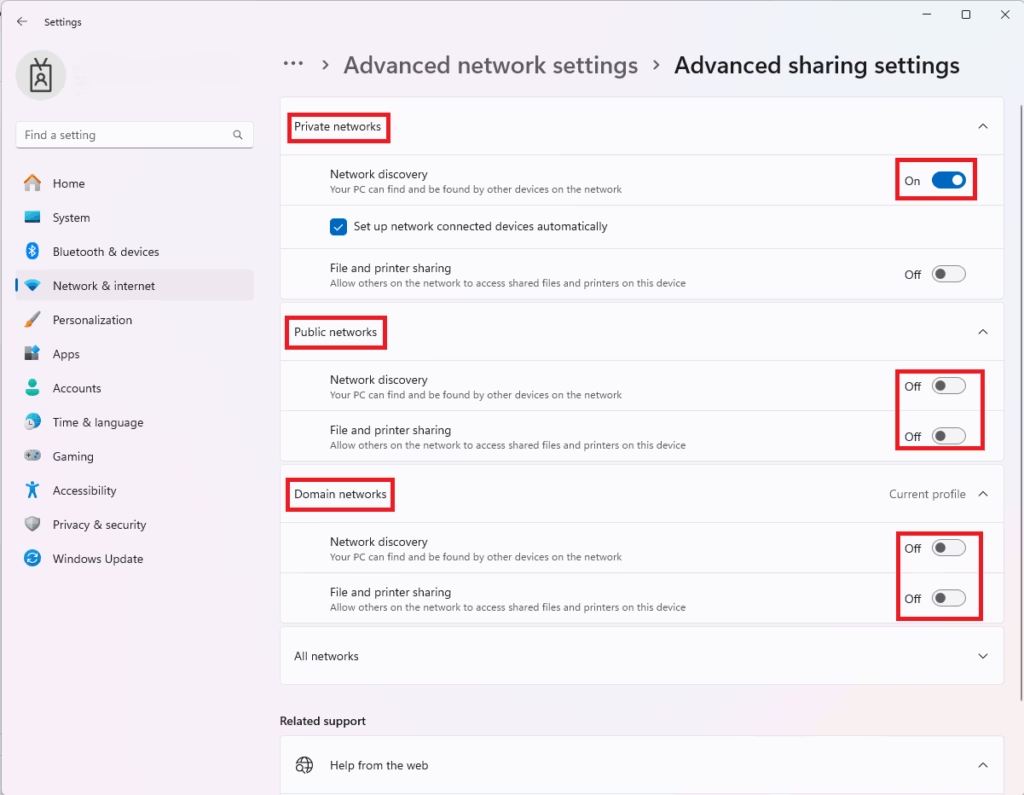
- Look at your network profiles (Private networks and Public networks). Click the one you use, usually Private networks, to expand it.
- Turn on the switches for:
- Network discovery
- File and printer sharing
- Close Settings when done. No restart is needed. Open File Explorer and click Network in the left pane. Other PCs and devices on the network should start to appear, though it can take a short while.
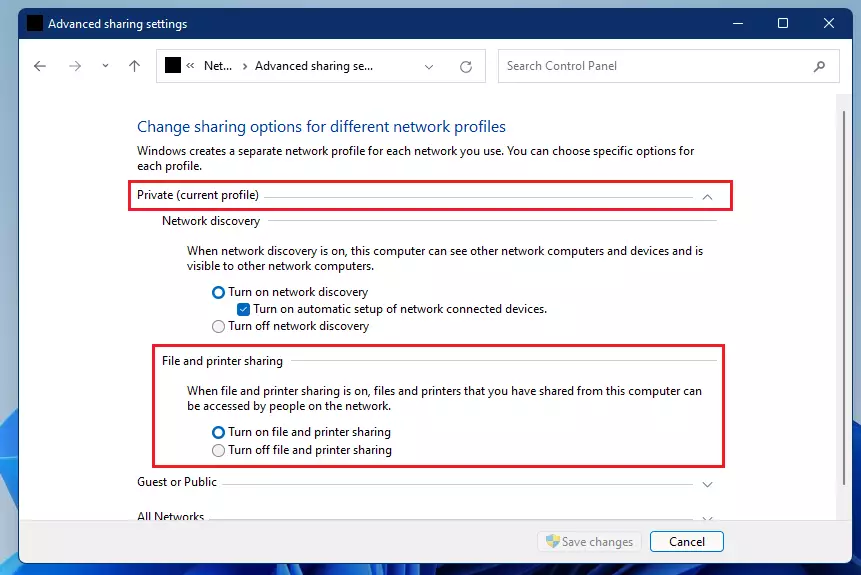
Enable Network Discovery Using the Control Panel
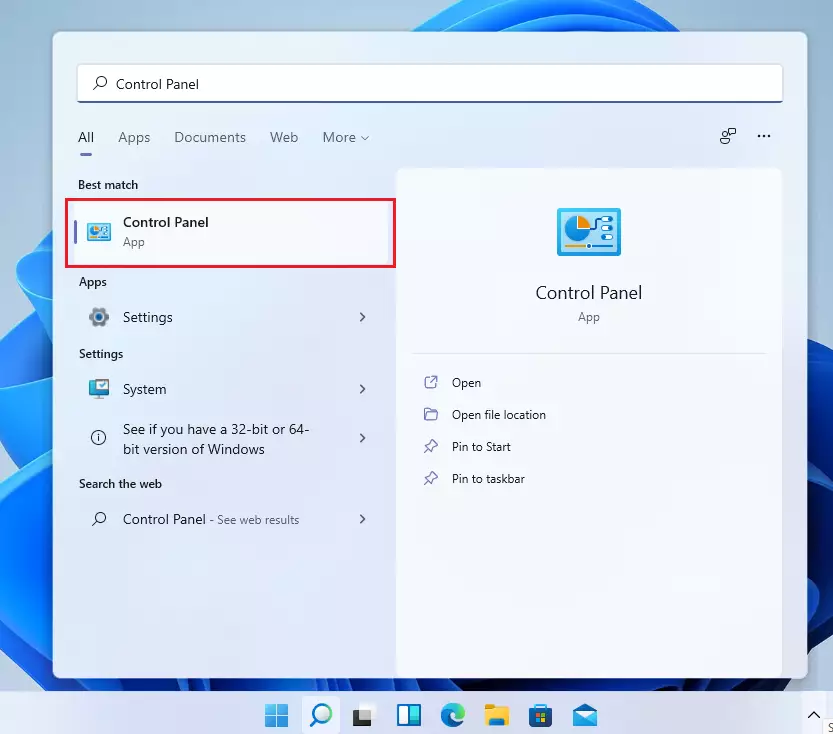
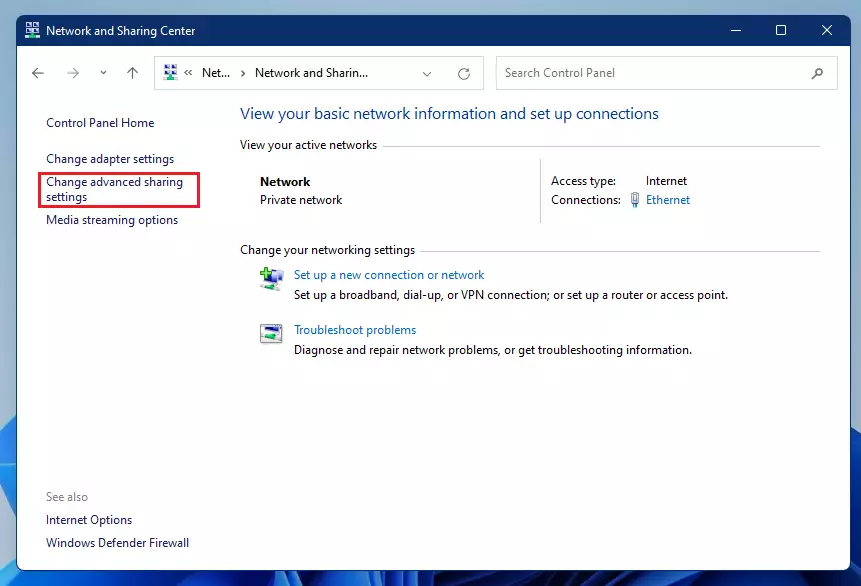
To enable Network Discovery in Control Panel, search for Control Panel in the Start menu, open Network and Sharing Center, and click Change advanced sharing settings. This turns the feature on for the profiles you choose, using the older, classic Windows interface. It is useful if you prefer the classic layout or can't reach the page in Settings.
Saving changes here needs administrator rights, so expect a User Account Control prompt. Turn on discovery only for the profile you actually use. To undo it, come back to the same page, choose the option to turn network discovery off, and click Save changes.
- Click Start, type Control Panel, and open it from the results.
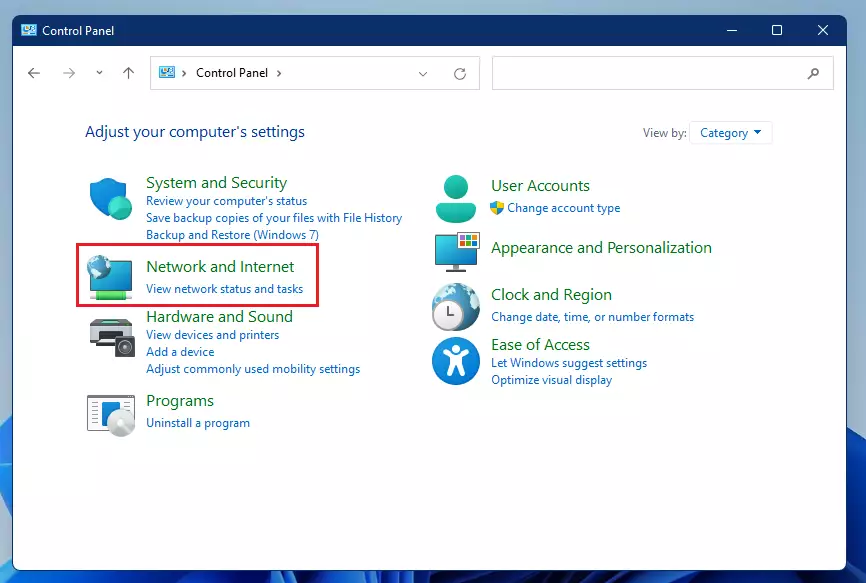
- Click Network and Internet. If your Control Panel is in icon view, skip this step and open Network and Sharing Center directly.
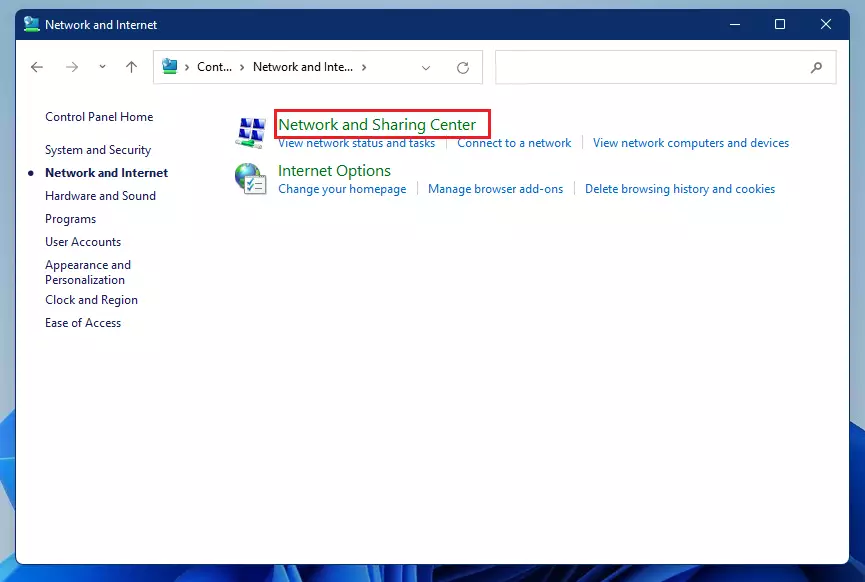
- Select Network and Sharing Center. It shows your active networks and the type of each.
- On the left side, click Change advanced sharing settings.
- Click the arrow to expand the Private and Guest or Public network profiles. Each shows its own options.
- Select Turn on network discovery and Turn on file and printer sharing for each profile you want. Avoid turning them on for Guest or Public unless you have a good reason.
- Click Save changes at the bottom. Approve the User Account Control prompt if it appears. The change takes effect straight away, with no restart.
Turn on Network Discovery and File Sharing Using Command Prompt
If you like working from the command line, you can enable these features quickly by running Command Prompt as an administrator. This is handy when you need to change the setting on several PCs or from a script. Run the two commands below, one after the other:
netsh advfirewall firewall set rule group="File and Printer Sharing" new enable=Yes
netsh advfirewall firewall set rule group="Network Discovery" new enable=Yes
How to open Command Prompt as admin:
- [ADMIN REQUIRED] Click the Start menu and type cmd or Command Prompt. Command Prompt appears at the top of the results.
- [ADMIN REQUIRED] Right-click Command Prompt and choose Run as administrator. Click Yes if User Account Control asks for permission. The window title should read "Administrator: Command Prompt".
- Copy and paste the commands above and press Enter after each. Each command should report that it completed. If you see an "Access is denied" message, the window is not running as administrator, so close it and repeat the previous step.
Extra Tip: Enable SMB 1.0 / CIFS File Sharing (If Needed)
To enable SMB 1.0 / CIFS File Sharing in Windows 11, open Programs and Features in Control Panel and click Turn Windows features on or off. Check the box next to SMB 1.0/CIFS File Sharing Support to connect with older network storage drives or legacy computers on your network.
SMB 1.0 is an old protocol with known security weaknesses, and Windows 11 does not install it by default. If you only need to reach an old device from this PC, expand the entry and enable just SMB 1.0/CIFS Client. Turn the feature back off once you no longer need it, or after you have copied your data off the old device.
To enable it:
- Open Control Panel.
- Go to Programs and Features. If you can't see it, switch View by in the top-right corner to Large icons or Small icons, or go through Programs.
- Click Turn Windows features on or off on the left. The Windows Features window opens with a list of optional components. You need administrator rights for this step.
- Find SMB 1.0/CIFS File Sharing Support and check its box. Expand it if you want to pick only the client.
- [ADMIN REQUIRED] Click OK and restart your computer if asked. Windows installs the feature first, and the restart finishes the change. To undo it, repeat these steps, clear the box, and restart again.
Learn more about turning Windows features on or off here.
Summary
Network Discovery helps your Windows 11 PC find and connect to other devices on your network, and you can turn it on using Settings or Control Panel.
Was this guide helpful?

About the Author
Richard
Tech Writer, IT Professional
Richard is a writer at Geek Rewind who turns complex IT tasks into clear, step-by-step guides. He draws on years of hands-on experience in system administration and enterprise IT operations, focusing on Windows, Linux and WordPress: the problems people actually run into, and the fixes that work. His server and WordPress guides come from systems he runs himself. Richard builds and maintains the platform behind Geek Rewind, from its Ubuntu servers and Nginx configuration to its custom WordPress plugins. Many new tutorials start with readers' questions, and he's always glad to answer them in the comments.

No comments yet — be the first to share your thoughts!