How to Make Each File Explorer Window Run Separately in Windows 11
Making each File Explorer window run separately in Windows 11 prevents one crashing window from closing all others.
This setting treats each File Explorer window like its own mini-program. If one window freezes or has an issue, the other windows you have open will continue to work perfectly fine.
The option is called “Launch folder windows in a separate process.” Turning this on can make your computer more stable, especially when you have many folders open at once.
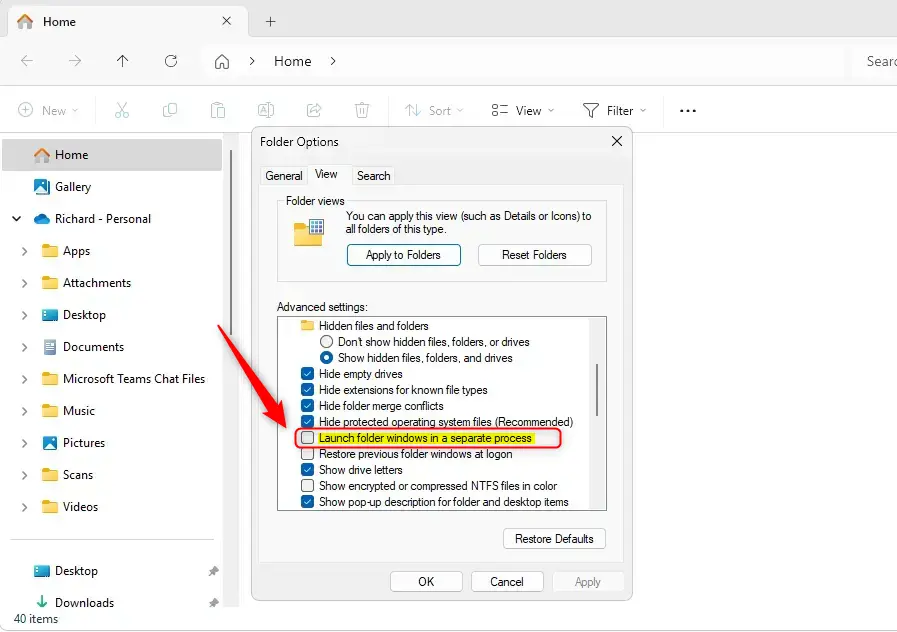
Open File Explorer, click the three dots, select Options, go to the View tab, and check “Launch folder windows in a separate process.” This setting ensures that if one File Explorer window freezes, others will remain unaffected.
Why Use Separate Processes for File Explorer?
- Better Stability: If one window crashes, others keep working.
- Easy to Fix: You can close just the problem window without losing everything.
- Simple to Turn On or Off: You can choose how you want it to work.
How to Turn On Separate Processes Using File Explorer Settings
You can make each File Explorer window run in its own process by changing a setting right inside File Explorer. This step stops one frozen window from making all your File Explorer tabs stop working, improving your computer’s stability.- Open File Explorer. You can do this by clicking the folder icon on your taskbar or pressing
Windows + Eon your keyboard. - Click the three dots (More) button at the top, then select Options. This opens Folder Options.
- In the Folder Options window, click the View tab.
- Look for the option that says “Launch folder windows in a separate process” and put a checkmark in the box next to it.
- Click OK to save your changes.
How to Turn On Separate Processes Using the Windows Registry (Advanced)
Why would you want to use separate processes for File Explorer?For users who prefer a more advanced approach, changing a setting in the Windows Registry also allows each File Explorer window to run separately. This requires navigating to a specific folder path and adding a new value, which instructs Windows on how to handle File Explorer processes.
- Press
Windows + R, typeregedit, and press Enter to open the Registry Editor. - Navigate to this folder path:
HKEY_CURRENT_USER\Software\Microsoft\Windows\CurrentVersion\Explorer\Advanced - Right-click on the Advanced folder in the left panel, choose New, then DWORD (32-bit) Value.
- Name the new value
SeparateProcess. - Double-click the new SeparateProcess entry, set the value data to
1to turn the feature on, or0to turn it off. - Click OK and close the Registry Editor.
- Restart your computer to apply the changes.

Summary
- Turning on separate processes helps keep File Explorer windows from crashing all at once.
- You can easily enable this in File Explorer’s Folder Options or by editing the Registry.
- Always back up your system before changing the Registry.
- This setting makes your file browsing more stable and responsive.
- You might need to restart your PC for the setting to work.
Turning on separate processes for File Explorer makes your file browsing more stable and stops all windows from crashing together. You can do this through File Explorer’s settings or by editing the Windows Registry, but always back up your system first.
Was this guide helpful?

About the Author
Richard
Tech Writer, IT Professional
Richard, a writer for Geek Rewind, is a tech enthusiast who loves breaking down complex IT topics into simple, easy-to-understand ideas. With years of hands-on experience in system administration and enterprise IT operations, he’s developed a knack for offering practical tips and solutions. Richard aims to make technology more accessible and actionable. He's deeply committed to the Geek Rewind community, always ready to answer questions and engage in discussions.


No comments yet — be the first to share your thoughts!