How to Enable or Disable Touchpad in Windows 11

Turning off your laptop touchpad stops the cursor from jumping around when your palms brush the pad while you type. In Windows 11 you can manage this built-in pointing device from the Settings app. Many laptops also have a keyboard shortcut or a dedicated function key for it. The exact key varies by manufacturer, so check the icons on your function row.
Disabling the touchpad helps prevent accidental clicks during long typing sessions or games. Turning it back on gives you full cursor control when you work away from a desk. Neither method deletes anything, and you can reverse either one at any time.
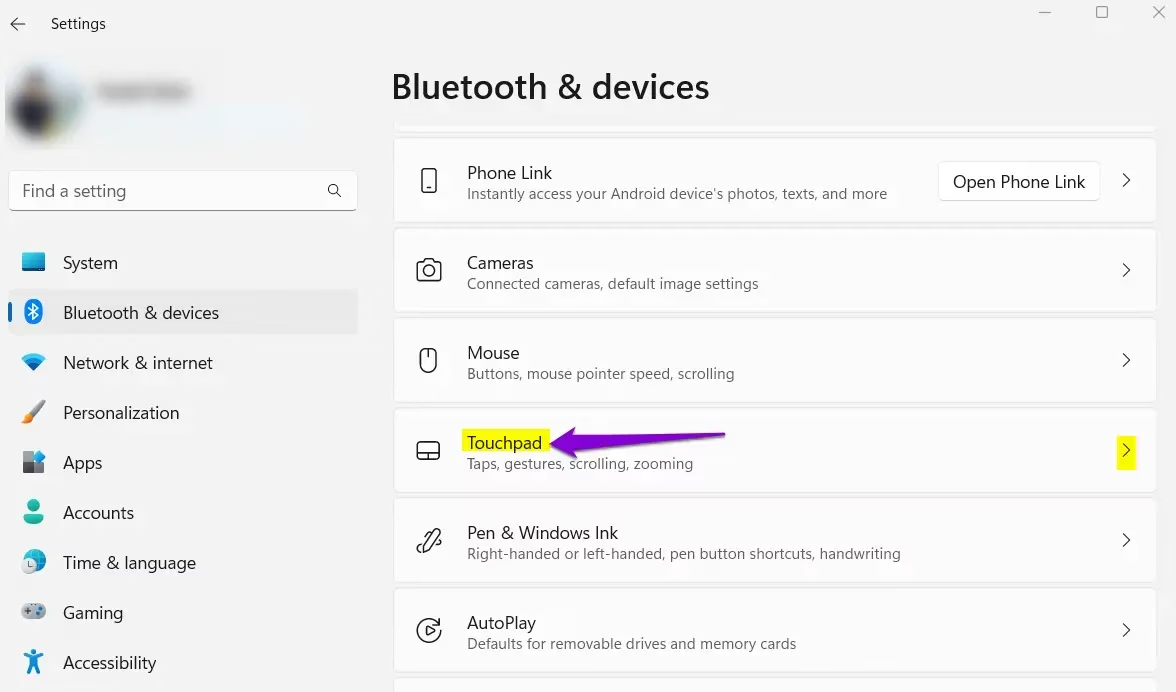
Open Settings by pressing Win+I, click Bluetooth & devices, select Touchpad, then turn the Touchpad toggle Off. The touchpad stops responding immediately with no restart required.
Option 1Turn On or Off Touchpad in Settings
The Settings app is the simplest way to disable the touchpad in Windows 11. It turns the built-in pad off completely, with no extra software or keyboard shortcut needed. You switch one toggle in the Bluetooth & devices section, and the change applies immediately. You do not need to restart.
- Open Settings by pressing
Win+I. The Settings window opens. - Click Bluetooth & devices in the left pane. The device options appear on the right.
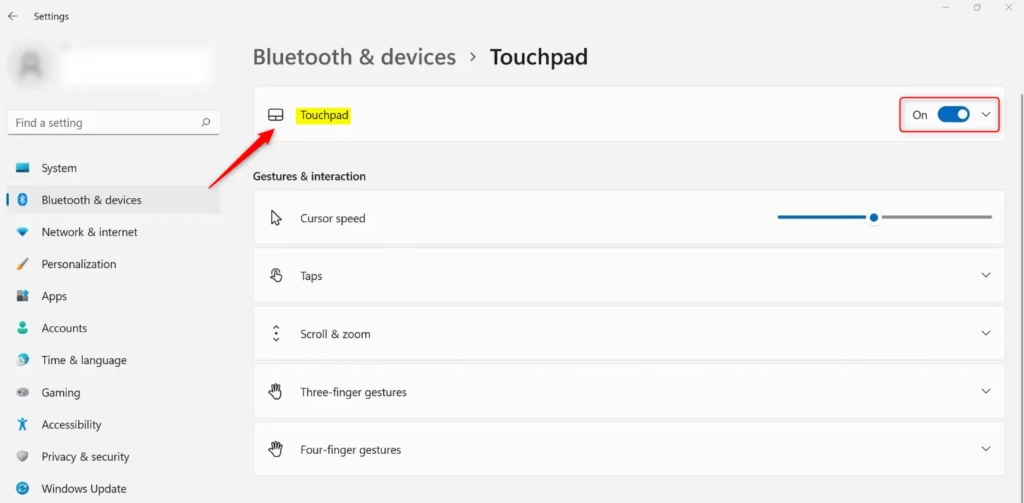
- Click Touchpad on the right side. (see screenshot below step 4) The touchpad page opens, with a Touchpad section at the top. Click it to expand the menu if it is collapsed.
- Turn the Touchpad toggle On (default) or Off, depending on what you want. (see screenshot below) The touchpad stops or starts responding straight away.
- Close Settings if you like.
This is normal on desktop PCs. On a laptop, it usually means the touchpad driver is missing or generic. Install the latest touchpad or chipset driver from your laptop maker’s support page, then check again.
If you turn the touchpad off and have no mouse connected, you can still get back to the setting. Press the Win plus I to open Settings , then use the Tab, arrow and Space keys to reach the toggle. A touchscreen also works if your laptop has one. Some laptops also offer a checkbox to leave the touchpad on when a mouse is connected. Clear that box if you want the touchpad disabled even with a mouse plugged in.
Option 2Turn On or Off Touchpad Using Registry
Turn On Touchpad
This configuration is the default state after Windows is installed, with the touchpad enabled. Use it when you want to undo an earlier change and return to the standard behavior.
Execute the command shown below. Type it exactly as shown, or copy and paste it, so you do not introduce typos.
reg add "HKEY_CURRENT_USER\Software\Microsoft\Windows\CurrentVersion\PrecisionTouchPad\Status" /v Enabled /t REG_DWORD /d 1 /f
Turn Off Touchpad
⚠️ Admin privileges required
Turning off the touchpad with this method requires an elevated command prompt with administrator rights. A normal Command Prompt window will return an error or fail to apply the change. To open one, search for Command Prompt in the Start menu, right-click it, and choose Run as administrator. Click Yes if User Account Control asks for permission. Standard user accounts will be asked for an administrator password.
It is also worth keeping a USB or Bluetooth mouse nearby before you disable the touchpad, in case you need to reverse the change.
reg add "HKEY_CURRENT_USER\Software\Microsoft\Windows\CurrentVersion\PrecisionTouchPad\Status" /v Enabled /t REG_DWORD /d 1 /f
Summary
You can manage your touchpad using either the Settings app or the registry. The Settings app is the fastest route for most people and takes only a few clicks to toggle the device. It also carries the least risk, because nothing needs administrator rights. Registry edits make more sense when you are setting up several machines and want to repeat the same change on each one. Back up the registry or create a restore point before you change it.
Which F key disables the touchpad?
No single F key works on every laptop. Many laptops use Fn plus one of the F keys, often F5, F6, F7, F9, or F10, and that key has a touchpad icon. Look for a small rectangle with a finger or a line through it. If none of the keys work, turn the touchpad off in Settings under Bluetooth & devices, then Touchpad.
How to reactivate touchpad 🪟 Windows 11?
Open Settings with Win+I, click Bluetooth & devices, then click Touchpad. Switch the Touchpad toggle on. The change applies right away, and you do not need to restart. If your laptop has a touchpad function key, you can also press Fn with that key to turn the pad back on.
Why is there no touchpad settings in 🪟 Windows 11?
Windows hides the Touchpad page when it cannot find a working touchpad. This usually means the touchpad driver is missing or damaged, or the pad is disabled in the BIOS. Open Device Manager and check Mice and other pointing devices. Then install the driver from your laptop maker's website.
Can the touchpad be turned off?
Yes. Open Settings with Win+I, click Bluetooth & devices, click Touchpad, and switch the toggle off. The change takes effect immediately, and nothing is deleted, so you can turn it back on at any time. Many laptops also have a function key that turns the touchpad off.
Have a question about this guide?
Answered by AI from this guide. Good questions may be added to this page — please don't include personal details.
Did this guide fix your problem?

About the Author
Richard
Tech Writer, IT Professional
Richard is a writer at Geek Rewind who turns complex IT tasks into clear, step-by-step guides. He draws on years of hands-on experience in system administration and enterprise IT operations, focusing on Windows, Linux and WordPress: the problems people actually run into, and the fixes that work. His server and WordPress guides come from systems he runs himself. Richard builds and maintains the platform behind Geek Rewind, from its Ubuntu servers and Nginx configuration to its custom WordPress plugins. Many new tutorials start with readers' questions, and he's always glad to answer them in the comments.
No comments yet — be the first to share your thoughts!