How to Disable Touchpad with Mouse in Windows 11

Disabling your laptop touchpad while a mouse is connected stops accidental palm brushes from moving the cursor in Windows 11. A built-in switch in the Settings app handles it, and the touchpad turns off as soon as Windows detects an external mouse. You don’t need a third-party tool for this. It works the same on Windows 11 Home and Pro, and it needs no restart.
Open Settings , press Win+I, go to Bluetooth & devices Touchpad, then uncheck Leave touchpad on when a mouse is connected. The touchpad disables automatically when an external mouse connects and reactivates when you disconnect it.
Why This Matters
Built-in laptop touchpads often get in the way during long typing sessions. Your palms rest close to the pad, and a light brush can send the cursor into the middle of a sentence or trigger a click you didn’t intend.
An external USB or Bluetooth mouse gives you better accuracy, but it doesn’t stop those stray touches. The touchpad is still active underneath. Turning it off whenever a mouse is detected keeps the cursor steady and leaves you with one pointing device to think about.
What Happens
With this preference enabled, Windows watches the pointing devices that are connected. When it sees an external mouse, it switches the touchpad off. When you unplug the mouse, the touchpad works again straight away, so you never have to toggle anything by hand.
To turn the feature on, follow these steps:
- Press Win+I to open Settings.
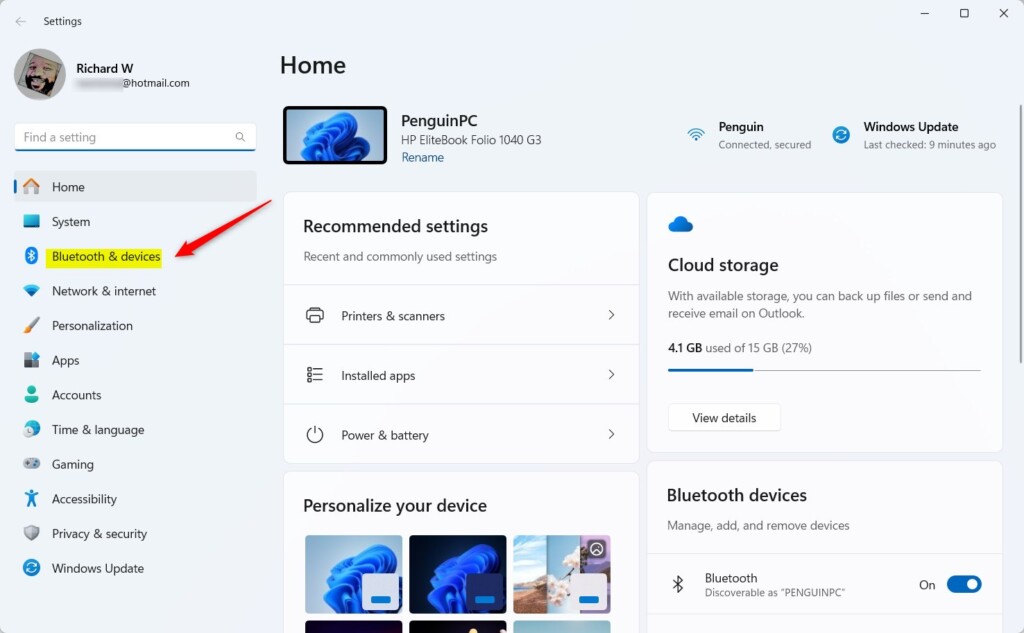
- Select Bluetooth & devices in the left-hand list.
- Select Touchpad. You should see the touchpad options, with a Touchpad toggle at the top.
- Make sure the Touchpad toggle is set to On. If it is off, the options below it are hidden.
- Select the arrow next to Touchpad to expand the section if it is collapsed.
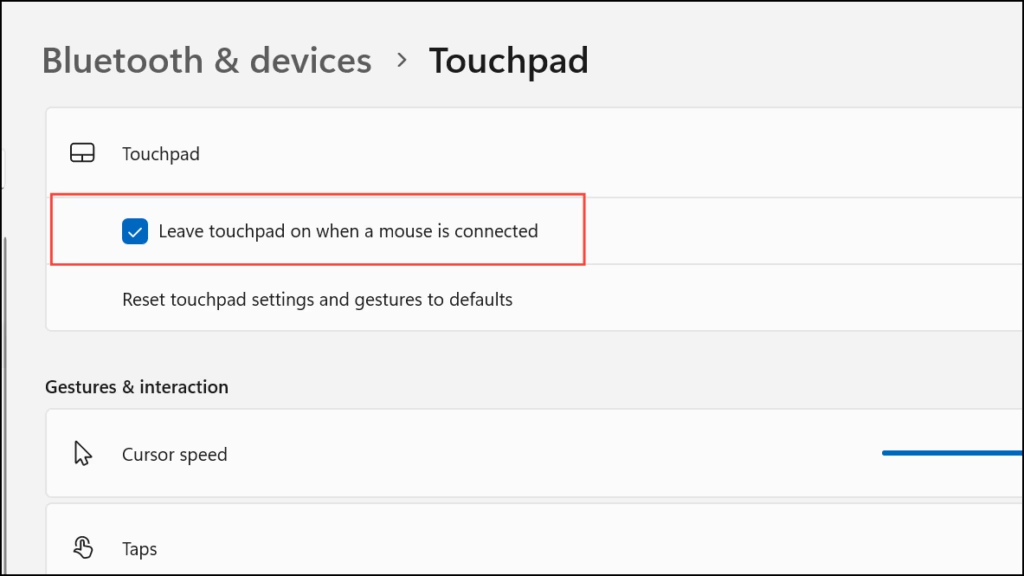
- Clear the Leave touchpad on when a mouse is connected checkbox. When it is cleared, Windows turns the touchpad off whenever a mouse is connected.
Test it by plugging in a USB mouse, or by connecting a Bluetooth mouse. The touchpad should stop responding. Unplug or disconnect the mouse and it should start working again.
To undo the change, go back to the same page and tick Leave touchpad on when a mouse is connected again.
Some older machines manage the touchpad through the manufacturer's own software, such as Synaptics or ELAN. In that case, look in the Mouse settings or the manufacturer's utility for a similar option. Updating the touchpad driver from the laptop maker's support page can also bring the setting back.
When that happens, Windows treats the mouse as disconnected and the touchpad comes back. If the mouse fails while the touchpad is off, you can still move around with the keyboard until you reconnect it.
Reference: Precision touchpad tuning (touchpad-tuning-guidelines)
Hardware manufacturers design Precision touchpads around these same tuning parameters. Windows 10 and newer builds rely on the same architecture for communicating with the hardware. That is why the setting looks and behaves almost the same across current laptops, as long as the driver is the standard one.
Option 1Use Settings
You can disable touchpad with mouse automatically in Windows 11 by using the built-in Settings app. This stops the cursor from jumping around when your palm brushes the laptop pad while typing. To set this up, open the main Windows settings menu, go to your device settings, and turn off the option that keeps the trackpad active when an external mouse plugs in.- Open Settings by pressing
Win+I. - Click on Bluetooth & devices on the left side.
- Click on Touchpad on the right side.
- Click on Touchpad to expand it open.
- Check the box (on - this is the default) or uncheck the box (off) next to Leave touchpad on when a mouse is connected. Choose what you want.
- You can now close Settings.
Option 2Use Registry
Registry modifications require an elevated command prompt. Open Windows Terminal with administrator privileges (an account type needed to make system-wide changes). Execute the appropriate command strings below to alter the hardware behavior.
Turn On Leave Touchpad On when Mouse Connected
The operating system keeps the touchpad active by default regardless of external hardware.
reg add "HKEY_CURRENT_USER\Software\Microsoft\Windows\CurrentVersion\PrecisionTouchPad" /v LeaveOnWithMouse /t REG_DWORD /d 4294967295 /f
Turn Off Leave Touchpad On when Mouse Connected
reg add "HKEY_CURRENT_USER\Software\Microsoft\Windows\CurrentVersion\PrecisionTouchPad" /v LeaveOnWithMouse /t REG_DWORD /d 0 /f
Summary
Modern Windows installations provide multiple pathways for hardware configuration. Device Manager offers deeper control for persistent hardware states.
Have a question about this guide?
Answered by AI from this guide. Good questions may be added to this page — please don't include personal details.
Did this guide fix your problem?

About the Author
Richard
Tech Writer, IT Professional
Richard is a writer at Geek Rewind who turns complex IT tasks into clear, step-by-step guides. He draws on years of hands-on experience in system administration and enterprise IT operations, focusing on Windows, Linux and WordPress: the problems people actually run into, and the fixes that work. His server and WordPress guides come from systems he runs himself. Richard builds and maintains the platform behind Geek Rewind, from its Ubuntu servers and Nginx configuration to its custom WordPress plugins. Many new tutorials start with readers' questions, and he's always glad to answer them in the comments.
No comments yet — be the first to share your thoughts!