How to Enable or Disable Recall in Windows 11

Recall in Windows 11 takes automatic screenshots of your screen, called snapshots, so you can search later for anything you have seen on your computer. It works like a visual timeline. You type a few keywords and Recall helps you find a forgotten document, a web page you visited, or an app you had open.
Recall needs a Copilot+ PC, which is a Windows computer with dedicated AI hardware. This tutorial assumes a Snapdragon processor and Windows 11 build 26120.2415 or newer. Newer builds may also support Copilot+ PCs with other processors, so check your device’s specifications. Recall also depends on security features such as Windows Hello, Secure Boot and device encryption.
Microsoft stores the snapshots locally on your machine to protect your privacy. You can pause or turn off the feature at any time. Recall is also off by default and only starts saving snapshots after you opt in during setup.
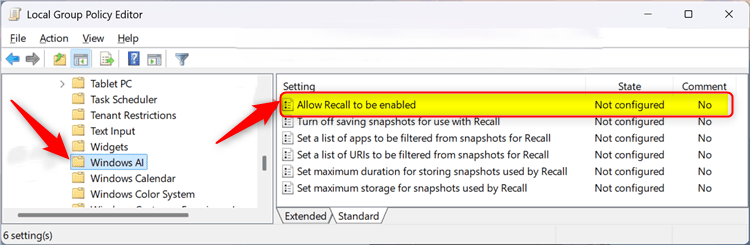
Open Local Group Policy Editor by pressing Win+R, typing gpedit.msc, and pressing Enter. Navigate to Computer Configuration Administrative Templates Windows Components Windows AI, double-click Allow Recall to be enabled, select Enabled to turn it on or Disabled to turn it off, then click OK and restart your computer.
How to Enable or Disable Recall for Users
Administrators managing computers in workplaces or schools can use the Local Group Policy Editor to control Recall access. This built-in Windows tool manages system settings from one place. The change then applies to the whole PC, whatever the user has chosen in Settings.
If you run Home edition, skip ahead to the Registry method later in this tutorial.
Step-by-Step to Enable or Disable Recall with Group Policy Editor
Follow the steps below in order. Sign in with an administrator account first, because standard accounts cannot change these policies.
- Click the Start button and type
gpedit.msc, then press Enter to open the Local Group Policy Editor. ⚠️ Requires admin privileges - In the window, go to this folder path:
Computer Configuration > Administrative Templates > Windows Components > Windows AI - On the right side, find and double-click
Allow Recall to be enabled. - In the window that opens, choose one of the options:
- Not Configured – Recall will be turned off for users.
- Enabled – Users can turn Recall on their device.
- Disabled – Recall will be completely turned off and removed.
- Click
OKto save your choice. - Restart your computer to make sure the setting works.
Managing Recall through the Local Group Policy Editor lets you control this AI feature across the whole system without touching individual app settings. Go to the Windows AI policy folder and change the main configuration rule to turn the feature on or off.
If you cannot find the Windows AI folder, your build may be too old or the device may not be a Copilot+ PC. Update Windows and look again. To undo the change, open the same rule and set it back to its previous option.
When you open the rule, you will see a set of selection options. Choose the one that matches what you want, then apply the change.
Available selection options include:
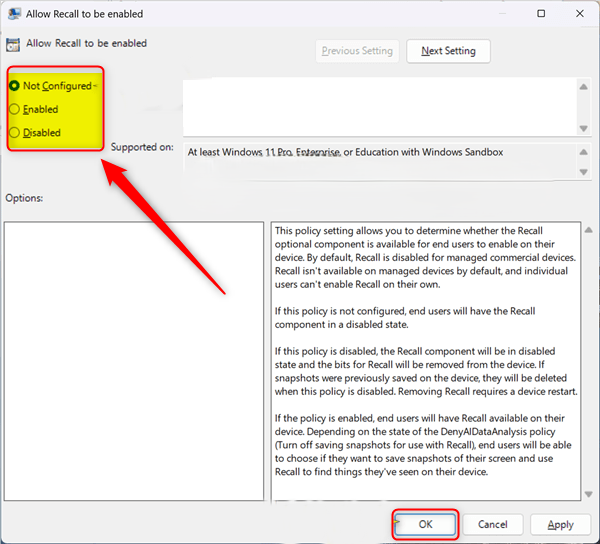
Click Apply, then OK, to save the rule. If Recall still behaves as before, restart the PC so the policy is fully applied.
How to Enable or Disable Recall Using the Windows Registry
Registry edits take effect immediately and can destabilize your system if you make a mistake, so back up the Registry first. In the Registry Editor, use File Export to save a copy. If something goes wrong, you can restore it by double-clicking the exported file.
Steps to Enable or Disable Recall via Registry
As with the Group Policy method, sign in with an administrator account. Work through the steps below in order and check each value before you move on.
- Press Windows + R, type
regedit, and press Enter to open the Registry Editor. ⚠️ Requires admin privileges - Go to this path:
HKEY_LOCAL_MACHINE\SOFTWARE\Policies\Microsoft\Windows\WindowsAI - If you don't see
WindowsAI, right-click onWindowsfolder, selectNew > Key, and name itWindowsAI. ⚠️ Requires admin privileges - Right-click inside the
WindowsAIfolder, selectNew > DWORD (32-bit) Value, and name itAllowRecallEnablement. ⚠️ Requires admin privileges - Double-click
AllowRecallEnablementand set the value to:1to enable Recall for managed users.0to disable Recall for everyone.
- If you want to allow Recall on Home devices, just delete the
AllowRecallEnablementvalue. ⚠️ Requires admin privileges - Close Registry Editor and restart your PC.
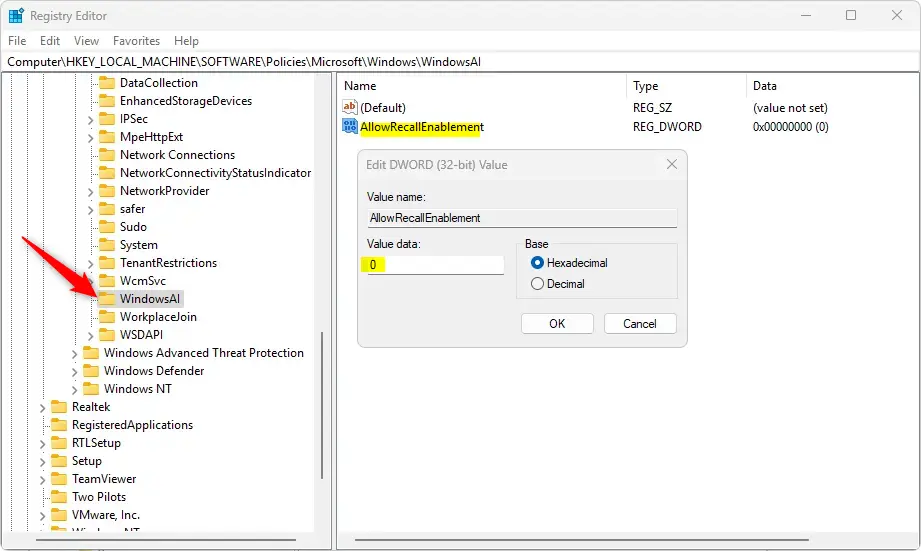
Controlling Recall through the Registry Editor gives you a direct way to turn the feature on or off if you use Windows Home edition, where Group Policy is not available. You create or modify a specific DWORD value inside the main Windows AI registry key. A DWORD is a simple numeric value that Windows reads as a setting.
If the key or value does not exist yet, that is normal. You create it yourself. Restart the PC after the change so Windows reads the new value. To reverse it, change the value back or delete the one you created.
Summary
Windows 11 Recall takes snapshots of your screen to help you find past information. You can turn the feature on or off with either the Group Policy Editor or the Registry Editor, depending on your preference, your Windows edition and your level of system access.
Have a question about this guide?
Answered by AI from this guide. Good questions may be added to this page — please don't include personal details.
Did this guide fix your problem?

About the Author
Richard
Tech Writer, IT Professional
Richard is a writer at Geek Rewind who turns complex IT tasks into clear, step-by-step guides. He draws on years of hands-on experience in system administration and enterprise IT operations, focusing on Windows, Linux and WordPress: the problems people actually run into, and the fixes that work. His server and WordPress guides come from systems he runs himself. Richard builds and maintains the platform behind Geek Rewind, from its Ubuntu servers and Nginx configuration to its custom WordPress plugins. Many new tutorials start with readers' questions, and he's always glad to answer them in the comments.
No comments yet — be the first to share your thoughts!