How to Enable or Disable Fast User Switching In Windows 11


Fast User Switching lets multiple people stay signed in on the same Windows 11 PC at the same time so you can jump between accounts without closing open apps or games. This feature keeps everyone’s files separate on shared hardware, but you need Windows 11 Pro or Enterprise to turn it on or off.
You can manage Fast User Switching using the Local Group Policy Editor or the Registry Editor (a tool for changing advanced system settings). If your PC runs Windows 11 Home, you have to use the registry method instead.
Enable or disable Fast User Switching in Windows 11 via Local Group Policy Editor or Registry Editor. This allows multiple users to stay logged in and switch between accounts without logging out. You need administrator privileges to make these changes.
What You Need
Administrator privileges are necessary to change the fast user switching setting. Signing in with administrator rights turns this feature on or off. This prevents unintended changes to user accounts.
Option 1Using Local Group Policy Editor
You can use the Local Group Policy Editor to enable fast user switching windows 11 on Pro, Enterprise, and Education editions. This tool lets you turn off the feature that hides the sign-in options for multiple users, allowing you to switch between accounts without closing running apps first.
- Open the Local Group Policy Editor by typing
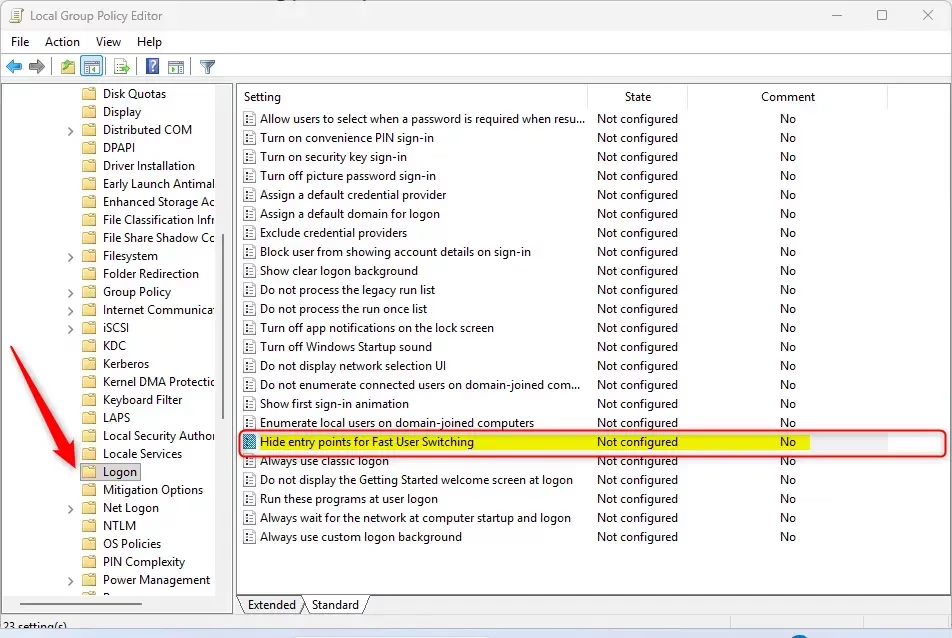
gpedit.mscin the search box and pressing Enter. - In the left pane, navigate to this location:
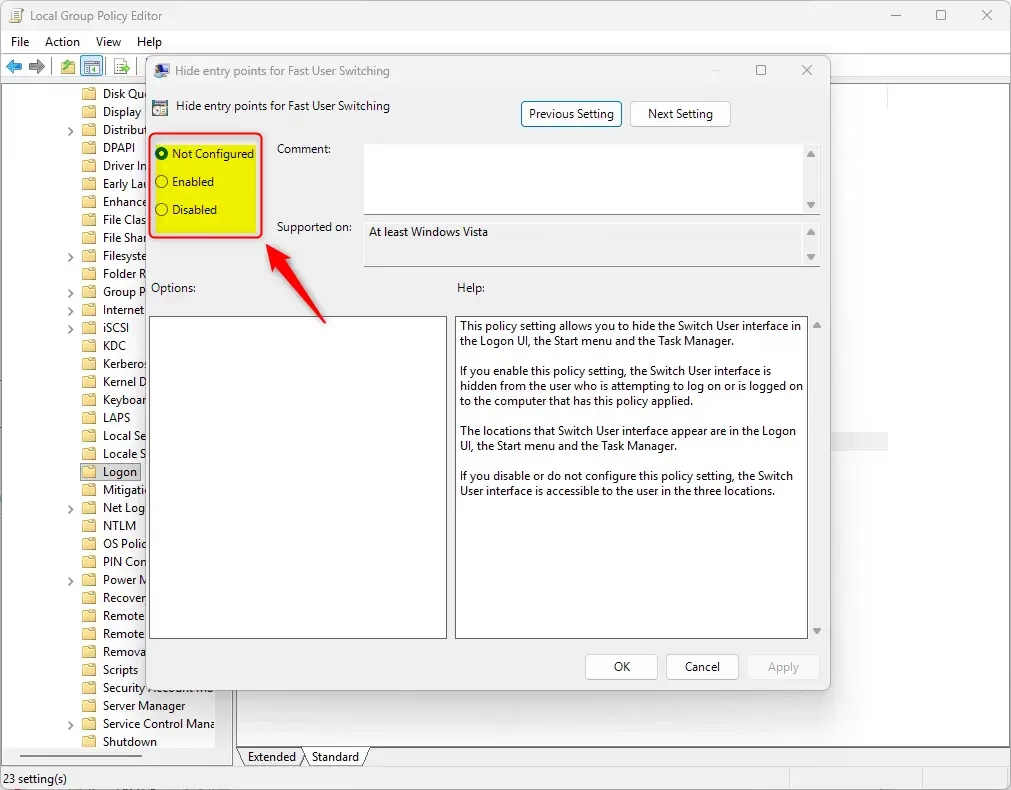
Computer Configuration > Administrative Templates > System > Logon - In the right pane, find the policy called Hide entry points for Fast User Switching and double-click it.
- To enable Fast User Switching (turn it on):
Select the dot next to Not Configured, then click OK. This is the default setting.
- To disable Fast User Switching (turn it off):
Select the dot next to Enabled, then click OK.
- You can now close the Local Group Policy Editor.
Option 2Using Registry Commands
You can use Registry Editor to enable fast user switching windows 11 on Home editions that do not have the Group Policy Editor. This method works by changing a specific value in the system database to control whether multiple people can sign in and use the PC at the same time.
- 🔒 Admin privileges required: Right-click on Windows Terminal and select Run as administrator.
- To enable Fast User Switching (turn it on):
Copy and paste this command, then press Enter:
reg delete "HKEY_LOCAL_MACHINE\SOFTWARE\Microsoft\Windows\CurrentVersion\Policies\System" /v HideFastUserSwitching /fThis is the default setting.
- To disable Fast User Switching (turn it off):
Copy and paste this command, then press Enter:
reg add "HKEY_LOCAL_MACHINE\SOFTWARE\Microsoft\Windows\CurrentVersion\Policies\System" /v HideFastUserSwitching /t REG_DWORD /d 1 /f
Summary
Fast user switching in Windows 11 keeps everyone signed in and allows account transitions without closing programs.
Was this guide helpful?

About the Author
Richard
Tech Writer, IT Professional
Richard is a writer at Geek Rewind who turns complex IT tasks into clear, step-by-step guides. He draws on years of hands-on experience in system administration and enterprise IT operations, focusing on Windows, Linux and WordPress: the problems people actually run into, and the fixes that work. His server and WordPress guides come from systems he runs himself. Richard builds and maintains the platform behind Geek Rewind, from its Ubuntu servers and Nginx configuration to its custom WordPress plugins. Many new tutorials start with readers' questions, and he's always glad to answer them in the comments.




No comments yet — be the first to share your thoughts!