

Copilot Journeys in Microsoft Edge on Windows 11 can be turned on or off from the browser settings in a few clicks. This guide shows where the switch is, what to expect after you change it, and why it may be missing on your PC.
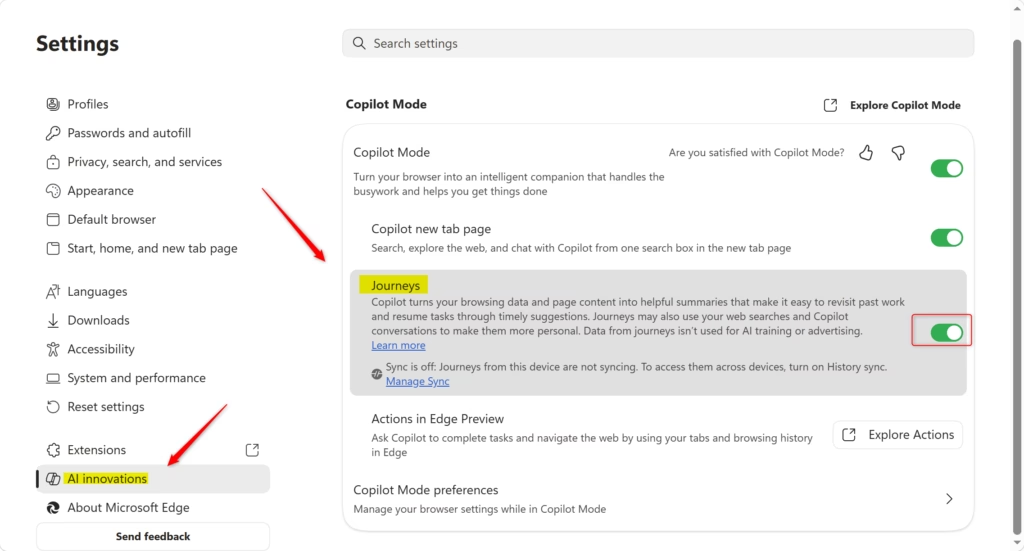
Open Microsoft Edge, click the Settings and more menu (three dots) in the top right, select Settings, then find AI innovations or Start, home, and new tab page in the left menu. Toggle the Journeys switch on or off. The change takes effect immediately with no restart needed.
Why use Copilot Journeys?
Copilot Journeys organizes your web browsing. It remembers where you left off, groups related browsing sessions, and summarizes your progress so you can pick a task back up later.
What happens when you enable it?
After you visit several websites about the same task, “Journey” cards appear on the new tab page. Selecting a card opens a Copilot chat that helps you finish the task. Because the cards are built from your history, you will not see any until you have browsed enough.
How to Enable or Disable Copilot Journeys
The Copilot Journeys settings in Edge let you turn this feature on or off whenever you want. You open the Edge menu, go to Settings , and change the option under AI innovations (or under the new tab page settings, depending on your Edge version). No restart of Windows is needed, and you can reverse the change at any time by following the same steps.
- Open Microsoft Edge.
- Click the Settings and more (three dots) menu in the top right corner and select Settings. A new Settings tab opens.
- In the left-hand menu, click AI innovations or Start, home, and new tab page. Which one holds the option depends on your Edge version.
Note: If you do not see the menu, click the three-line icon or widen your browser window. Edge hides the side menu when the window is narrow. - Find the Journeys setting. Set the switch to On or Off, depending on what you want. The switch should change position right away. There is no Save button.
If you see an “Explore Journeys” button instead of a toggle, click it first to reach the feature settings. - Close the Settings tab. Open a new tab to check the result. With the feature on, Journey cards can show up there once Edge has seen enough of your browsing. With it off, they will not.
If you cannot find the Journeys setting at all, update Edge first, since the feature may not be in older versions. It may also not be available yet for your account or region. If the setting is greyed out on a work or school PC, your organization probably manages Edge, and you will need to ask your administrator.

Privacy and Data
It skips sensitive pages such as online banking and excludes InPrivate windows. Be aware that turning Copilot Journeys off deletes all the data associated with it. If you turn it back on later, your earlier Journeys will not come back, so be sure before you switch it off.
Summary
Copilot Journeys puts your web tasks into summary cards on your new tab page. You can manage the feature in Edge Settings, under "AI innovations" or "Start, home, and new tab page."
References:
Copilot Journeys - Microsoft Support
Meet Copilot Mode in Edge: Your AI browser
Have a question about this guide?
Answered by AI from this guide. Good questions may be added to this page — please don't include personal details.
Did this guide fix your problem?

About the Author
Richard
Tech Writer, IT Professional
Richard is a writer at Geek Rewind who turns complex IT tasks into clear, step-by-step guides. He draws on years of hands-on experience in system administration and enterprise IT operations, focusing on Windows, Linux and WordPress: the problems people actually run into, and the fixes that work. His server and WordPress guides come from systems he runs himself. Richard builds and maintains the platform behind Geek Rewind, from its Ubuntu servers and Nginx configuration to its custom WordPress plugins. Many new tutorials start with readers' questions, and he's always glad to answer them in the comments.
No comments yet — be the first to share your thoughts!