How to Restrict Desktop Themes in Windows 11
Restricting desktop themes in Windows 11 stops people from changing your PC’s background, colors, and sounds. This is done using the Group Policy Editor, a built-in Windows tool that lets you control settings on computers.
This feature locks the current theme, so everyone sees the same look. It’s handy for keeping a consistent brand image on company computers or ensuring a professional look on shared workstations.
For example, you can set a specific company theme on all work laptops, making sure your brand colors and logo appear everywhere. After you apply this setting, users won’t be able to change themes in Windows 11’s Personalization settings because the options will be grayed out.
Restrict desktop themes in Windows 11 by opening the Local Group Policy Editor and navigating to User Configuration > Administrative Templates > Control Panel > Personalization. Double-click “Prevent changing theme,” select “Enabled,” and click “OK.” Alternatively, use the Registry Editor to create a DWORD value named NoThemesTab in 🗝️HKEY_CURRENT_USER\Software\Microsoft\Windows\CurrentVersion\Policies\Explorer and set its data to 1.
Method 1Using the Local Group Policy Editor
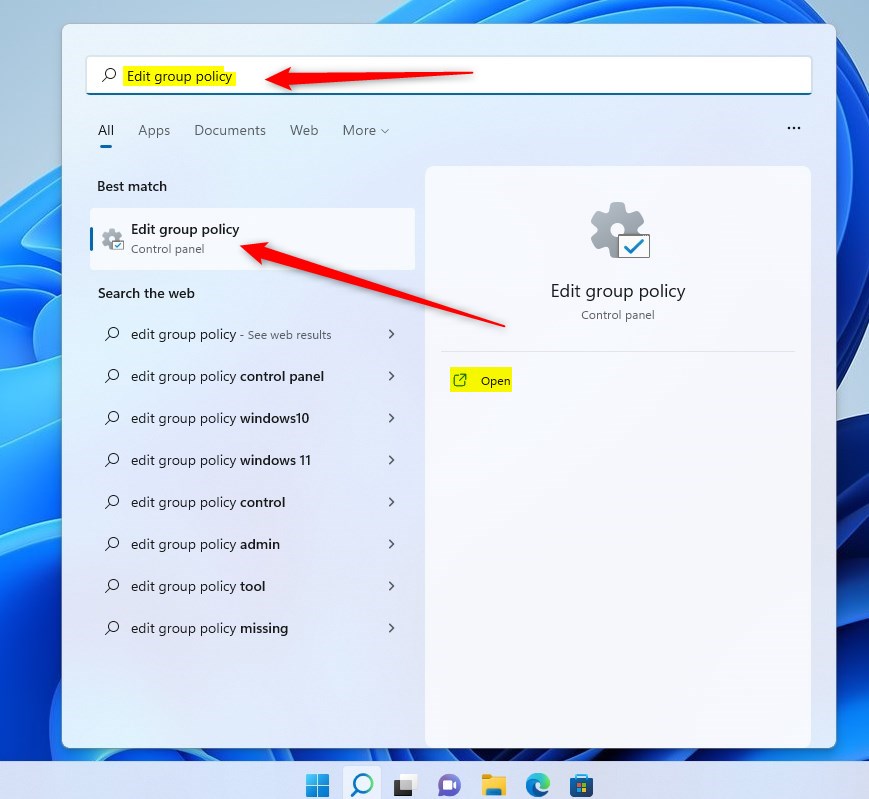
To restrict desktop themes in Windows 11, use the Local Group Policy Editor. This tool lets you manage your computer’s settings and is the preferred way to set a personalization policy. To open it, click the Start menu, type ‘Edit group policy,’ and select the result.
You can use the Local Group Policy Editor to manage these settings. This is the preferred way to enforce a Windows 11 personalization policy.
- Click the Start menu and type “Edit group policy.” Select the result to open it.
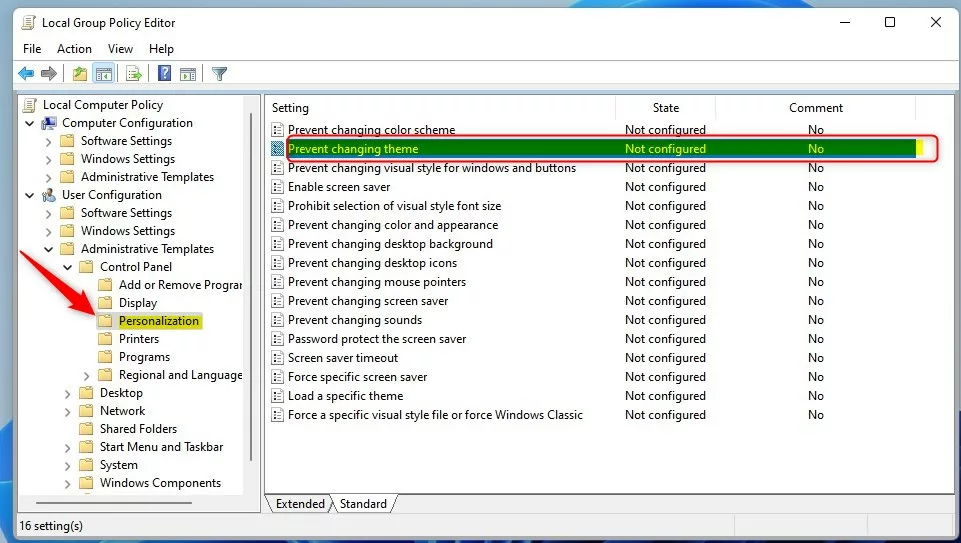
- In the left sidebar, go to: User Configuration > Administrative Templates > Control Panel > Personalization.
- In the right window, double-click “Prevent changing theme.”
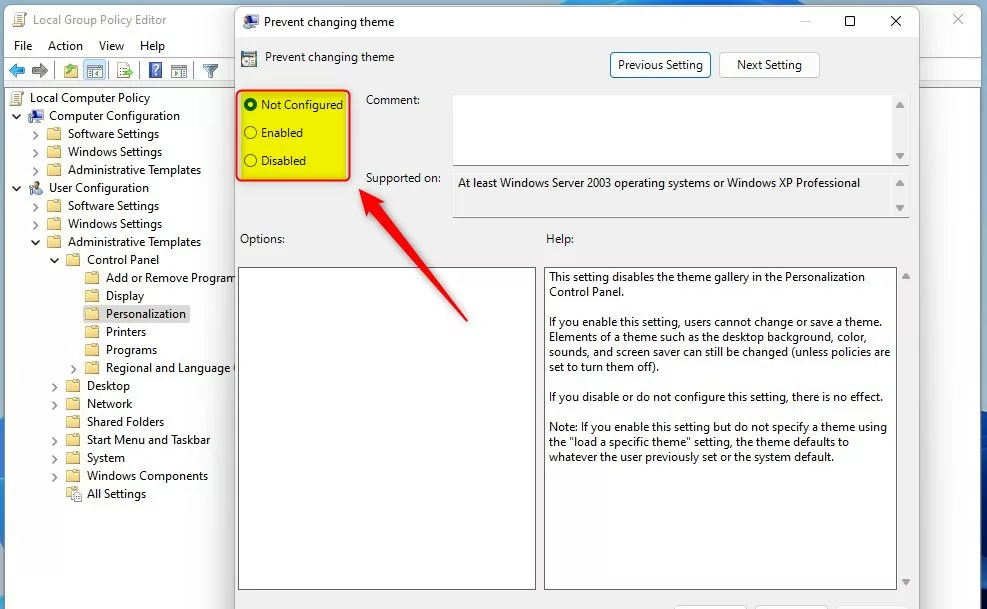
- Select “Enabled” to stop users from changing themes.
- Click “OK,” close the window, and restart your computer.
Method 2Using the Windows Registry
If the Group Policy Editor isn’t available, restricting desktop themes in Windows 11 is possible by editing the Windows Registry. Press the Windows key and R together, type ‘regedit,’ and press Enter to open the Registry Editor. Then, navigate to the specific path: 🗝️HKEY_CURRENT_USER\Software\Microsoft\Windows\CurrentVersion\Policies\Explorer.
If you cannot use the policy editor, the Windows Registry offers an alternative.
- Press ⊞ Win+R, type “regedit,” and hit Enter.
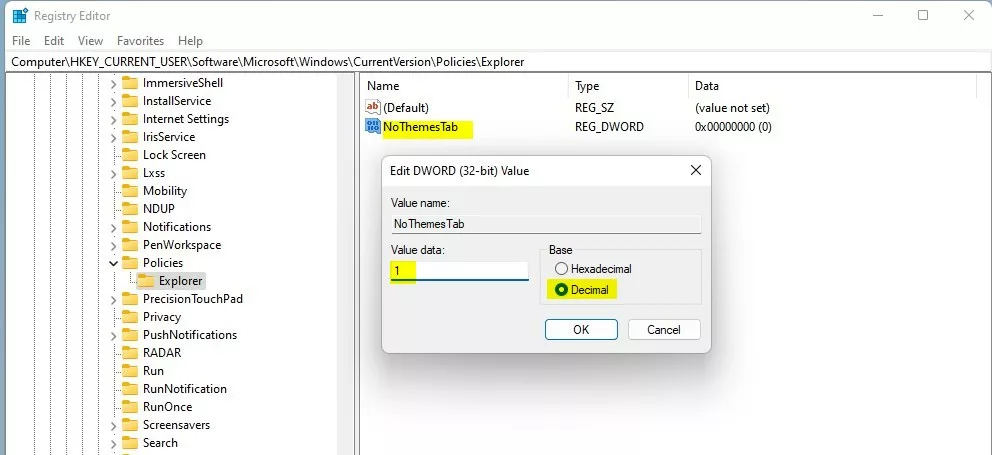
- Go to this path: 🗝️HKEY_CURRENT_USER\Software\Microsoft\Windows\CurrentVersion\Policies\Explorer
- If you do not see the “Explorer” folder, right-click on “Policies,” select New, and create a Key named “Explorer.”

- Right-click inside the empty space on the right side. Select New > DWORD (32-bit) Value.
- Name this new value
NoThemesTab. - Double-click
NoThemesTaband change the “Value data” to1. - Click “OK” and restart your computer.
Automation for IT Admins
For IT Admins managing many computers, a PowerShell script can automate setting the registry key. This keeps desktop customization consistent across your entire network.
New-ItemProperty -Path "HKCU:\Software\Microsoft\Windows\CurrentVersion\Policies\Explorer" -Name "NoThemesTab" -Value 1 -PropertyType DWORD -Force
Troubleshooting Multi-Monitor and Virtual Desktops
Desktop theme restrictions in Windows 11 prevent wallpaper changes when you switch virtual desktops. This happens because Windows 11 treats each virtual desktop as a separate area. Restricting themes stops Windows from assigning different wallpapers to these separate areas, ensuring your wallpaper remains the same on all virtual desktops.
Kiosk Mode and Assigned Access
In Kiosk mode, which creates a locked-down environment, you can configure a specific theme for all users on a shared PC. This ensures the interface remains static for public-facing terminals.
Summary
You can restrict desktop themes in Windows 11 using either the Local Group Policy Editor or the Windows Registry. Both methods help you keep the desktop appearance the same for all users by locking theme settings.
Does restricting themes affect dark/light mode settings?
Yes, restricting themes often locks the ability to toggle between dark and light modes. These modes are part of the Windows personalization framework, so disabling theme changes prevents new color schemes from being applied, effectively freezing the current light or dark mode until the restriction is lifted.
How do I revert theme restrictions if I lose access?
To revert theme restrictions in Windows 11 if you lose access, you need to log in with an administrator account. Then, go back to the Group Policy Editor or Registry Editor and remove the restriction to restore full personalization.
Was this guide helpful?

About the Author
Richard
Tech Writer, IT Professional
Richard, a writer for Geek Rewind, is a tech enthusiast who loves breaking down complex IT topics into simple, easy-to-understand ideas. With years of hands-on experience in system administration and enterprise IT operations, he’s developed a knack for offering practical tips and solutions. Richard aims to make technology more accessible and actionable. He's deeply committed to the Geek Rewind community, always ready to answer questions and engage in discussions.

No comments yet — be the first to share your thoughts!