How to Turn On or off Shared Experiences in Windows 11

Shared Experiences in Windows 11 links your computer to nearby devices over Bluetooth and Wi-Fi , so you can pick up a task on another screen where you left off. You can open a web page, draft a message, or continue an app across devices tied to your Microsoft account.
If you only want to stop your PC from sharing activity with nearby devices, the quickest route is the Settings app. The Group Policy and Registry methods below are for locking the setting down or for cases where Settings doesn’t expose it.
- Open Settings (Win+I).
- Click Apps, then Advanced app settings.
- Click Share across devices. You should now see a drop-down with the sharing options.
- Choose Off to stop sharing, or choose My devices only or Everyone nearby to turn it back on.
The exact wording and location of this option can differ between Windows 11 builds. If you don’t see it, use one of the methods below.
Open Settings (Win+I), click Apps Advanced app settings, then click Share across devices. Select Off to disable Shared Experiences, or choose My devices only or Everyone nearby to turn it on. The setting applies immediately without restart.
Option 1Turn Shared Experiences On or Off Using Local Group Policy Editor
If you run Windows 11 Pro, Enterprise, or Education, you can turn Shared Experiences on or off with the Local Group Policy Editor. This is a built-in tool for managing system settings. Windows 11 Home does not include it, so Home users should skip to the Registry method further down.
Who can use this? Windows 11 Pro, Enterprise, and Education. You need to be signed in as an administrator.
- Press Win+R to open the Run box.
- Type
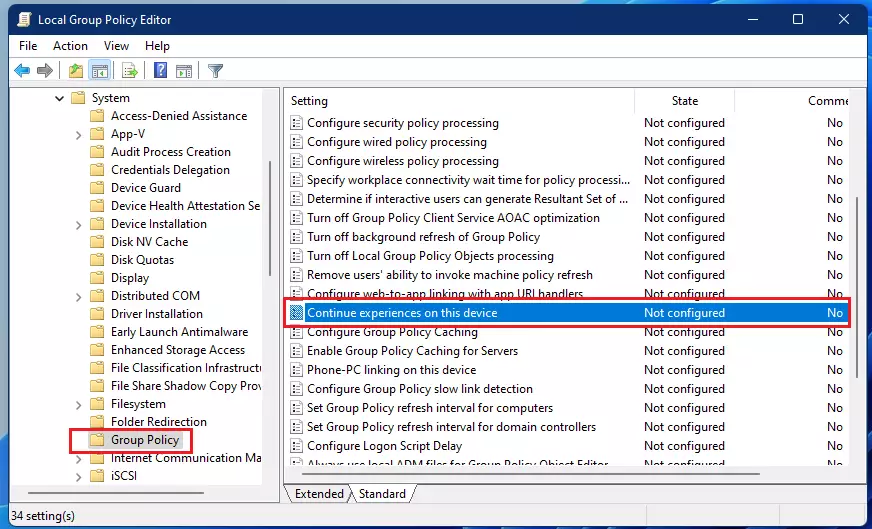
gpedit.mscand press Enter. The Local Group Policy Editor opens. If you see a “Windows cannot find” error, you are on Home edition. - In the left pane, go to Computer Configuration Administrative Templates System Group Policy. The right pane now lists the policies for that folder.
- Find the policy called Continue experiences on this device in the right pane.
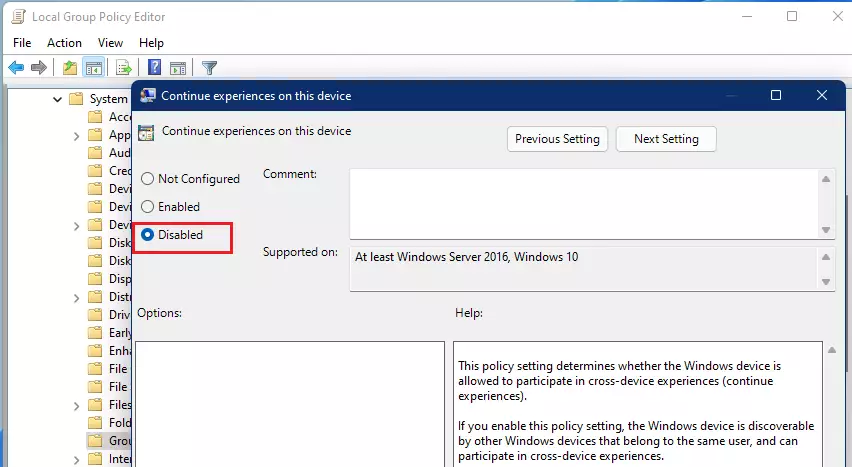
- Double-click it. A settings window opens for that policy.
- To enable Shared Experiences, select Not Configured (the default). Then click OK.
- To disable Shared Experiences, select Disabled. Then click OK.
- Close the Local Group Policy Editor window.
The change usually applies after a sign-out or restart. If the setting hasn’t taken effect, restart the PC. To undo it, open the same policy and set it back to Not Configured.
Option 2Turn Shared Experiences On or Off Using Registry Editor
If you use Windows 11 Home, you can make the same change in the Registry Editor. This is a hierarchical database that stores low-level settings for Windows and your installed apps. It also works on Pro, Enterprise, and Education if you prefer it to Group Policy.
A wrong edit can cause stability problems. In Registry Editor, click File Export, choose All as the export range, and save the file somewhere safe. Double-clicking that file later restores the backup.
- Press Windows key + R, type
regedit, and press Enter. Click Yes if User Account Control asks for permission. - In Registry Editor, go to this key:
HKEY_LOCAL_MACHINE\SOFTWARE\Policies\Microsoft\Windows\System. You can paste the path into the address bar at the top of the window. - To enable Shared Experiences, look in the right pane for a DWORD value named EnableCdp. If it exists, right-click it, click Delete, and confirm. If it doesn't exist, you don't need to do anything.
- To disable Shared Experiences, create or modify the DWORD value EnableCdp and set its value to 0. To create it, right-click an empty area of the right pane and choose New DWORD (32-bit) Value. Name it EnableCdp, then double-click it, enter 0 under Value data, and click OK.
- Close Registry Editor and restart your computer to apply the change.
A new DWORD starts at 0, which is the "off" setting. To undo a disable, delete the value and restart.
Here is how the registry code looks if you want to create a file to apply the changes:
Enable Shared Experiences (default)
reg delete "HKLM\SOFTWARE\Policies\Microsoft\Windows\System" /v EnableCdp /fDisable Shared Experiences
reg add "HKLM\SOFTWARE\Policies\Microsoft\Windows\System" /v EnableCdp /t REG_DWORD /d 0 /fSave the text in Notepad with a .reg extension, then double-click the file and confirm the prompts. Restart afterwards, as with the manual method.
Summary
- Shared Experiences help your PC share things and continue activities with other Windows devices.
- You must be an administrator to change these settings.
- Use the Local Group Policy Editor if you have Windows 11 Pro, Enterprise, or Education.
- If you have Home edition, use the Registry Editor instead.
- Turning off Shared Experiences stops your device from being found by others for sharing.
- Always double-check your changes before closing the tools, and restart if the setting doesn't seem to apply.
Managing Shared Experiences lets you control how your computer connects and shares tasks with nearby devices. Use the Settings app for a quick change. Use the Local Group Policy Editor on Pro, Enterprise, and Education editions, or the Registry Editor on Home. The Group Policy and Registry methods require administrator rights, and once you disable the feature your device stops being found by others for sharing.
Have a question about this guide?
Answered by AI from this guide. Good questions may be added to this page — please don't include personal details.
Did this guide fix your problem?

About the Author
Richard
Tech Writer, IT Professional
Richard is a writer at Geek Rewind who turns complex IT tasks into clear, step-by-step guides. He draws on years of hands-on experience in system administration and enterprise IT operations, focusing on Windows, Linux and WordPress: the problems people actually run into, and the fixes that work. His server and WordPress guides come from systems he runs himself. Richard builds and maintains the platform behind Geek Rewind, from its Ubuntu servers and Nginx configuration to its custom WordPress plugins. Many new tutorials start with readers' questions, and he's always glad to answer them in the comments.
No comments yet — be the first to share your thoughts!