How to Enable or Disable Wake On LAN (WOL) in Windows 11

- 24 steps
- Needs administrator rights
- Includes a restart or sign-out
Wake on LAN (WOL) lets you turn on your Windows 11 computer remotely over your local network. Another device sends a special network signal called a magic packet. The PC wakes from sleep or hibernation, and with the right settings it can also start from a full shutdown.
You can use WOL to reach files on your main desktop from a laptop in another room, or to start a PC for overnight downloads without leaving it running all day. Setup takes changes in three places: the BIOS/UEFI, your network adapter properties (or Device Manager), and Fast Startup. WOL works best over a wired Ethernet connection. Wi-Fi support depends heavily on the adapter and is often unreliable.
Open Device Manager, expand Network adapters, double-click your Ethernet adapter, and adjust settings under the Advanced and Power Management tabs. Alternatively, use the Settings app under Network & internet Advanced network settings.
Understanding Wake on LAN (WOL)
Wake on LAN is a feature that lets you turn on a computer remotely. Your network card keeps listening for a specific data frame called a magic packet, even while the PC is asleep or shut down. The packet contains the target adapter’s MAC address repeated in a fixed pattern. When the card sees its own address in that pattern, it tells the PC to power on.
For this to work, the network card must keep getting a small amount of power while the PC is off. That is why you need to change settings in the firmware, in Windows, and in the power options.
Step 1Check Your Computer’s BIOS/UEFI Settings
Adjust your computer’s low-level firmware settings, known as the BIOS or UEFI, before making changes in Windows 11. This interface gives your computer’s hardware its first instructions when you power on. If WOL is disabled here, nothing you change in Windows will make it work.
Accessing BIOS/UEFI
To get started, open your computer’s BIOS or UEFI settings:
- Restart your PC.
- As soon as the manufacturer’s logo appears, press the setup key. Common keys are Delete, F2, F10 and F12. Your motherboard or laptop manual lists the right one.
- Wait for the BIOS/UEFI screen to load. If Windows starts instead, you missed the window. Restart and try again, tapping the key repeatedly.
If your PC boots too fast to catch the key, you can also reach UEFI from within Windows 11 through the advanced startup options. The path depends on your Windows build, so the key method is usually quicker.
Finding the WOL Setting
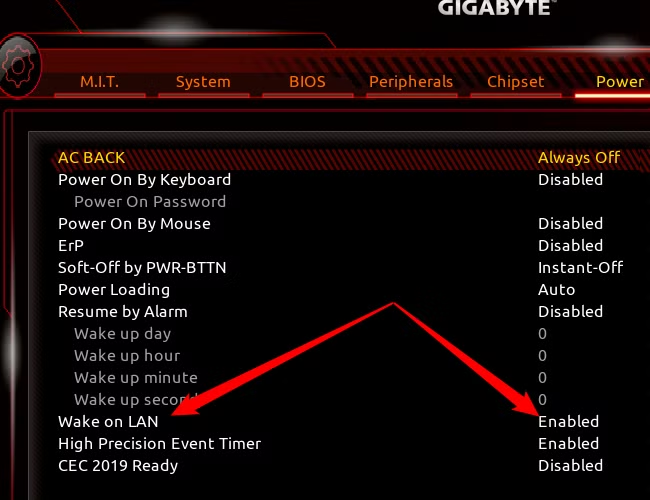
Inside the BIOS/UEFI menu, find the setting for Wake on LAN. Menu names vary by manufacturer, so check these places:
- Sections called Power Management, Advanced Settings or APM Configuration.
- Options named Wake on LAN or Power On By PCI/PCIe.
Set the option to Enabled. If you see related options such as a deep sleep or ErP/EuP power-saving mode, be aware that these can cut power to the network card. If WOL fails later, check whether such a setting is turned on and disable it.
Saving and Exiting
You must save your BIOS/UEFI changes, or they are lost when the PC restarts. Press F10 or choose the save and exit option on screen, then confirm. The PC restarts back into Windows 11.
Step 2Configure Network Adapter Settings in 🪟 Windows 11
Now that the firmware is set up, tell Windows 11 to let your network adapter wake the computer. You need an administrator account for the changes below. They apply to both Windows 11 Home and Pro.
Accessing Network Adapter Properties
You can start from the Settings app to reach your adapter’s properties:
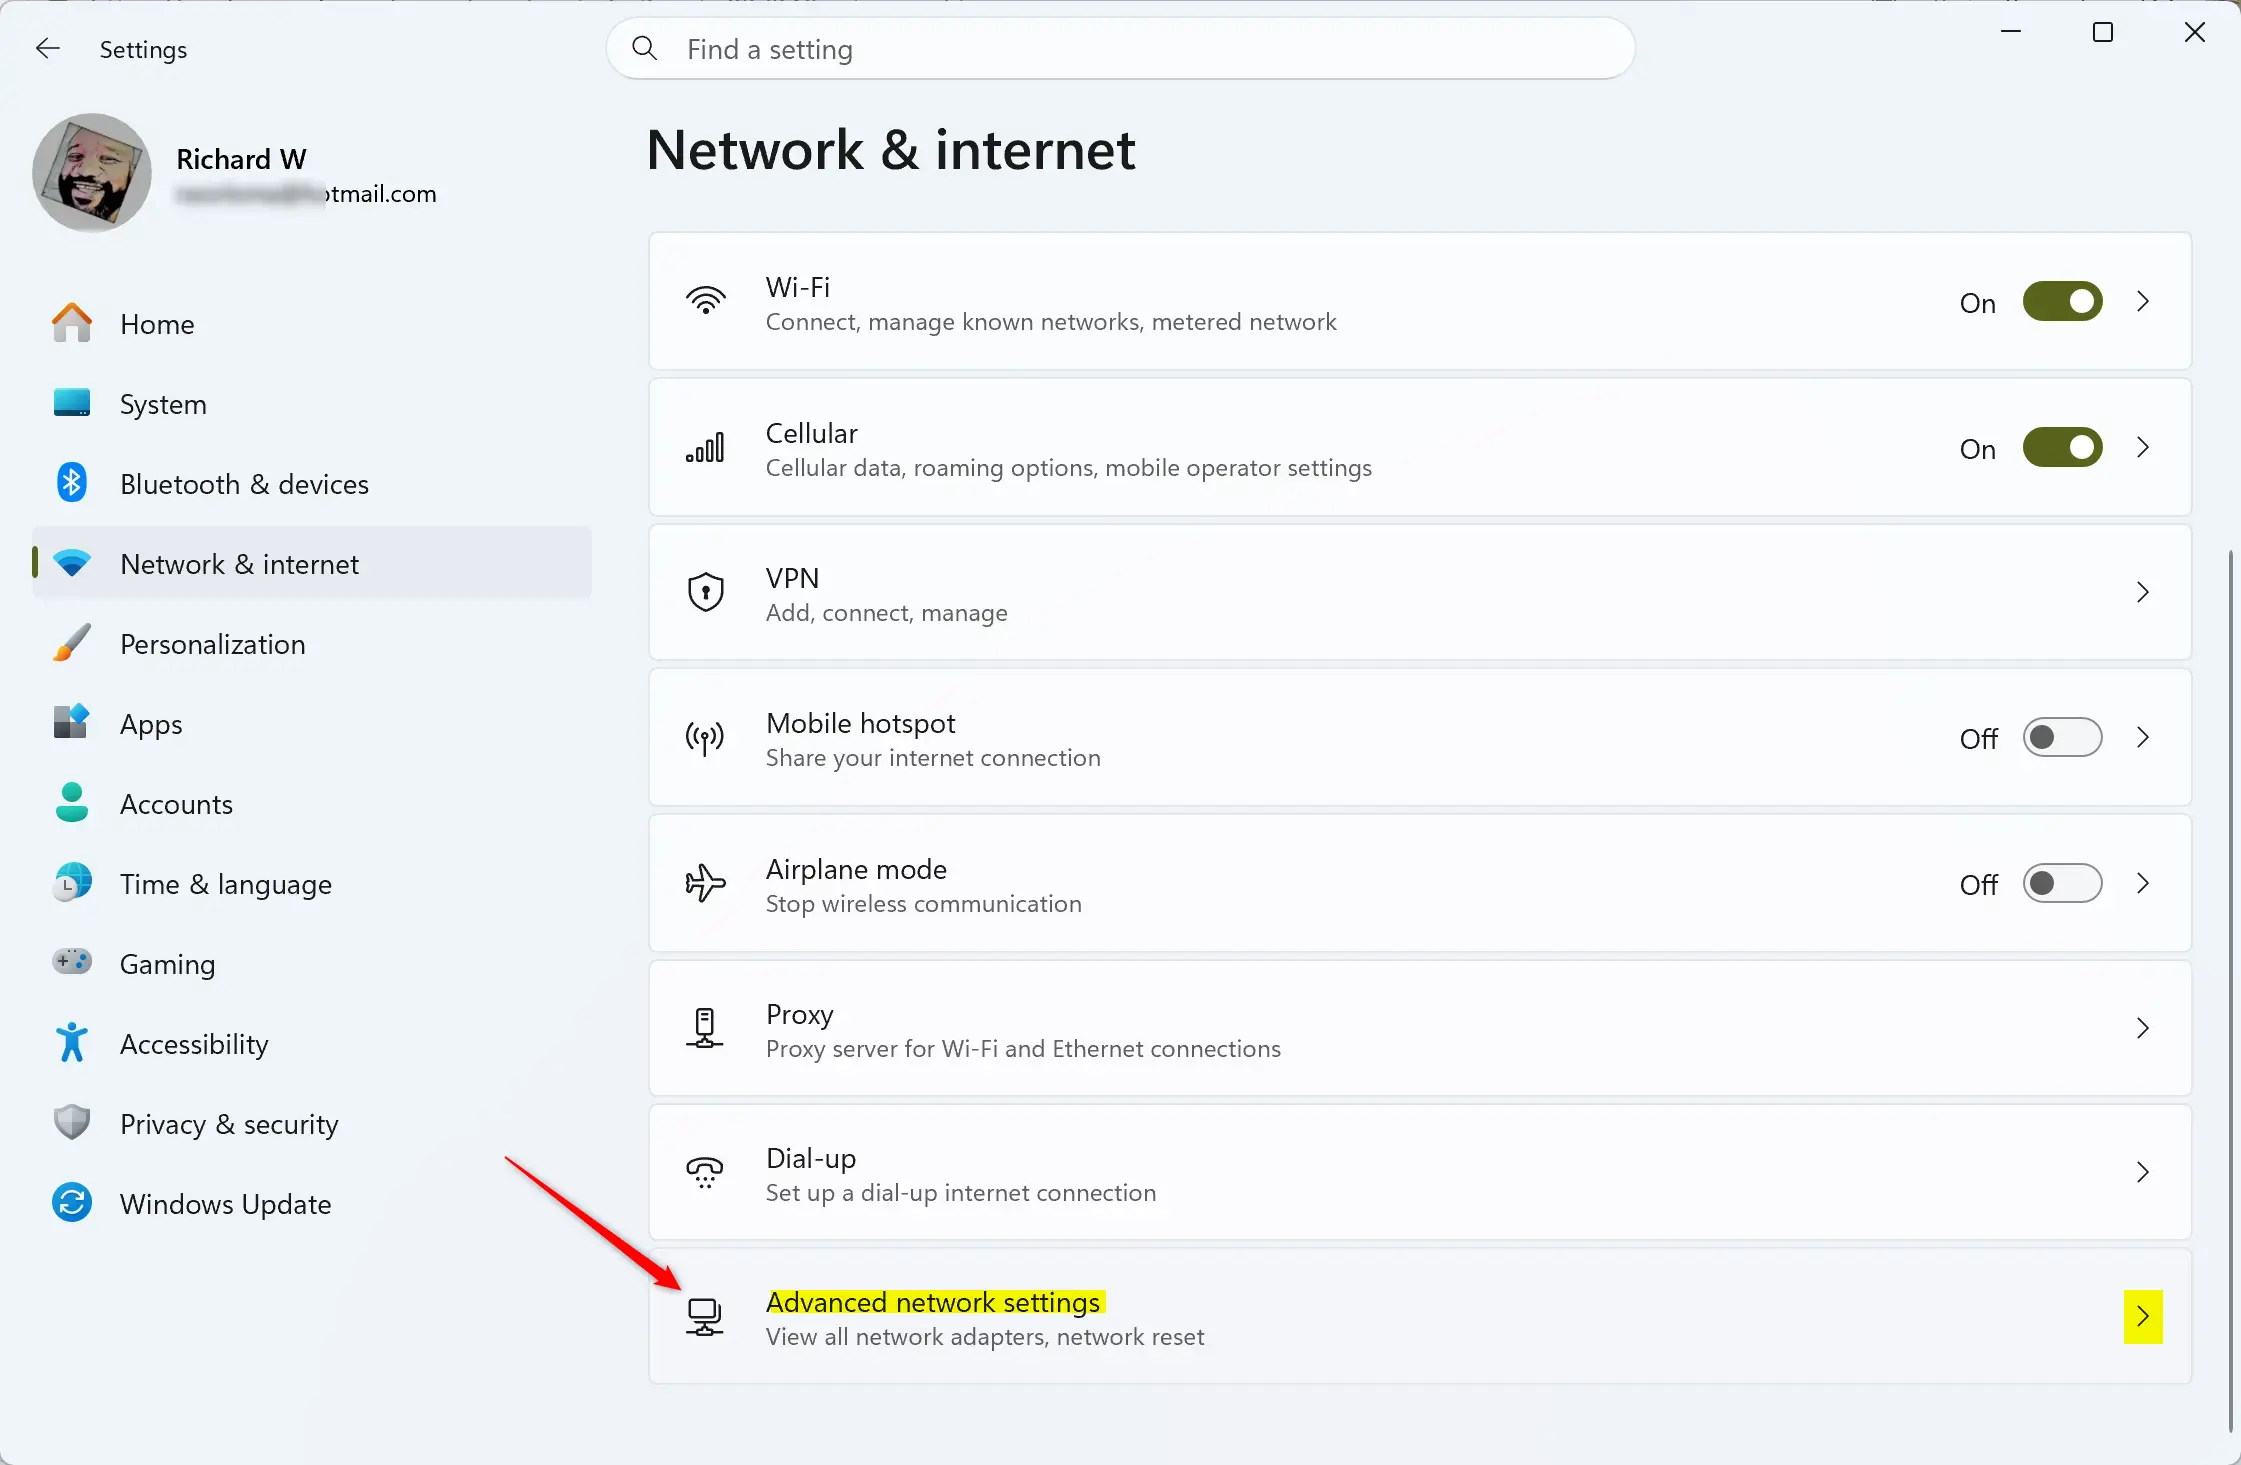
- Open Settings and select Network & internet.
- Choose Advanced network settings. You will see a list of your network adapters.
- Find the adapter you use for your wired connection. It is usually labeled Ethernet. Click it to expand its details.
- Under Network adapter details, click Edit.
Depending on your Windows 11 build, this screen may only let you rename the adapter and not show the Advanced and Power Management tabs. If that happens, use the Device Manager method in the next section, which always opens those tabs. You can also scroll down in Advanced network settings to More network adapter options, right-click your Ethernet adapter, choose Properties, then click Configure.
Enabling Wake on Magic Packet
The Wake on Magic Packet setting is on the Advanced tab of your network adapter properties:
- Click the Advanced tab.
- In the Property list, select Wake on Magic Packet.
- Set Value to Enabled.
Some adapters also list related properties, such as one for waking from a full shutdown. If you see one, enable it as well. Property names depend on the driver, so yours may differ slightly.
A magic packet is a special network signal that wakes a WOL-configured computer. It contains a unique pattern that your network adapter recognizes.
Configuring Power Management Options
Next, make sure the adapter can wake the PC. Open the Power Management tab. This keeps the network card powered enough to receive signals while the PC is off or asleep.
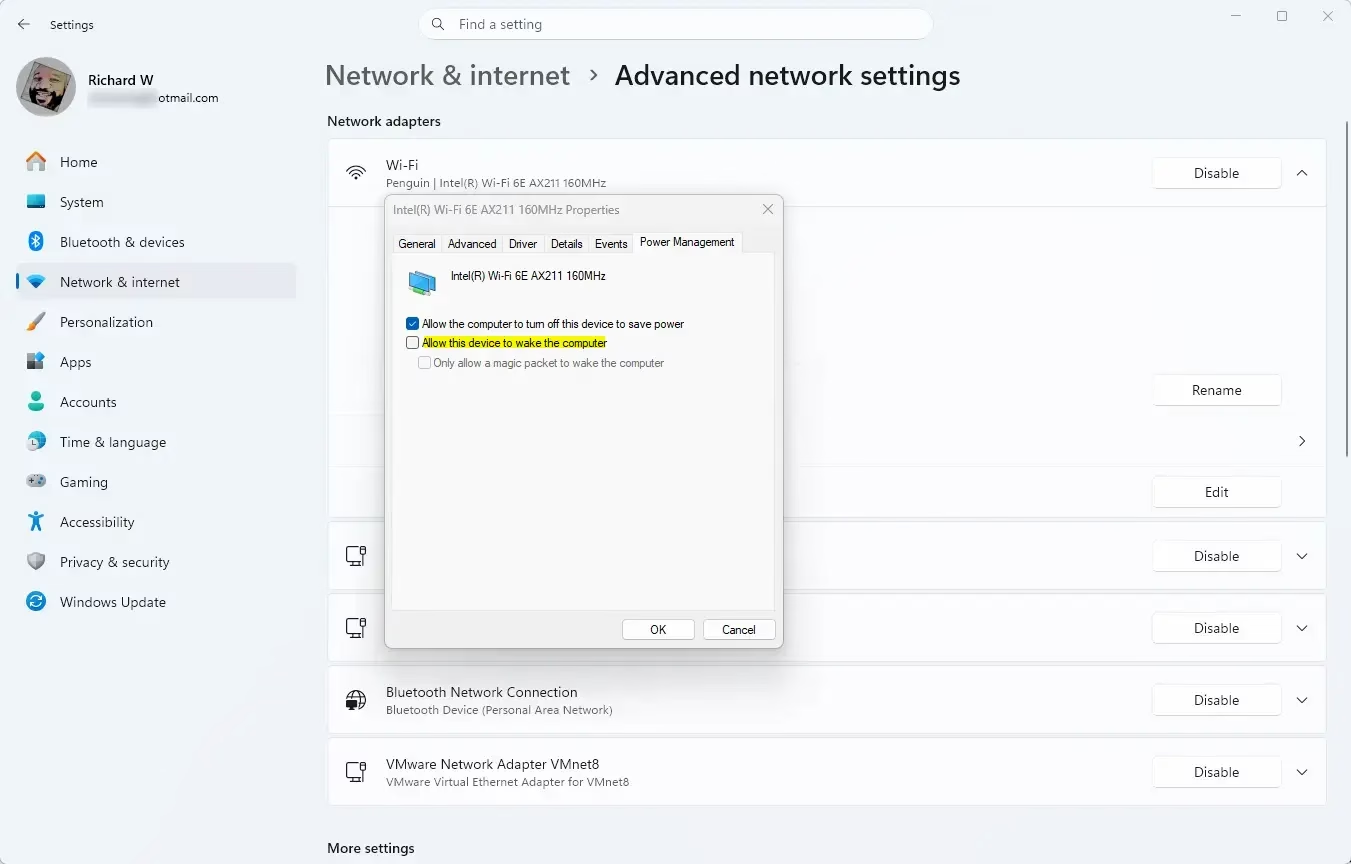
- Make sure Allow the computer to turn off this device to save power is checked. This allows Windows to put the network adapter into a low-power state where it can still listen for the magic packet.
- Crucially, check the box that says Allow this device to wake the computer. This is the main switch for WOL in Windows. If the box is greyed out, your driver may not support WOL or may be outdated. Install the latest driver from your PC or motherboard maker.
- You’ll also see an option called Only allow a magic packet to wake the computer. It’s a good idea to check this box. It adds an extra layer of security by ensuring that only the specific magic packet can wake your PC, not just any random network traffic.
Click OK to save all your changes. The properties window closes. Your network connection may drop for a moment while the adapter resets. This is normal.
Step 3Adjusting Device Manager Settings (Alternative Method)
Device Manager is another way to reach the same adapter settings. Use it if the Settings route does not show the tabs you need. It gives you direct access to the adapter’s driver, advanced properties and power features.
Opening Device Manager
There are two quick ways to open Device Manager:
- Right-click the Start button and select Device Manager from the menu.
- Or press Win+R to open the Run dialog, type
devmgmt.msc, and press Enter.
The Device Manager window opens with a list of hardware categories.
Locating Your Network Adapter
- Expand the Network adapters section.
- Find your wired Ethernet adapter. It usually has “Ethernet” in its name, and may include a vendor name such as Intel or Realtek. Ignore Wi-Fi , Bluetooth and virtual adapters.
- Double-click the adapter. Its Properties window opens.
Configuring Advanced and Power Management Tabs
You need to set both the Advanced and Power Management tabs for Wake on LAN to work properly. Set Wake on Magic Packet to enabled on the first tab, then confirm that the power options allow the device to wake the computer.
- First, go to the Advanced tab. Scroll through the list of properties and find Wake on Magic Packet. Set its value to Enabled.
- Next, click on the Power Management tab. Ensure that Allow this device to wake the computer is checked. It’s also recommended to check Only allow a magic packet to wake the computer. Make sure Allow the computer to turn off this device to save power is also checked.
If the Power Management tab is missing, the driver does not expose power options. Try updating the driver, or install the one from your PC maker's support page rather than the generic Microsoft one.
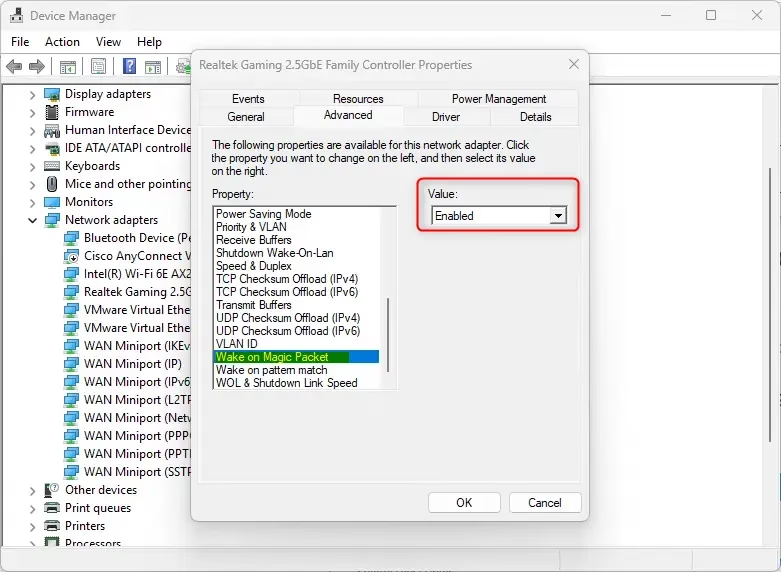
Click OK when you’re done. The window closes and the settings apply right away. You do not need to restart Windows for these tab changes.
Step 4Disabling Fast Startup (Often Necessary)
Windows 11's Fast Startup feature can stop Wake on LAN from working correctly. Fast Startup speeds up boot times by saving system data to disk on shutdown. That hybrid shutdown can leave network devices in a state that blocks WOL signals. Turning it off costs you a slightly slower boot, and you can turn it back on at any time.
Accessing Power Options
You change this setting in the classic Control Panel:
- Search for "Control Panel" in the Windows search bar and open it.
- In the top right corner, change the View by option to Large icons or Small icons.
- Click Power Options.
Finding Shutdown Settings
In the Power Options window, click Choose what the power buttons do in the left-hand sidebar. The System Settings page opens.
Disabling Fast Startup
Disabling Fast Startup prevents Windows 11 from entering a hybrid shutdown state that often blocks Wake on LAN signals. Follow these steps:
- Click Change settings that are currently unavailable. This needs administrator rights and approval at the UAC prompt. The greyed-out options under Shutdown settings become available.
- Uncheck Turn on fast startup (recommended).
- Click Save changes.
Your computer will now perform a full shutdown instead of a hybrid shutdown, which can help WOL function reliably. To undo this later, return to the same screen and check the box again.
Step 5Enabling WOL Using Command Prompt or PowerShell
If you prefer the command line, you can enable Wake on LAN with a short command. It is fastest once you know your network adapter's exact name. This method uses the powercfg tool that ships with Windows 11 Home and Pro.
Opening Windows Terminal as Administrator
- Click the Start button and type "Terminal".
- Right-click Windows Terminal in the search results and select Run as administrator.
- Approve the UAC prompt. A terminal window opens. Check that the title bar or prompt shows it is running with administrator rights, because powercfg changes will fail without them.
Listing Devices That Can Wake Your PC
First, list the devices that can wake your PC. In PowerShell or Command Prompt, type powercfg -devicequery wake_programmable and press Enter. The output lists every hardware component that can be set to turn on your system.
powercfg -devicequery wake_programmableLook through the list and find the exact name of your Ethernet adapter. It will look something like “Intel(R) Ethernet Connection (7) I219-V” or “Realtek PCIe GbE Family Controller.” Copy the name exactly, including punctuation and numbers in brackets, because the next command needs a precise match.
Enabling Wake on LAN
To enable waking, use the powercfg tool with your adapter name. Type powercfg -deviceenablewake followed by your exact adapter name in quotes. This turns on remote waking for that one piece of hardware.
powercfg -deviceenablewake "Your Network Adapter Name Here"For example, if your adapter name is “Intel(R) Ethernet Connection (7) I219-V,” the command would be:
powercfg -deviceenablewake "Intel(R) Ethernet Connection (7) I219-V"Press Enter to run the command. If it works, the command prints nothing and returns to the prompt, and the device is now enabled for waking your computer. An error message usually means the adapter name has a typo or the terminal is not elevated. You can check the result with the wake_armed query described below.
Step 6Disabling WOL Using Command Prompt or PowerShell
If you ever need to turn off Wake on LAN, you can also do it from the command line. This is useful if you’re troubleshooting or no longer need the feature, for example on a laptop you want to keep from waking in a bag.
Opening Windows Terminal as Administrator
As before, open Windows Terminal and make sure you select Run as administrator.
Listing Devices Currently Waking Your PC
Before you change anything, check which devices are currently allowed to wake the PC. In the terminal, run the powercfg -devicequery wake_armed command. The list shows the hardware that is actively armed to turn on your system. You can run it again after changes to confirm your setup.
powercfg -devicequery wake_armedFind your Ethernet adapter in this list and note its exact name. If it is not listed, WOL is not currently armed for it.
Disabling Wake on LAN
Disabling works like enabling. Type the powercfg -devicedisablewake command followed by your exact network adapter name in quotes. This stops your network card from responding to remote wake signals.
powercfg -devicedisablewake "Your Network Adapter Name Here"For instance:
powercfg -devicedisablewake "Intel(R) Ethernet Connection (7) I219-V"Press Enter. This command disarms the device, preventing it from waking your computer via WOL. Run the wake_armed query again to confirm the adapter no longer appears. You can re-enable it at any time with the enable command above.
Summary
Test your configuration by sending a magic packet from another device on your network. To do this you need the target PC's MAC address, which you can find in Settings Network & internet Ethernet, listed as the physical address. Use a free WOL app or tool on a phone or another computer, enter the MAC address, and send the packet. Put the target PC to sleep or shut it down first, then confirm it powers on.
If it does not wake, go back through the checklist below. The most common causes are a disabled BIOS/UEFI option, Fast Startup still on, or a PC connected over Wi-Fi.
- Check BIOS/UEFIRestart your PC and enter its BIOS/UEFI settings (often by pressing Delete, F2, F10, or F12 during startup). Find and enable the Wake on LAN or similar option. Save and exit.
- Configure Network AdapterGo to Windows Settings Network & internet Advanced network settings. Select your Ethernet adapter, click Edit, and in the Advanced tab, enable "Wake on Magic Packet." In the Power Management tab, check "Allow this device to wake the computer" and optionally "Only allow a magic packet to wake the computer."
- Disable Fast StartupSearch for Control Panel, open it, go to Power Options, then "Choose what the power buttons do." Click "Change settings that are currently unavailable" (requires admin rights) and uncheck "Turn on fast startup."
- Use Command Line (Optional)Open Windows Terminal as administrator. Use commands like `powercfg /devicequery wake_armed` to list devices and `powercfg /deviceenablewake "Your Adapter Name"` or `powercfg /devicerestoredefault "Your Adapter Name"` to enable or disable WOL.
Wake on LAN (WOL) setup provides convenient remote access. If you do not need it, you can turn the feature off again by reversing the steps above.
Have a question about this guide?
Answered by AI from this guide. Good questions may be added to this page — please don't include personal details.
Did this guide fix your problem?

About the Author
Richard
Tech Writer, IT Professional
Richard is a writer at Geek Rewind who turns complex IT tasks into clear, step-by-step guides. He draws on years of hands-on experience in system administration and enterprise IT operations, focusing on Windows, Linux and WordPress: the problems people actually run into, and the fixes that work. His server and WordPress guides come from systems he runs himself. Richard builds and maintains the platform behind Geek Rewind, from its Ubuntu servers and Nginx configuration to its custom WordPress plugins. Many new tutorials start with readers' questions, and he's always glad to answer them in the comments.
[…] can also configure a Windows PC to wake up when there is network activity, but not all PCs support Waking on […]
[…] a PC supports it, the Wake-On-LAN feature is a better option to wake it up and connect to it remotely. It comes ready to use with some network adapters and Windows systems. If a PC does not support […]