How to Disable Bing Trending Searches in Microsoft Edge


To remove trending searches from Edge, open Settings Privacy, search, and services > Address bar and search > Search suggestions and filters, then turn off Show me trending searches from Microsoft Bing. If you manage several accounts or want the change to stick, you can also set a registry policy, covered in the second method below.
Bing trending searches are the popular search ideas that appear when you click or type in the Microsoft Edge address bar. Edge version 110 and newer lets you turn them off, which leaves you with a quieter address bar. The first method takes about a minute. The second is for shared PCs or setups where you want the setting locked.
To turn off Bing trending searches in Edge, open Settings Privacy, search, and services > Address bar and search > Search suggestions and filters, then switch off Show me trending searches from Microsoft Bing. The change applies immediately with no restart. Edge version 110 or newer is required. On shared or managed PCs, a registry policy under 🗝️HKEY_LOCAL_MACHINE\
Turn on or off Bing Trending searches in the address bar in Edge
This method uses the Edge Settings page. It works on every Windows 11 edition, Home included, and needs no administrator rights. It changes the setting for your Edge profile only, and you can reverse it at any time. These steps turn off trending on Bing in the Edge address bar.
- Open the Microsoft Edge browser. The browser window opens.
- Click Settings and more. This is the three horizontal dots button in the top right corner (shortcut: Alt+F). A menu drops down.
- Select Settings. The Edge Settings page opens in a new tab.

- Select Privacy, search, and services in the list on the left. The privacy options appear on the right.
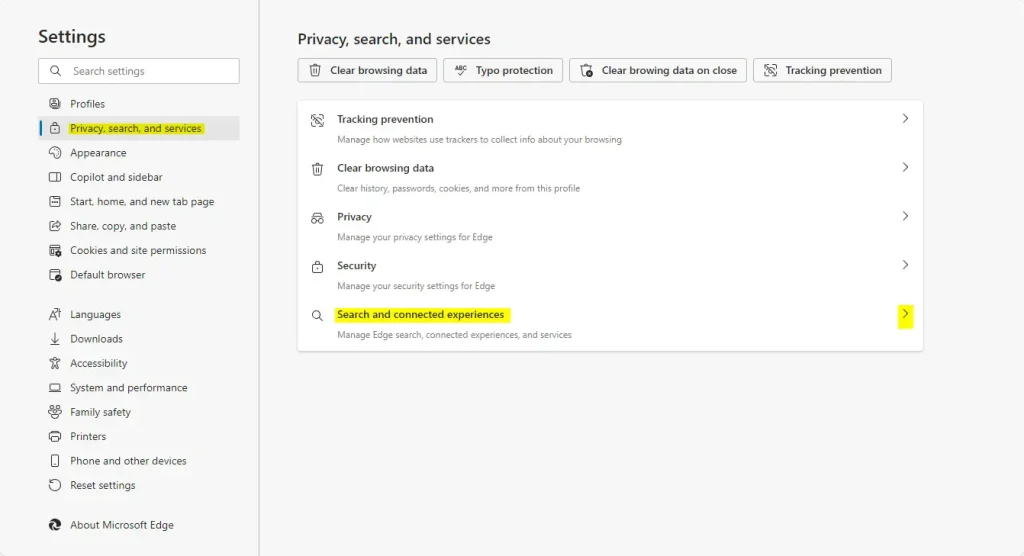
- Scroll down to the Services section and click Address bar and search. It opens a page with the address bar options.
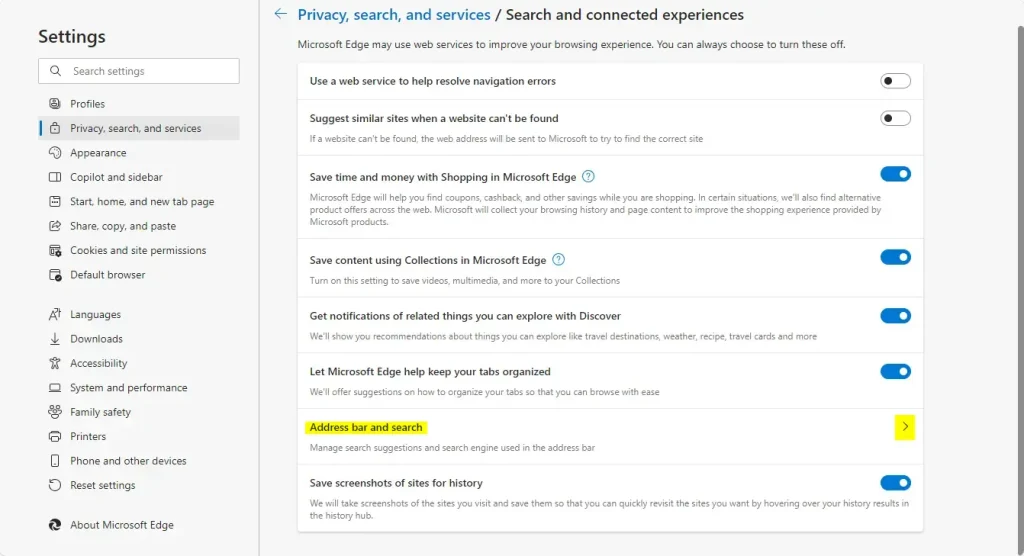
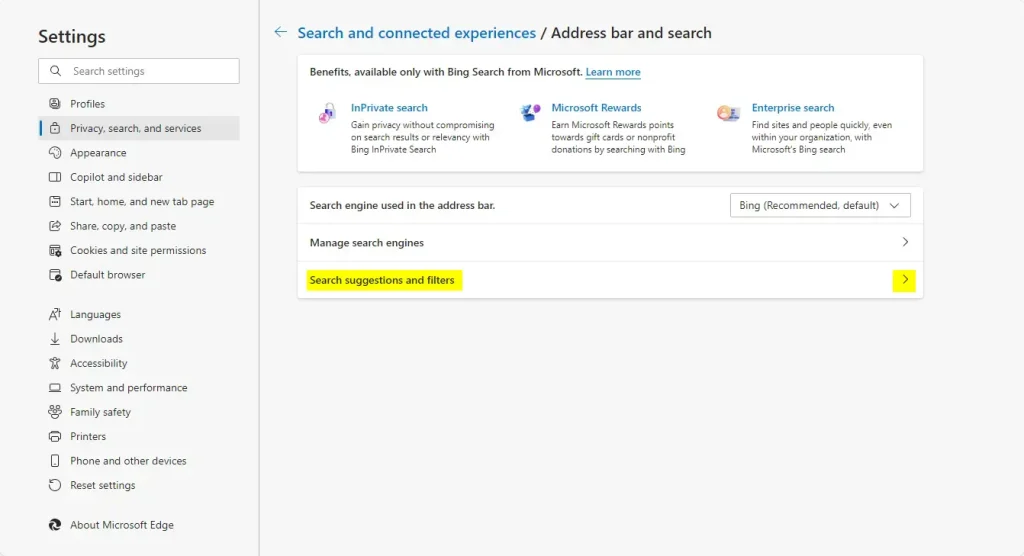
- Click the Search suggestions and filters tile. The page that opens lists the suggestion settings.
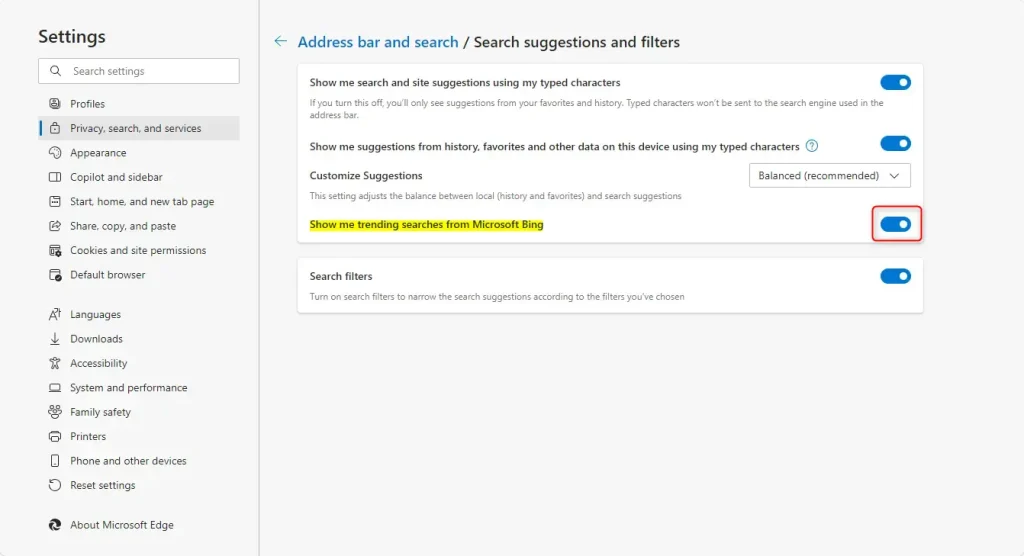
- Find Show me trending searches from Microsoft Bing. This tile controls whether trending searches appear.
- Click the toggle switch next to it. Set it to Off to hide trending searches, or back to On to show them again.
The change applies right away. Click the address bar and the trending list should be gone. If you were trying to remove trending now from Edge search, this is the switch that does it.
An older build won’t have it, so update Edge first. You can check the version and trigger an update under About Microsoft Edge at the bottom of the left list in Settings. If the toggle is greyed out or Edge says some settings are managed by your organization, a policy is controlling it. On a work PC, ask your administrator. On your own PC, check whether you set the registry policy from the second method.
You can close the Edge settings tab when you are finished. Edge saves the change on its own, so there is nothing to confirm.
Enable / Disable Bing Trending searches in Edge using the Registry
This method uses the Windows Registry, a database that stores settings for Windows and its applications. You add a policy for Edge under HKEY_LOCAL_MACHINE\SOFTWARE\Policies\Microsoft\Edge. The policy forces the feature off for the whole system, which helps if several people share the PC or you want a setting that users can't change from the browser. It works on Home as well as Pro, but you need an administrator account.
It takes a minute and gives you a safe way back.
These steps create the policy value that switches trending searches in Edge on or off for every user on the PC.
- Open the Windows Registry. Approve the User Account Control prompt if one appears.
- Go to the key path shown below. Use the folder tree on the left, or paste the path into the address bar at the top of the editor.
Computer\HKEY_LOCAL_MACHINE\SOFTWARE\Policies\Microsoft\Edge
If the Edge key does not exist yet under Microsoft, right-click Microsoft, choose New Key, and name it Edge. Then select the new key so you can work inside it.
- Right-click Edge in the left pane, then choose New DWORD (32-bit) Value. A new entry appears in the right pane with its name ready to edit.
- Name the new entry AddressBarTrendingSuggestEnabled and press Enter. Check the spelling, because Edge ignores a policy with the wrong name.
- Double-click AddressBarTrendingSuggestEnabled. The Edit DWORD (32-bit) Value window opens.
- Enter the value in the Value data box. Use
1to turn on trending searches in Edge. To turn them off, enter0. - Click OK. The entry now shows your value in the right pane.
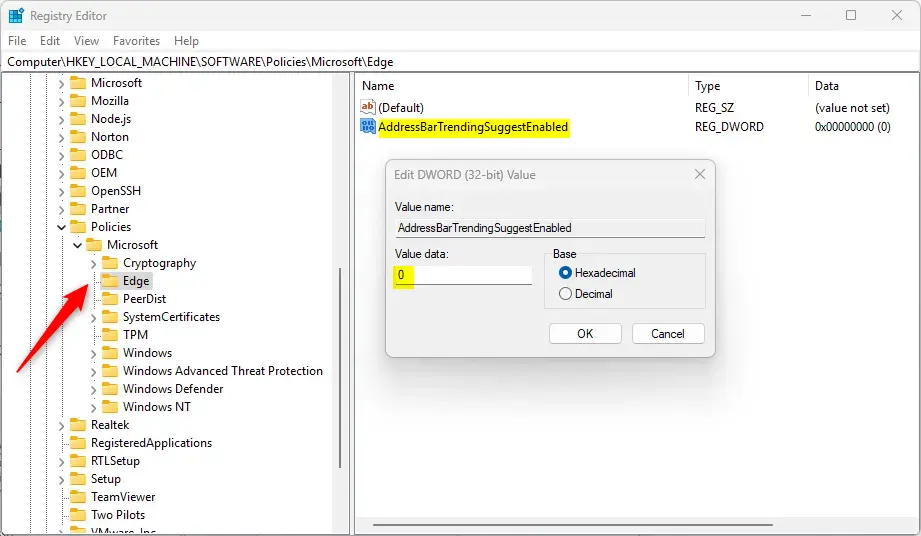
To undo this, delete the AddressBarTrendingSuggestEnabled entry you created. Right-click it, choose Delete, and confirm. Edge then goes back to its default behavior and the setting in Edge Settings works again.
AddressBarTrendingSuggestEnabled
Close Registry Editor and close any open Edge windows, then open Edge again. You might need to restart your computer for the change to take effect. Once a policy sets this option, Edge may show the toggle as locked or say that some settings are managed by your organization. That is normal for a policy-based setting.
Managing Bing trending searches helps create a cleaner browsing experience.
- Enabling or disabling Bing's "Trending Searches" feature in Microsoft Edge is straightforward and can be done through the browser settings or the Windows Registry Editor.
- Users who prefer a cleaner browsing experience can quickly turn off trending searches to avoid distractions.
- Modifying settings in Edge can enhance user experience and allow for personalized browsing.
- Always back up the registry before making any changes to ensure system stability.
- These adjustments give users greater control over their search and browsing preferences in Microsoft Edge.
Have a question about this guide?
Answered by AI from this guide. Good questions may be added to this page — please don't include personal details.
Did this guide fix your problem?

About the Author
Richard
Tech Writer, IT Professional
Richard is a writer at Geek Rewind who turns complex IT tasks into clear, step-by-step guides. He draws on years of hands-on experience in system administration and enterprise IT operations, focusing on Windows, Linux and WordPress: the problems people actually run into, and the fixes that work. His server and WordPress guides come from systems he runs himself. Richard builds and maintains the platform behind Geek Rewind, from its Ubuntu servers and Nginx configuration to its custom WordPress plugins. Many new tutorials start with readers' questions, and he's always glad to answer them in the comments.
No comments yet — be the first to share your thoughts!