How to Create a Self-Signed SSL Certificate on Ubuntu 24.04


A self-signed SSL certificate on Ubuntu 24.04 is a certificate you create and sign yourself, instead of getting it from a certificate authority (CA). It encrypts web traffic on a test server or local machine. Browsers show a security warning when you visit the site, because no CA has verified your identity. The encryption still works. The browser just has no third party to vouch for who you are.
OpenSSL is the tool that handles the Secure Sockets Layer and Transport Layer Security (SSL/TLS) protocols, and it is installed on Ubuntu 24.04 by default. With a few terminal commands you build a private key and a certificate, so you can test secure web apps without paying for a commercial certificate. Do not use a self-signed certificate on a public production site. Visitors will see the warning, and many clients will refuse the connection.
Generate a private key and certificate signing request using `openssl genrsa` and `openssl req`. Then, create the self-signed certificate with `openssl x509`, specifying the key, request, and desired validity period.
OpenSSL config file
The openssl.cnf configuration file lets you list alternative domain names and IP addresses before you generate the certificate. It lives in the /etc/ssl directory. Add your server details to it so the certificate covers every name you use to reach your local sites. Modern browsers check these alternative names and ignore the common name alone.
You need an account with sudo privileges to edit this file, because it is owned by root. Make a backup copy first. If something goes wrong, you can restore the original.
The generation process needs every DNS (Domain Name System) name you want the certificate to be valid for. Say you want a certificate for example.com and its www subdomain. You must list both example.com and www.example.com. A name you leave out will trigger a name-mismatch error in the browser, even after you accept the certificate warning.
First, open the openssl.cnf file in the /etc/ssl directory with a text editor by running the command below. Use sudo so you can save your changes.
sudo nano /etc/ssl/openssl.cnf
Then add a [ Domain Name ] section that holds your domain and subdomains. If you have more than one hostname or domain name, separate them with commas. Use the same names you will type into the browser.
Add your entry at the end of the file, below the existing sections, so you do not break any settings that are already there.
[ example.com ]
subjectAltName = DNS:srv1.example.com, DNS:srv2.example.com, DNS: srv3.example.com
Save the file and exit the editor. In nano, press Ctrl+O and then Enter to save, then Ctrl+X to exit. No restart is needed. OpenSSL reads the file each time you run it.
Create SSL certificate
Next, run the OpenSSL commands that create a private key and a certificate signing request (CSR). You then use these files to encrypt traffic on your web server, with no paid certificate from a CA. Keep the private key secret. Anyone who has it can impersonate your server.
sudo openssl ecparam -name prime256v1 -genkey -out server.key
sudo openssl req -new -key server.key -out server.csr
When prompted, enter the certificate details. They are saved in the server.csr file, which we use in the next step to generate the actual certificate. The prompts usually ask for country, state, locality, organization and common name. Set the common name to your main domain, such as the one you listed in the configuration file. Most other fields can be left blank by pressing Enter.
You are about to be asked to enter information that will be incorporated
into your certificate request.
What you are about to enter is what is called a Distinguished Name or a DN.
There are quite a few fields but you can leave some blank
For some fields there will be a default value,
If you enter '.', the field will be left blank.
-----
Country Name (2 letter code) [AU]:US
State or Province Name (full name) [Some-State]:New York
Locality Name (eg, city) []:Brooklyn
Organization Name (eg, company) [Internet Widgits Pty Ltd]:GeekRewind
Organizational Unit Name (eg, section) []:IT
Common Name (e.g. server FQDN or YOUR name) []:srv1.example.com
Email Address []:admin@example.com

Please enter the following 'extra' attributes
to be sent with your certificate request
A challenge password []:
An optional company name []:
Finally, run the command below to generate a self-signed certificate valid for 10 years. A long lifetime is convenient on a lab machine, but you can pick a shorter one if you prefer to rotate certificates more often.
sudo openssl x509 -in server.csr -out server.crt -req -signkey server.key -extfile /etc/ssl/openssl.cnf -extensions example.com -days 3650
If the command runs successfully, you will see output similar to the lines below. If you see an error instead, check that the file names in the command match the files you created and that you are in the folder that holds them.
Certificate request self-signature ok
subject=C = US, ST = New York, L = Brooklyn, O = GeekRewind, OU = IT, CN = srv1.example.com
Once the files are generated, copy them to the /etc/ssl/private directory. This is the standard place for keys and certificates on Ubuntu. Only root and members of the ssl-cert group can read it, so use sudo for the copy.
sudo cp server.* /etc/ssl/private
List the contents of the /etc/ssl/private directory. You should see the files you just created. Because of the directory permissions, you will probably need sudo to list it. If the files are missing, run the copy step again and read any error message it prints.
total 24
drwx--x--- 2 root ssl-cert 4096 Feb 21 10:05 .
drwxr-xr-x 4 root root     4096 Feb 21 10:01 ..
-rw-r--r-- 1 root root      847 Feb 21 10:05 server.crt
-rw-r--r-- 1 root root      481 Feb 21 10:05 server.csr
-rw------- 1 root root      302 Feb 21 10:05 server.key
-rw-r----- 1 root ssl-cert 1700 Jan 15 12:06 ssl-cert-snakeoil.key
Validate the server.crt file using this link. Check that the subject matches your domain, that the alternative names include every hostname you added, and that the validity dates cover the period you expect.
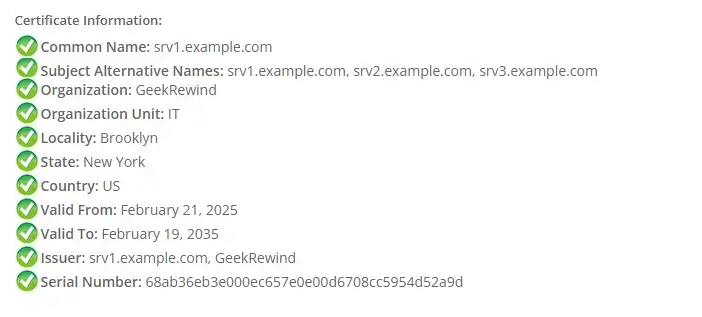
That should do it! Point your web server at the certificate and key files, and reload the server. To undo everything, delete the generated files and remove the section you added from openssl.cnf, or restore your backup.
Conclusion:
Creating a self-signed SSL certificate on Ubuntu 24.04 is a straightforward process, and it teaches you a lot about how SSL/TLS works. Here are the key takeaways:
- No Cost InvolvedSelf-signed certificates are free to create, making them an economical choice for personal projects and testing.
- Hands-on ExperienceThis process provides practical knowledge about how keys, signing requests and certificates fit together.
- Customizable OptionsYou can specify multiple hostnames or domain names in the OpenSSL configuration file.
- LongevityThe generated self-signed certificate can be valid for a substantial period (up to 10 years in this guide).
- Easy ManagementStoring the certificate files in the appropriate directories keeps them protected and easy to find.
This process gives you a self-signed SSL certificate that matches your own hostnames, so you get encrypted connections in your local development environment. Browsers will still warn about the certificate until you choose to trust it on that machine.
Have a question about this guide?
Answered by AI from this guide. Good questions may be added to this page — please don't include personal details.
Did this guide fix your problem?

About the Author
Richard
Tech Writer, IT Professional
Richard is a writer at Geek Rewind who turns complex IT tasks into clear, step-by-step guides. He draws on years of hands-on experience in system administration and enterprise IT operations, focusing on Windows, Linux and WordPress: the problems people actually run into, and the fixes that work. His server and WordPress guides come from systems he runs himself. Richard builds and maintains the platform behind Geek Rewind, from its Ubuntu servers and Nginx configuration to its custom WordPress plugins. Many new tutorials start with readers' questions, and he's always glad to answer them in the comments.
[…] you can use a public certificate like Let’s Encrypt or a self-signed on on your […]
[…] a public certificate like Let’s Encrypt or a self-signed on your […]
[…] a public certificate like Let’s Encrypt or a self-signed on your […]
[…] Set up a Self-signed SSL certificate […]