How to Re-Enable TLS 1.0 and 1.1 on Windows 11


TLS 1.0 and 1.1 are older security protocols. Microsoft turned them off by default in Windows 11 version 22H2 to protect your PC from online threats. They are still too weak for modern use, which is why the default changed.
Re-enabling them lets you connect to older websites and legacy apps that still rely on this technology. Typical examples are an old intranet site, a line-of-business app, or a device web page that was never updated. The cost is lower security, and your data is more exposed to attack. Only do this if you have no other choice, and treat it as a temporary fix.
Before you start, make sure you are signed in with an administrator account. The steps work on Windows 11 Home and Pro, because both include the Registry Editor. Back up the registry or create a restore point first, so you can undo the change if something goes wrong.
Open Registry Editor, navigate to 🗝️HKEY_LOCAL_MACHINE\
How to Check Enabled TLS Versions
Review the current configuration before you touch the registry. PowerShell shows which protocols are active on the machine, and it tells you whether the keys you need already exist. That saves you from creating duplicates.
- Right-click the Start button and choose Terminal (Admin). Click Yes if User Account Control asks for permission. A PowerShell window opens with administrator rights.
- Run this command:
Get-ItemProperty -Path 'HKLM:\SYSTEM\CurrentControlSet\Control\SecurityProviders\SCHANNEL\Protocols\*' - Read the output. If the keys are already there, you only need to check their values later instead of creating them. If nothing is returned, the keys do not exist yet, and you will create them in the steps below.
Re-enabling TLS 1.0 and 1.1 via Registry Editor
Re-enabling TLS 1.0 and 1.1 on Windows 11 means editing system keys so that older security protocols are allowed again. Some older apps and websites still need them to connect properly. You do this in the Registry Editor by adding the specific values that tell Windows it may use these legacy encryption methods again. No extra software is needed.
A mistake in the registry can cause problems, so work slowly and check each name as you type it.
Apply these modifications to the Schannel settings in the Windows Registry. Schannel is the Windows component that handles TLS and SSL connections. Its settings control which protocol versions the system offers and accepts.
Step 1: Press Win + R, type regedit, and hit Enter to launch the Registry Editor. Click Yes if User Account Control appears. The Registry Editor window opens, with a folder tree on the left and values on the right.
Step 2: Navigate to: HKEY_LOCAL_MACHINE\SYSTEM\CurrentControlSet\Control\SecurityProviders\SCHANNEL\Protocols
You can paste the path into the address bar at the top of the Registry Editor and press Enter, or expand the folders one by one in the left pane. When you arrive, the last folder in the path is selected.
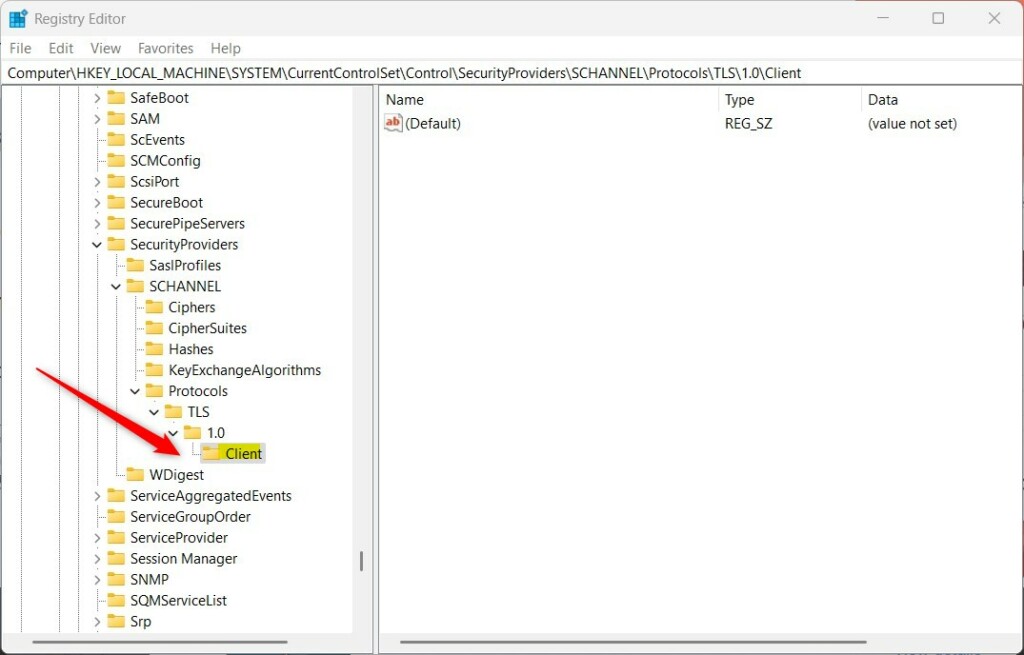
Step 3: Create the keys for TLS 1.0.
- Right-click the
Protocolsfolder and select New Key - Name the new key
TLS 1.0and press Enter. If it already exists, as your PowerShell check may have shown, skip this and use the existing one. - Right-click the new key, select New Key, and name it
Client. - Right-click the parent key again, select New Key, and name it
Server.
Check the spelling carefully. Windows ignores a key with the wrong name and does not show an error.
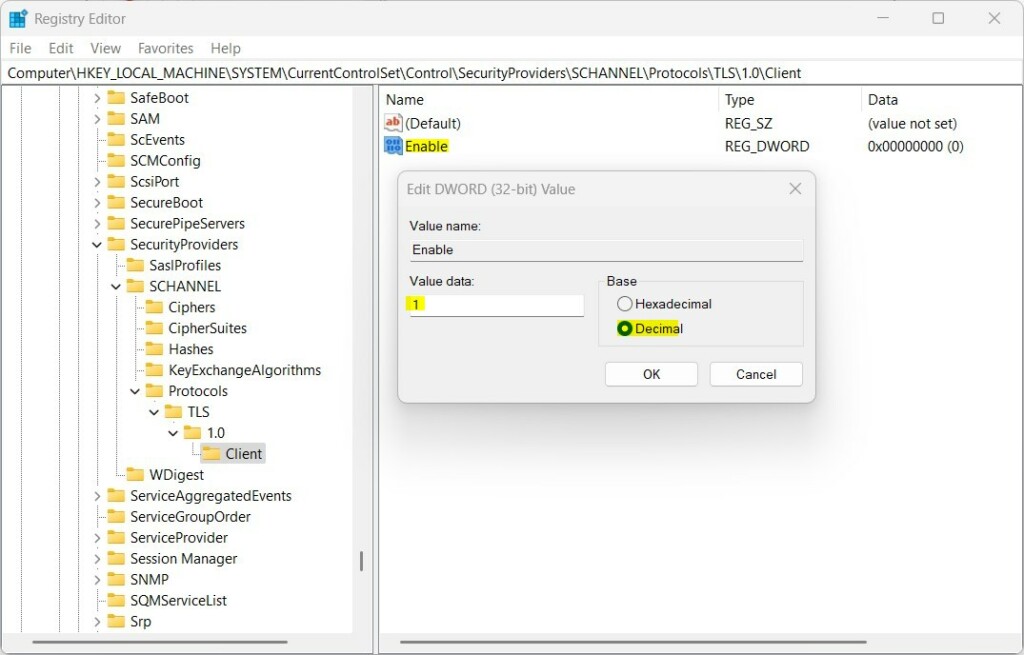
Step 4: Add the values. Do the following in both the Client and Server folders.
- Select the folder, then right-click the empty space in the right pane.
- Select New DWORD (32-bit) Value and name the entry
Enabled. - Double-click the entry, type
1in the Value data box, and click OK. - Create a second DWORD named
DisabledByDefault. Double-click it, type0in the Value data box, and click OK.
Leave the Base option on its default setting. Each folder should now list both entries with the data you typed. If a value already existed, double-click it and change the data instead of creating a new one.
Step 5: Repeat the key creation process for TLS 1.1 if necessary. Use the same subkeys and the same two values as you did for TLS 1.0. You only need this if you actually have software that requires TLS 1.1, so skip it if TLS 1.0 is enough.
When you are done, close the Registry Editor and restart the PC. The changes do not take effect until the restart. After you sign back in, you can run the PowerShell check from the start of this guide again to confirm the keys are in place.
To undo the change later, open the same keys and set the values back to what they were. You can also delete the keys you created, then restart.
Troubleshooting SSL Handshake Failures
An SSL handshake error means your PC and the server failed to negotiate a secure connection. Turning on TLS 1.0 might resolve the issue, but it is not the only possible cause. The server may also require a newer protocol or a cipher your PC does not offer.
If the connection still fails after the restart, check these things:
- Check Group Policy settings. They frequently override registry configurations. Group Policy is available on Windows 11 Pro, Enterprise and Education, but not on Home.
- Confirm you edited the right keys and spelled every name exactly. A typo means Windows ignores the setting.
- Make sure you restarted the PC after the change. Signing out is not enough.
- Check whether the app uses its own settings. Some browsers and older programs choose their own protocol versions and may need a change in their own options.
Summary
Restoring TLS 1.0 and 1.1 is a temporary workaround for legacy software dependencies. Because these protocols lack adequate security, running them leaves the Windows 11 environment exposed. Upgrading software to support modern standards like TLS 1.2 or 1.3 remains the safest long-term approach.
If you must keep the old protocols for a while, use them only on trusted networks, and keep the rest of the PC fully updated. Once the old software or device is updated or retired, undo the change.
Have a question about this guide?
Answered by AI from this guide. Good questions may be added to this page — please don't include personal details.
Did this guide fix your problem?

About the Author
Richard
Tech Writer, IT Professional
Richard is a writer at Geek Rewind who turns complex IT tasks into clear, step-by-step guides. He draws on years of hands-on experience in system administration and enterprise IT operations, focusing on Windows, Linux and WordPress: the problems people actually run into, and the fixes that work. His server and WordPress guides come from systems he runs himself. Richard builds and maintains the platform behind Geek Rewind, from its Ubuntu servers and Nginx configuration to its custom WordPress plugins. Many new tutorials start with readers' questions, and he's always glad to answer them in the comments.
No comments yet — be the first to share your thoughts!