
This article explains how to create a self-signed SSL certificate on Ubuntu 24.04.
A self-signed certificate is a digital certificate signed by the person or organization that created it rather than a trusted certificate authority (CA). Self-signed certificates are free to create, which makes them an excellent choice for small projects or personal use.
Creating self-signed certificates is a valuable learning experience for those interested in SSL/TLS. It provides a hands-on understanding of certificate work without needing a CA’s involvement.
OpenSSL config file
An easy way to manage your server hostname is in the OpenSSL config file containing all the server names.
In this post, we’ll add all the DNS or domain names for which we want to generate certificates.
First, open the openssl.cnf file in the [/etc] directory by running the command below.
sudo nano /etc/ssl/openssl.cnf
Then, add a [ Domain Name ] section containing domain and sub-domains. If you have multiple hostnames or domain names, comma-separate them.
Add your your entry to the end of the file.
[ example.com ]
subjectAltName = DNS:srv1.example.com, DNS:srv2.example.com, DNS: srv3.example.com
Save the file and exit.
Create SSL certificate
With your hostnames or domain names specified, create your self-signed SSL certificates.
sudo openssl ecparam -name prime256v1 -genkey -out server.key
sudo openssl req -new -key server.key -out server.csr
When prompted, enter the certificate details in the server.csr file. We’ll use this file to generate the actual certificate.
You are about to be asked to enter information that will be incorporated
into your certificate request.
What you are about to enter is what is called a Distinguished Name or a DN.
There are quite a few fields but you can leave some blank
For some fields there will be a default value,
If you enter '.', the field will be left blank.
-----
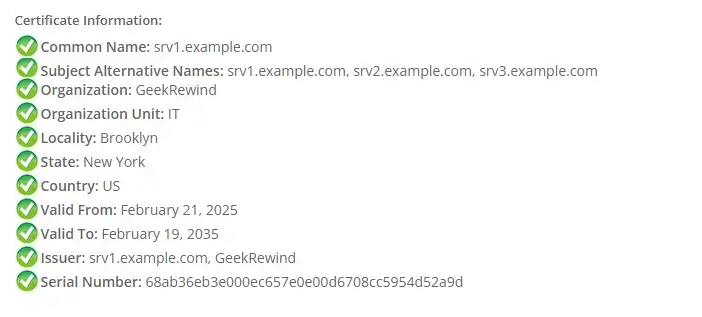
Country Name (2 letter code) [AU]:US
State or Province Name (full name) [Some-State]:New York
Locality Name (eg, city) []:Brooklyn
Organization Name (eg, company) [Internet Widgits Pty Ltd]:GeekRewind
Organizational Unit Name (eg, section) []:IT
Common Name (e.g. server FQDN or YOUR name) []:srv1.example.com
Email Address []:[email protected]
Please enter the following 'extra' attributes
to be sent with your certificate request
A challenge password []:
An optional company name []:
Finally, run the command below to generate a self-signed certificate valid for 10 years.
sudo openssl x509 -in server.csr -out server.crt -req -signkey server.key -extfile /etc/ssl/openssl.cnf -extensions example.com -days 3650
If the command runs successfully, you will see a result similar to the lines below.
Certificate request self-signature ok
subject=C = US, ST = New York, L = Brooklyn, O = GeekRewind, OU = IT, CN = srv1.example.com
Once the certificates are generated, you can copy them to the [/etc/ssl/private] directory.
sudo cp server.* /etc/ssl/private
You should see the files created when you list the content of your /etc/ssl/private directory.
total 24
drwx--x--- 2 root ssl-cert 4096 Feb 21 10:05 .
drwxr-xr-x 4 root root     4096 Feb 21 10:01 ..
-rw-r--r-- 1 root root      847 Feb 21 10:05 server.crt
-rw-r--r-- 1 root root      481 Feb 21 10:05 server.csr
-rw------- 1 root root      302 Feb 21 10:05 server.key
-rw-r----- 1 root ssl-cert 1700 Jan 15 12:06 ssl-cert-snakeoil.key
Validate the server.crt file using this link.
That should do it!
Conclusion:
Creating a self-signed SSL certificate on Ubuntu 24.04 is a straightforward process that can significantly enhance your understanding of SSL/TLS. Here are the key takeaways:
- No Cost Involved: Self-signed certificates are free to create, making them an economical choice for personal projects.
- Hands-on Experience: This process provides practical knowledge about how digital certificates work.
- Customizable Options: You can easily specify multiple hostnames or domain names in the OpenSSL configuration file.
- Longevity: The generated self-signed certificate can be valid for a substantial period (up to 10 years).
- Easy Management: Storing the certificate files in the appropriate directories simplifies management and accessibility.
Following these steps, you can successfully generate a self-signed SSL certificate tailored to your needs.


Leave a Reply to How to Install Emby Media Server on Ubuntu 24.04 - Geek Rewind Cancel reply