How to Install ProFTPD on Ubuntu 24.04


ProFTPD is a free FTP server for Linux. Once it runs on your Ubuntu 24.04 machine, other computers on the network can upload and download files from it with any FTP client. It installs from the standard APT package manager in a few minutes, and you can encrypt connections with TLS/SSL afterward.
This guide covers the install, the basic configuration, blocking specific accounts, and enabling TLS with a self-signed certificate. You need a user account with sudo rights and a terminal on the server.
Open a terminal on your Ubuntu 24.04 server and run sudo apt update, then sudo apt install proftpd-core. ProFTPD is in Ubuntu’s default repositories, so no third-party source is needed. APT downloads and installs the packages, and the service normally starts on its own. The main configuration file is /etc/proftpd/proftpd.conf.
Install ProFTPD
ProFTPD is in Ubuntu’s default repositories, so you don’t need to add a third-party source or install extra dependencies. Run the command in the block below in a terminal.
- Open a terminal on the Ubuntu 24.04 server.
- Run the install command shown below and enter your password if sudo asks for it.
- Confirm the install if APT asks. You should see APT download and unpack the packages. The service normally starts on its own when the install finishes.
sudo apt update
sudo apt install proftpd-core
Nearly everything you change in the first half of this guide lives in that file. Before you edit it, it is worth making a backup copy so you can roll back if a change stops the service from starting.
Configure basic settings
To configure the basics, edit the main configuration file with a text editor. Changes only take effect after the service restarts, which comes later in this guide.
- Open the terminal.
- Run sudo nano /etc/proftpd/proftpd.conf to open the file in the nano editor.
- Look through the file. You should see the server name, the port number and the directory paths near the top.
- Change these values to match your network setup and how you want the server to behave.
Plain FTP listens on port 21 by default. If the server has a firewall enabled, such as UFW, make sure that port is allowed, or clients won’t be able to connect.
sudo nano /etc/proftpd/proftpd.conf
Next, adjust the server settings for your environment, as shown in the example below. Change only the values you understand. The defaults are sensible for a first test.
# Set off to disable IPv6 support which is annoying on IPv4 only boxes.
# Comment out to turn off IPv6 if you don't need it

#UseIPv6 on

#
#Change the server name to match your environment

ServerName "proftpd.example.com"

# Use this to jail all users in their homes
# line 39 : uncomment (specify root directory for chroot)

DefaultRoot ~

#
..........
..........
When you are done, save the file and exit the editor. In nano, press Ctrl+O, then Enter to save, then Ctrl+X to exit.
The ftpusers file lists the accounts that are not allowed to log in to the FTP server. System accounts such as root are normally listed there already, which is what you want. Run the command in the block below to open the file for ProFTPD on Ubuntu 24.04.
sudo nano /etc/ftpusers
To block an account, add its name to the file. Put each account on its own line, so you can block as many users as you need.
- Go to the end of the list in the file.
- Type the account name you want to block on a new line.
- Repeat on further lines for each additional user.
To let a blocked user back in later, delete their line from the file and restart ProFTPD.
root
Save and exit the file, then restart ProFTPD with the command below. The restart makes the service read your configuration changes. If it fails to start, you most likely made a typo in the configuration file, so reopen it and check the lines you changed.
sudo systemctl restart proftpd
You should now be able to connect to ProFTPD with any FTP client, using the server's IP address and a valid Ubuntu username and password. Every user account that is not listed in the ftpusers file is allowed to log in.
At this stage the connection is not encrypted. Usernames, passwords and files cross the network in plain text, so use this setup only for testing or on a network you fully trust. The next part adds TLS.
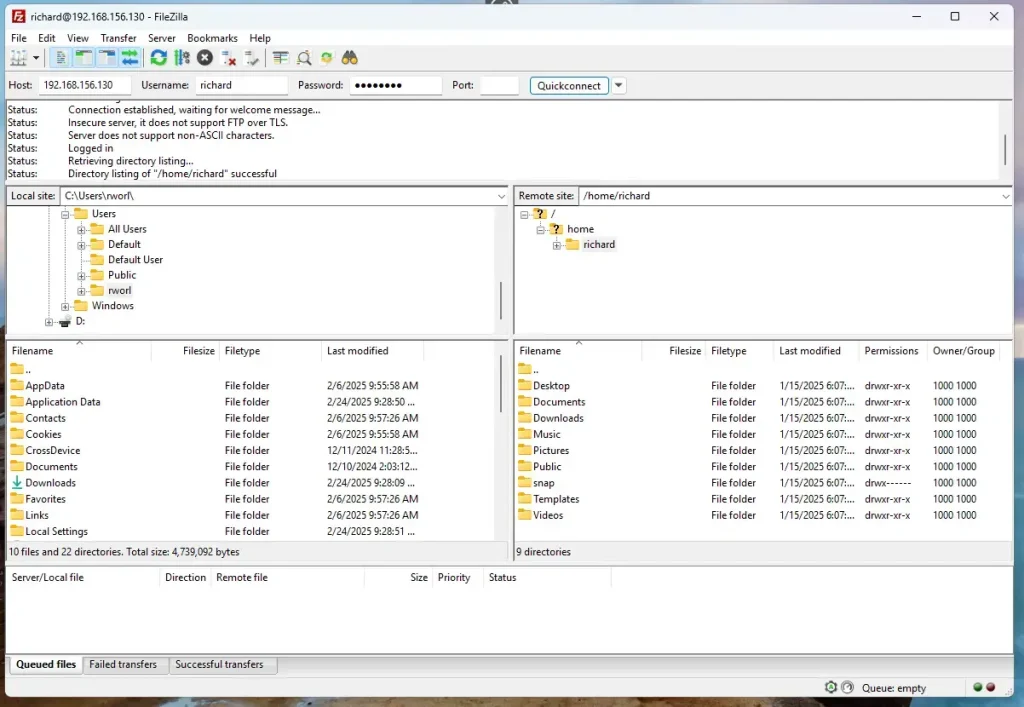
Access ProFTPD over SSL/TLS
To use SSL/TLS with ProFTPD, the server needs a security certificate. You can use a free certificate from a public provider such as Let's Encrypt, or you can create your own self-signed certificate. Either way, usernames, passwords and file transfers are encrypted, so other people on the same network can't read them.
A public certificate like Let's Encrypt or a self-signed both work on your server. A public certificate is the better choice if clients connect from outside your own network, because their FTP clients will trust it without a warning.
In this post we create a self-signed certificate for ProFTPD. It is quick to set up and fine for internal use. The drawback is that FTP clients will warn you that they can't verify who issued it.
Run the command in the block below to generate the self-signed certificate for ProFTPD.
sudo openssl req -x509 -nodes -newkey rsa:3072 -keyout proftpd.pem -out proftpd.pem -days 3650
When the command prompts you, enter the certificate details, such as country, organization and server name. If you plan to connect by hostname, use that hostname as the common name. When it finishes, you should have a certificate file and a key file.
Country Name (2 letter code) [AU]:US
State or Province Name (full name) [Some-State]:NY
Locality Name (eg, city) []:Brooklyn
Organization Name (eg, company) [Internet Widgits Pty Ltd]:GeekRewind
Organizational Unit Name (eg, section) []:IT
Common Name (e.g. server FQDN or YOUR name) []:proftpd.example.com
Email Address []:
Keep the private key readable only by root, because anyone who gets it can impersonate your server.
sudo cp proftpd.* /etc/ssl/private
sudo chmod 600 /etc/ssl/private/proftpd.pem
Next, install the ProFTPD SSL module by running the command in the block below. ProFTPD can't speak TLS until this module is installed.
sudo apt install proftpd-mod-crypto
After the module is installed, run the command below to open its configuration file in your editor.
sudo nano /etc/proftpd/modules.conf
Update the lines shown below so they point to the certificate and key you just copied. The paths must match the file names you used exactly, or ProFTPD will fail to start.
# Install proftpd-mod-crypto to use this module for TLS/SSL support.
# Uncomment to enable SSL/TLS

LoadModule mod_tls.c

........
........
Save and exit the file.
Next, reopen the main ProFTPD configuration file with the command below.
sudo nano /etc/proftpd/proftpd.conf
Then uncomment line 143 so the TLS configuration is included. To uncomment a line, remove the # at the start of it. Line numbers can shift if you added or removed lines earlier, so check that you are on the line that includes the TLS configuration.
# This is used for FTPS connections
#

Include /etc/proftpd/tls.conf

#
Save the file and exit.
Next, open the ProFTPD TLS configuration file with the command below.
sudo nano /etc/proftpd/tls.conf
Uncomment the lines shown in the block below by removing the # at the start of each one.
#Uncomment the lines below and update the TLS protocol.

TLSEngine                               on
TLSLog                                  /var/log/proftpd/tls.log
TLSProtocol                             TLSv1.3

#
#

#Uncomment lines 27/8 and specify the certificates created above.

TLSRSACertificateFile                   /etc/ssl/private/proftpd.pem
TLSRSACertificateKeyFile                /etc/ssl/private/proftpd.pem

#
#
Save and exit the file, then restart the ProFTPD service with the command below. The TLS settings only apply after this restart. If the service won't start, check the certificate paths and the lines you uncommented.
sudo systemctl restart proftpd
With SSL/TLS configured, open your FTP client and set the site to use SSL/TLS. The exact wording depends on the client. Look for an encryption option that requires or uses explicit FTP over TLS, then connect.
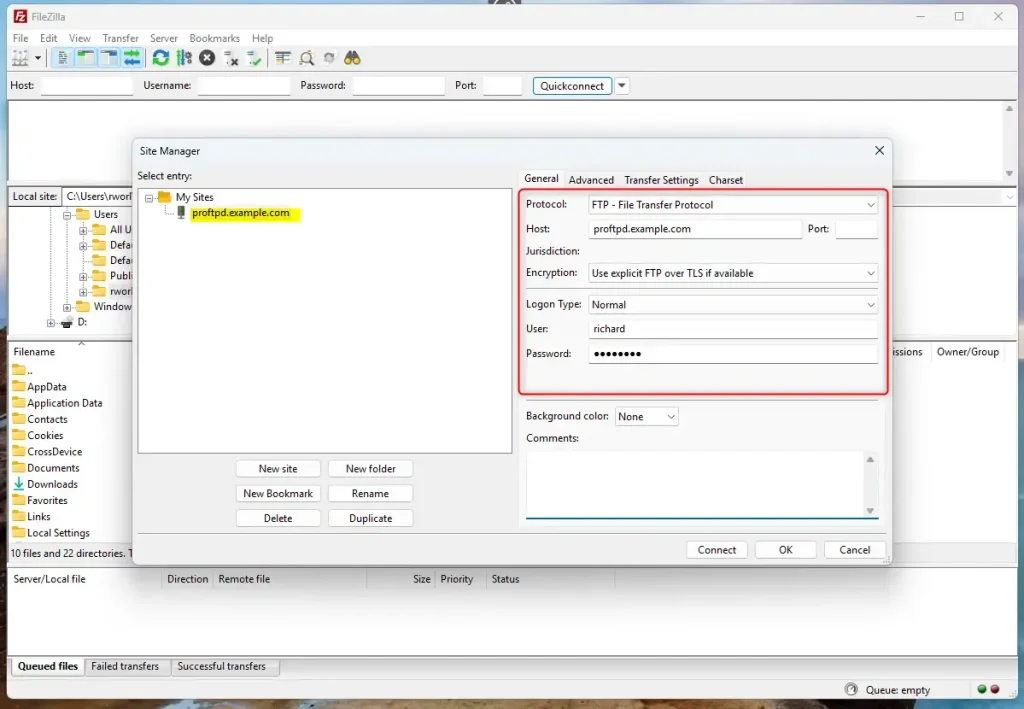
Because we used a self-signed certificate, the client will show a certificate warning the first time you connect. Check that the details match the certificate you created, then choose OK to trust it.
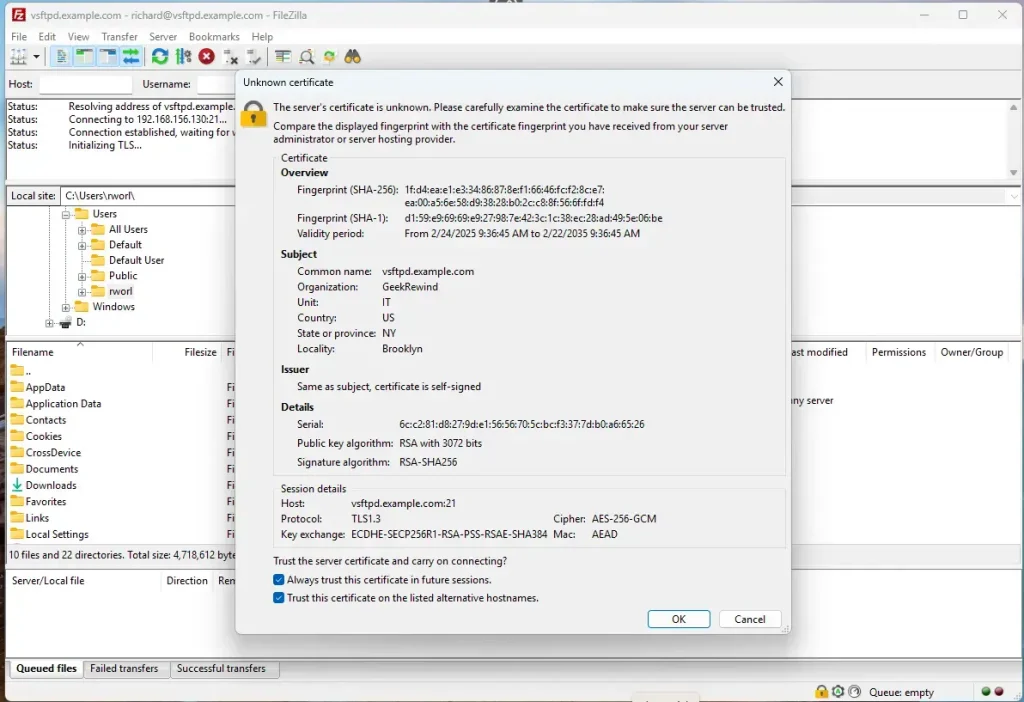
ProFTPD is now communicating over SSL/TLS. Your FTP client should show that the connection is encrypted, and you can browse and transfer files as usual.
That should do it!
Conclusion:
- ProFTPD Installation: Installing ProFTPD on Ubuntu 24.04 is straightforward, requiring minimal setup.
- Secure Communication: Configuring SSL/TLS enhances security, ensuring safe data transmission.
- Customization: ProFTPD allows customization of server settings to fit specific user needs.
- Reliable Performance: Known for its stability, ProFTPD is a trusted choice for file transfers.
- User Access Control: Utilizing the
ftpusersfile helps manage which users can access the FTP server. - Self-Signed Certificates: A self-signed certificate can provide an immediate solution for secure connections.
By working through the installation and configuration steps above, you can set up and secure a ProFTPD server for everyday file transfers. For use outside your own network, switch from the self-signed certificate to a public one.
Have a question about this guide?
Answered by AI from this guide. Good questions may be added to this page — please don't include personal details.
Did this guide fix your problem?

About the Author
Richard
Tech Writer, IT Professional
Richard is a writer at Geek Rewind who turns complex IT tasks into clear, step-by-step guides. He draws on years of hands-on experience in system administration and enterprise IT operations, focusing on Windows, Linux and WordPress: the problems people actually run into, and the fixes that work. His server and WordPress guides come from systems he runs himself. Richard builds and maintains the platform behind Geek Rewind, from its Ubuntu servers and Nginx configuration to its custom WordPress plugins. Many new tutorials start with readers' questions, and he's always glad to answer them in the comments.
No comments yet — be the first to share your thoughts!