How to Configure Device Usage Tailoring in Windows 11 Personalization Settings

Device usage tailoring in Windows 11 lets you pick up to six ways you use your computer: Gaming, Family, Creativity, School, Entertainment, and Business. Windows uses your picks to show tips and app ideas that fit your routine. You will find it in the Settings app under Personalization, and it changes what you see on the Start menu , the lock screen, and in some suggestions.
You can turn choices on or off whenever your habits change. Picking an option only changes recommendations. It does not change how your system runs or perform.
Open Settings with Win+I, click Personalization in the sidebar, scroll down and click Device usage, then toggle on the categories that match how you use your computer: Gaming, Family, Creative, School, Entertainment, or Business. Windows saves your choices immediately with no restart needed.
Prerequisites Before You Begin
Standard user permissions work for most personalization steps. You may need an administrator account to change diagnostic data controls.
- A device running Windows 11 Home or Pro (build 22000 or later).
- An active user account. Most Personalization settings can be changed by a standard user, but diagnostic data controls may require an administrator.
- An internet connection if you want Microsoft account-synced preferences to update across your devices.
To check your build, press the Win+R, type winver, and press Enter.
How to Access Personalization Settings in 🪟 Windows 11
Open the Settings app from the Start menu or with the Win+I shortcut. Then choose Personalization in the sidebar. This is where desktop themes, visual options, and device tailoring live.
- Open the Start menu and click Settings (the gear icon), or press the Win+I. The Settings window opens.

Windows 11 Start menu with Settings gear icon highlighted. - Click Personalization in the left-hand sidebar. The right pane now shows your desktop layout, color schemes, and tailoring options.
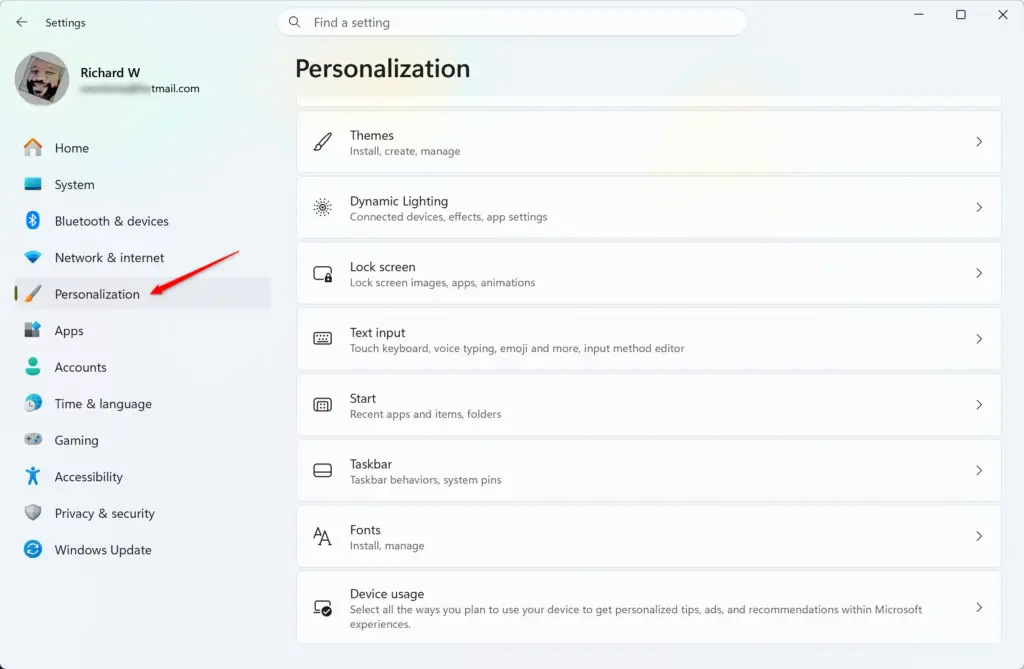
Settings › Personalization
Navigating to Device Usage Options
The setting that controls usage-based tips and recommendations is a sub-page inside Personalization. It sits near the bottom of the list, so you have to scroll to reach it.
- Scroll down the Personalization page.
- Click Device usage. The page opens with a list of usage categories.
If you do not see Device usage, your Windows 11 installation is probably out of date. The option was introduced in a later feature update. Open Settings Windows Update, install any pending updates, restart, and look again.
Configuring Your Device Usage Categories
On the Device usage page, choose the categories that match how you use this computer. Selecting only the relevant ones cuts down on suggestions you do not care about.
- Review the categories on the screen: Gaming, Family, Creative, School, Entertainment, and Business. Some builds label the Creative option as Creativity. Each one has a short description.
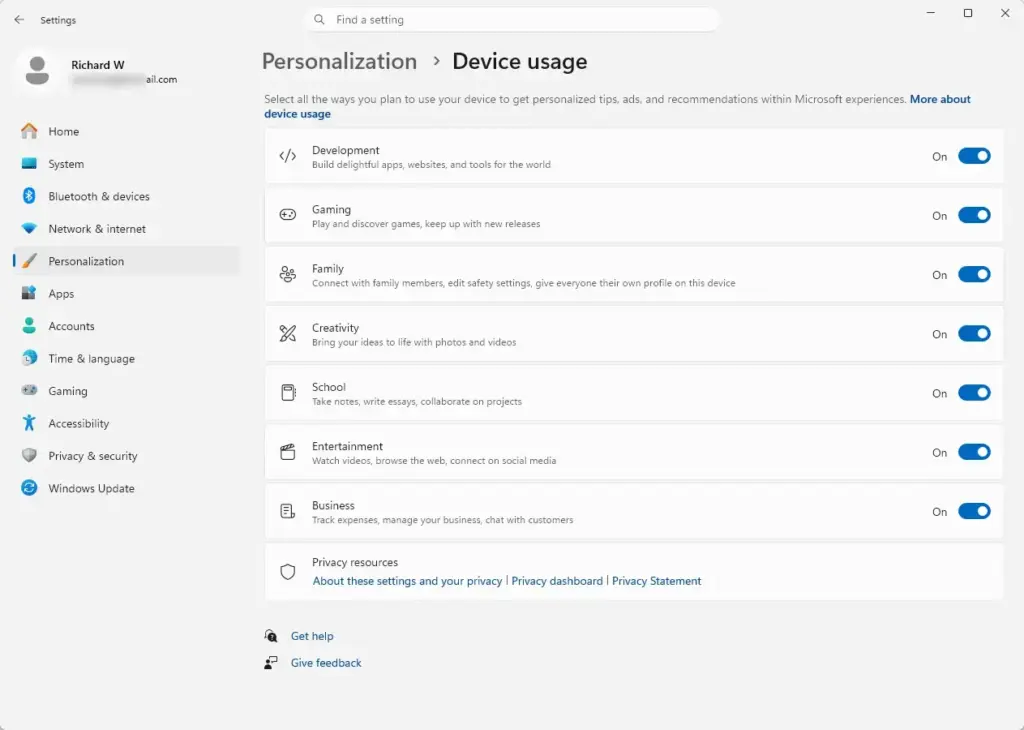
Settings › Personalization › Device usage - Turn on the option next to each way you plan to use the device. You can pick several, for example Gaming and Creative on a machine used for both. On some builds these appear as checkboxes, on others as toggle switches.
- Leave the page when you are done. Windows saves your choices as you make them, so there is no Save button. Later tips and app suggestions follow your selection.
To undo a choice, return to this page and turn that option off. No restart is needed.
How Tailoring Affects System Tips and Recommendations
Device usage tailoring touches several places in Windows. Your selections nudge what Windows shows you in each of these:
- Start menu recommendations: Pinned sections and recommended files lean toward software tied to your chosen categories, for example design tools for Creative or game launchers for Gaming.
- Tip notifications: Pop-up notifications with shortcuts, feature tours, and productivity tips line up with your selected use cases instead of generic prompts.
- App suggestions: Suggestions in the Microsoft Store and in setup wizards favor tools relevant to your workflow.
These are suggestions only. Nothing is installed or removed because of them, and the effect can take a little while to show up.
Managing Diagnostic Data Required for Accurate Tailoring
Tailoring works best when Windows is allowed to use some diagnostic data about how you use features. If your recommendations never seem to change, check your diagnostic data settings under Privacy & security. You may need an administrator account here.
- Press the Windows key + I to open Settings.
- Click Privacy & security in the left-hand sidebar.

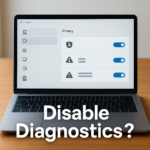
- Select Diagnostics & feedback. The page lists the diagnostic data options and the tailored experiences setting.
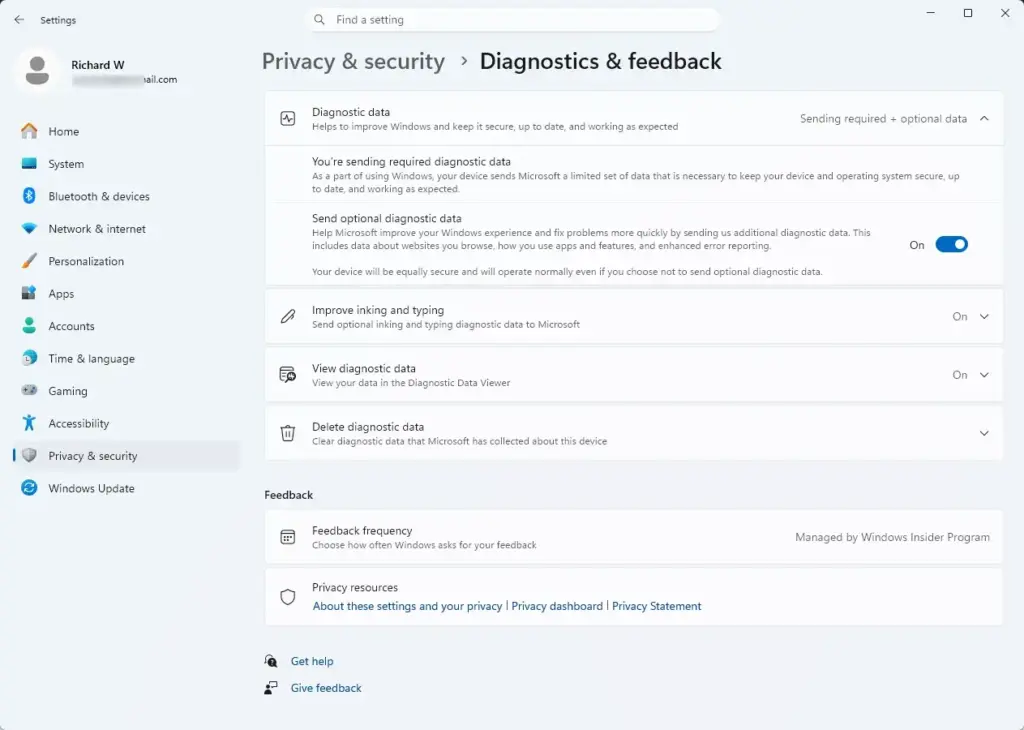
Settings › Privacy › Diagnostics - Make sure diagnostic data is set to at least Required diagnostic data, or turn on Optional diagnostic data (shown as Send optional diagnostic data on current builds), if you want Windows to fine-tune recommendations based on feature usage. Required data cannot be turned off. If you choose Send no optional diagnostic data, Windows has less to work with and may personalize your experience less deeply.
You can switch the setting back at any time. Changes apply right away.
Configuring Device Usage via the Windows Registry
This is useful if the Settings app fails to save your choices, or if you manage several machines through scripted deployments. Registry changes can break things if you edit the wrong value, so export the key first: in Registry Editor, right-click the key and choose Export. Double-clicking the saved .reg file later restores it.
- Press the Windows key + R to open the Run dialog box.
- Type regedit and press Enter. Click Yes at the User Account Control prompt. This requires administrator privileges, and the Registry Editor window opens.
- Go to this registry path by typing or pasting it into the address bar at the top:
HKEY_CURRENT_USER\Software\Microsoft\Windows\CurrentVersion\Privacy - Look for DWORD values that match your device usage preferences, such as TailoredExperiencesWithDiagnosticDataEnabled. Double-click the value and set Value data to 1 to enable tailored experiences or 0 to disable them. Click OK.
Sign out and back in, or restart, so the change is picked up reliably. To undo it, set the value back or import your exported .reg file.
Advanced Tip: Disabling Tailored Experiences Completely
If you want a quieter Windows with fewer personalized tips, sponsored suggestions, and tailored onboarding prompts, turn off the related privacy switches. Doing this stops Windows from using your diagnostic data for customized suggestions. It does not stop all diagnostic data collection. That is controlled separately on the Diagnostics & feedback page.
- Open Settings and go to Privacy & security.
- Click General.
- Turn off Let apps show me personalized ads by using my advertising ID. On some builds the wording differs slightly, for example "by changing my advertising ID".
- Turn off Show me suggested content in the Settings app.
- Go back to Privacy & security, click Diagnostics & feedback, expand Tailored experiences, and set the toggle to Off. This stops Microsoft from using your diagnostic data to offer customized tips, ads, and recommendations. If the toggle is greyed out, check your diagnostic data level on the same page first.
Each switch can be turned back on from the same page whenever you want personalized suggestions again.
Was this guide helpful?

About the Author
Richard
Tech Writer, IT Professional
Richard is a writer at Geek Rewind who turns complex IT tasks into clear, step-by-step guides. He draws on years of hands-on experience in system administration and enterprise IT operations, focusing on Windows, Linux and WordPress: the problems people actually run into, and the fixes that work. His server and WordPress guides come from systems he runs himself. Richard builds and maintains the platform behind Geek Rewind, from its Ubuntu servers and Nginx configuration to its custom WordPress plugins. Many new tutorials start with readers' questions, and he's always glad to answer them in the comments.


No comments yet — be the first to share your thoughts!