How to Change Device Usage Settings in Windows 11


- 6 steps
- Needs administrator rights
Device usage settings in Windows 11 control how Windows tailors tips, suggestions and recommendations to the way you use your PC. You pick the activities that apply to you from six categories: Gaming, Family, Creativity, Schoolwork, Entertainment and Business. You find them at Settings Personalization Device usage. The page is there on both Windows 11 Home and Pro.
Turning these options off stops Windows from using your answers to personalize suggestions and helps limit targeted ads. It is not a full privacy switch, and the later sections cover the broader controls. You can change your choices at any time, and nothing here is permanent.
Open Settings by pressing Win+I, click Personalization in the left pane, scroll down and click the Device usage tile, then toggle On or Off each of the six categories—Gaming, Family, Creativity, Schoolwork, Entertainment and Business—to match how you use your PC. Changes apply immediately with no restart needed.
How to change device usage settings
Device usage settings let you tell Windows how you plan to use the PC, so it can show tips, tools and suggestions that fit. You change them in the Settings app under Personalization, where you pick the activities that apply, such as gaming, schoolwork or entertainment. The steps below take you there, and each one says what you should see on screen.
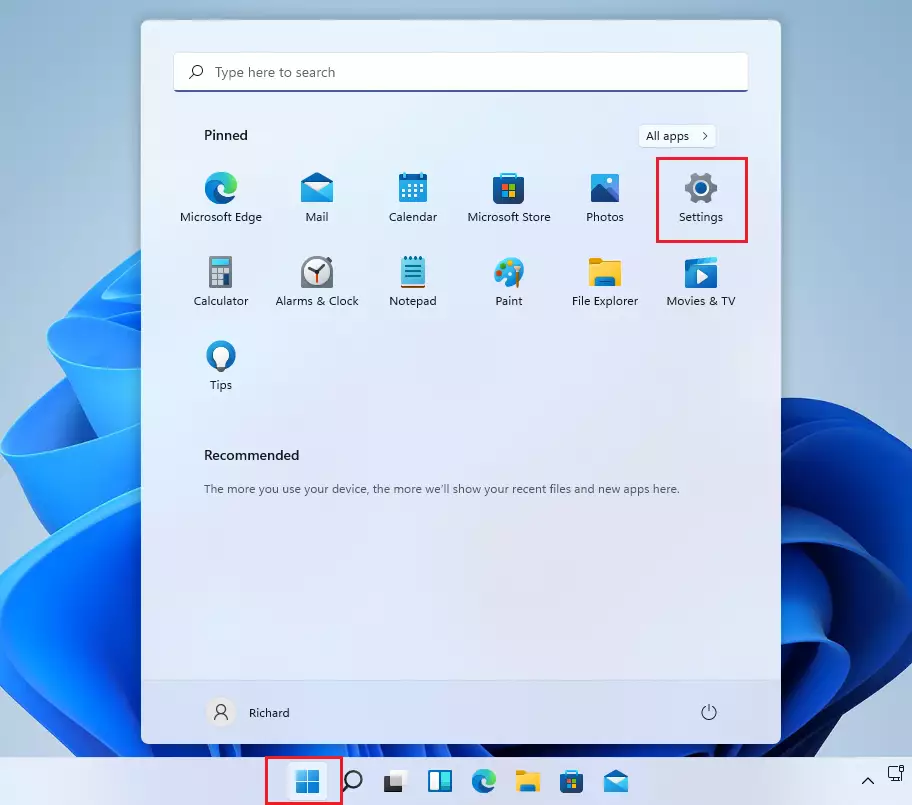
- Press the Win+I to open Settings . You can also click Start and select Settings. The Settings window opens with a list of categories down the left side.
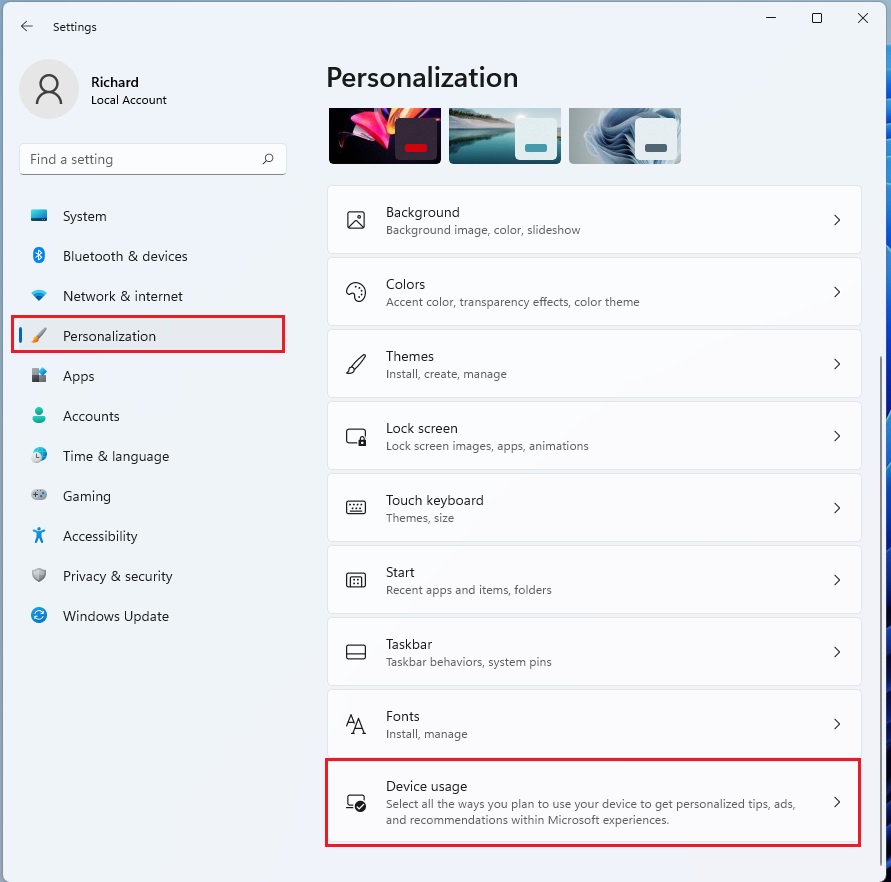
- In the Settings window, click Personalization in the left pane. The right side now shows the personalization options, such as Background, Colors and Themes.
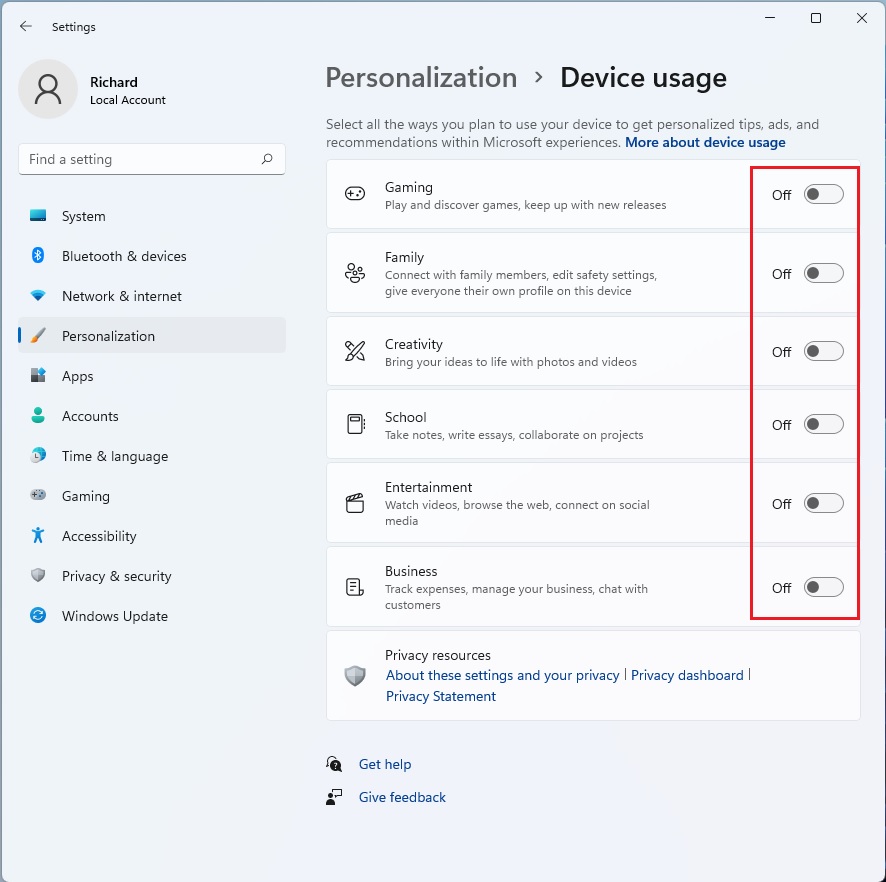
- Scroll down on the right and click the Device usage tile. The page lists the six categories, each with its own On/Off toggle.
The Device usage page is not on every build, and work or school PCs managed by an organization can hide it. Running Windows Update is the first thing to try. If the PC is managed, your IT administrator controls what appears.
The categories you leave active shape the tips, suggestions and recommendations Windows shows you. They are Gaming, Family, Creativity, Schoolwork, Entertainment and Business. You switch each one On or Off on the Device usage page to control which kinds of tailored suggestions you receive.
- Look at each category on the Device usage page and read its short description.
- Click the toggle next to a category to switch it On or Off. The toggle changes right away, and there is no Save or Apply button.
- Leave only the categories that match how you really use the PC. To keep the tailoring to a minimum, switch all six Off.
To undo a change, return to the same page and flip the toggle back. Windows will still show some general tips with every category off, because this page only controls the tailored part.
Device usage settings apply to your own user profile, not to the whole PC. You do not need administrator rights to change them, so any account can adjust its own choices. On a shared computer, each person sets theirs separately, and your changes will not affect other accounts.
Managing Hardware with Bluetooth & Devices
The Bluetooth & devices page is a separate area of Settings. It handles your actual hardware: headphones, printers, your phone and similar items. Open Settings and click Bluetooth & devices in the left pane to see everything in one place. The main options are listed below.
- Bluetooth: Toggle this On to connect wireless headphones, speakers and other Bluetooth devices. If the toggle is missing, the PC may have no Bluetooth adapter, or its driver may be missing or disabled.
- Printers & Scanners: Add or remove printing devices here. Windows lists what it finds, and you can click a printer to see its options or remove it.
- Phone Link: Sync your mobile device to see texts and photos on your PC. You need to sign in with a Microsoft account and pair your phone.
- Autoplay: Choose what happens when you plug in a USB drive or memory card. For example, you can have Windows open the folder, ask you every time, or do nothing.
- Pen & Windows Ink: Customize how your digital pen works on your screen. This page appears mainly on touch or pen-capable devices.
To add a new device, click Add device at the top of the Bluetooth & devices page. Make sure the device is switched on and in pairing mode first. Choose the connection type in the window that opens, then follow the on-screen prompts to pair your hardware. When pairing finishes, the device shows up in the list on the page.
Data Privacy and Usage
Device usage settings affect privacy because Windows uses your answers to refine the suggestions it shows you. Turning off the toggles on the Device usage page limits that tailoring. For broader control, open Settings Privacy & security. There you can review what apps and Windows may collect or use, including advertising and diagnostic options. These are separate settings from Device usage, so check them too if privacy is your main goal.
Summary
These settings give you control over both your privacy and your hardware. Go to Personalization, then Device usage, to adjust how Windows suggests content to you. Use Bluetooth & devices to manage your peripherals. Neither menu needs special permissions to change, and you can reverse any choice by returning to the same page.
Related Topics
Have a question about this guide?
Answered by AI from this guide. Good questions may be added to this page — please don't include personal details.
Did this guide fix your problem?

About the Author
Richard
Tech Writer, IT Professional
Richard is a writer at Geek Rewind who turns complex IT tasks into clear, step-by-step guides. He draws on years of hands-on experience in system administration and enterprise IT operations, focusing on Windows, Linux and WordPress: the problems people actually run into, and the fixes that work. His server and WordPress guides come from systems he runs himself. Richard builds and maintains the platform behind Geek Rewind, from its Ubuntu servers and Nginx configuration to its custom WordPress plugins. Many new tutorials start with readers' questions, and he's always glad to answer them in the comments.
No comments yet — be the first to share your thoughts!