How to Clear Full Diagnostic Data History Manually in Windows 11

Diagnostic data history in Windows 11 is the stored record of what your PC shares with Microsoft about how you use your apps and hardware. Clearing it erases the logs stored on your drive and stops Microsoft from keeping past activity tied to your device.
You can delete this data at any time from the Privacy & security page in Settings. It protects your privacy and frees up a little disk space. You don’t need admin tools for the main method, and it works the same on Home and Pro.
Open Settings , go to Privacy & security, select Diagnostics & feedback, scroll to Delete diagnostic data, and click the Delete button. Windows immediately removes stored diagnostic logs from your device and notifies Microsoft to delete matching data linked to your account.
What Is Diagnostic Data in 🪟 Windows 11?
Diagnostic data is a collection of technical details about your computer and its health. Microsoft uses it to fix bugs and improve system stability. Windows collects it automatically while you use the device. It falls into two groups: basic required data and optional usage data. You can view or clear both at any time.
- Required diagnostic data: The basic information needed to keep your device secure, up to date, and running properly. It covers your device setup, its capabilities, and whether apps are running correctly. You can’t turn this off on a normal Home or Pro install.
- Optional diagnostic data: Extra information about how you use your apps, website activity, crash reports, and advanced device health data. Microsoft uses it to make deeper improvements to Windows and other Microsoft products. This is the part you can switch off.
Microsoft says diagnostic data is encrypted and sent securely. Even so, you may not like the idea of a long history sitting on your PC. Windows 11 version 22H2 and newer include built-in settings to delete that stored history completely. If you’re not sure which version you have, press the Win, type winver, and press Enter.
Where 🪟 Windows 11 Stores Diagnostic Data
The main location is 📁C:\
The built-in option clears the related log files, telemetry caches, and viewing history in one pass. That stops leftovers from staying on your drive. It also handles the request to Microsoft for the matching data, which no manual folder cleanup can do.
How to Clear Diagnostic Data History in 🪟 Windows 11
To clear the history, open Settings, go to your privacy options, and click the delete button in the diagnostic data section. This removes the technical logs your computer has saved locally. It also tells Microsoft to delete the matching data linked to your device.
- Click the Start button on your taskbar and select Settings, the gear icon. Or press Windows key + I. The Settings window opens.

Windows 11 Start menu with Settings gear icon highlighted. - Click Privacy & security in the menu on the left. The privacy options appear on the right.

- Under the Windows permissions section, click Diagnostics & feedback.
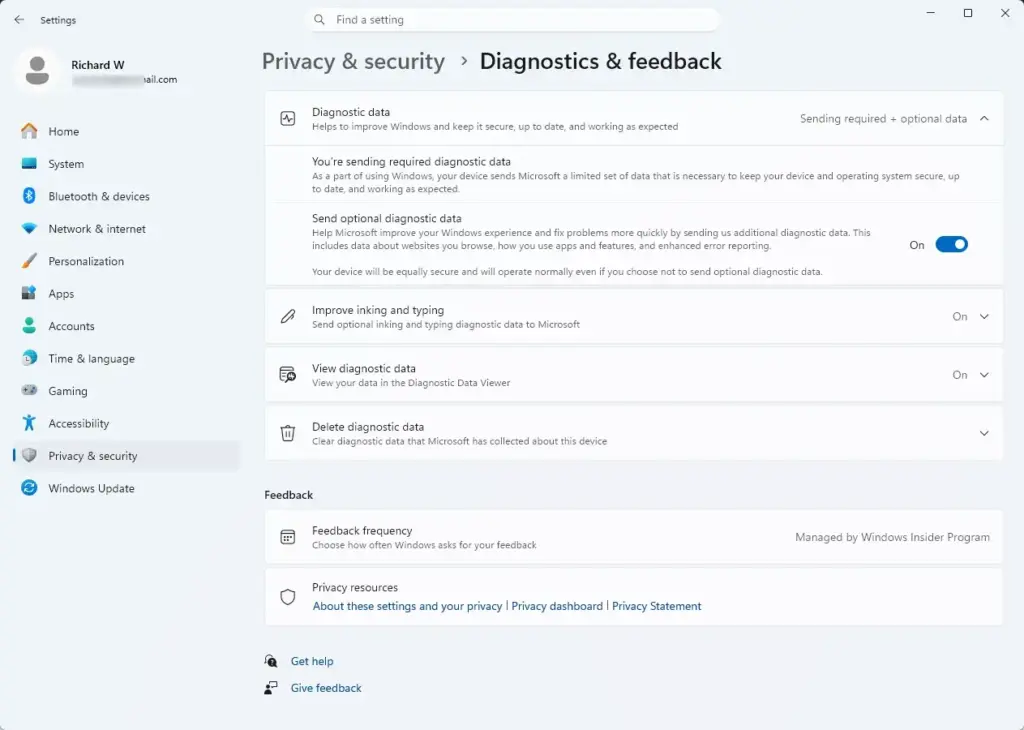
Settings › Privacy › Diagnostics - Scroll down until you find the section labeled Delete diagnostic data. If it is collapsed, click it to expand it.
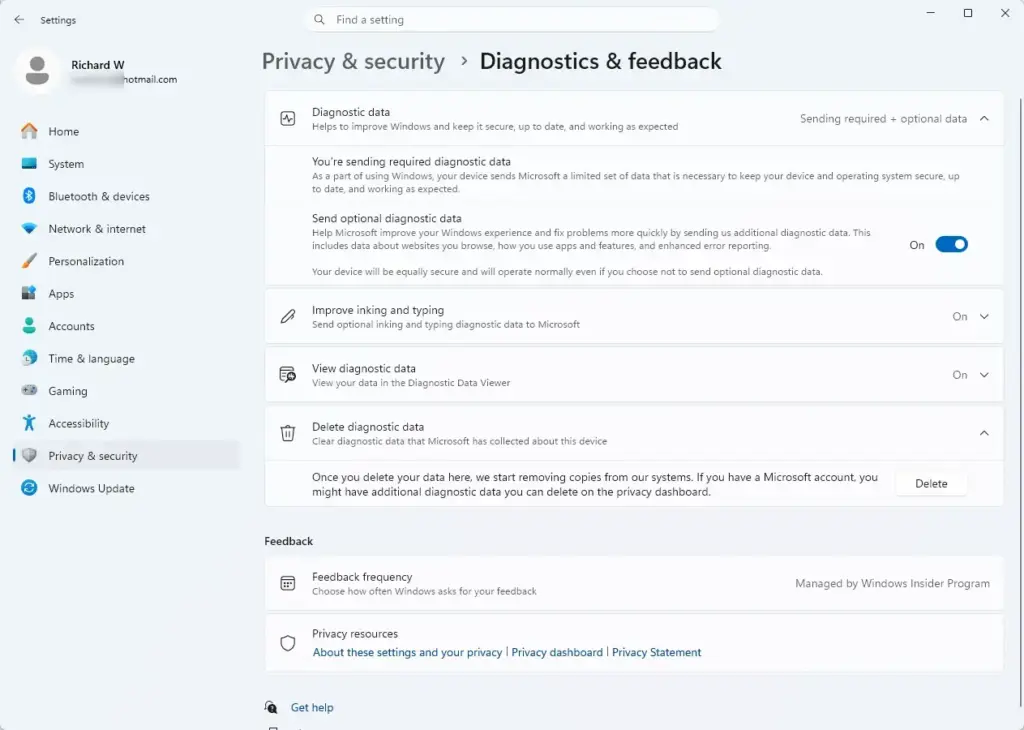
- Click the Delete button next to it. Windows starts clearing the stored diagnostic data history from your device straight away.
The deletion is permanent, and you can't undo it. Windows will start collecting new diagnostic data as you keep using the PC, so the history builds up again unless you change the collection settings below.
If you don't see Delete diagnostic data, check your Windows version. The option comes with recent Windows 11 releases, so run Windows Update first. On a work or school PC, an administrator may have locked the page, and you'll need to ask your IT team.
Configuring Diagnostic Data and Telemetry Levels
After clearing your history, you may want to limit what Windows collects from now on. You can cut collection down to the minimum that Windows allows. The next sections cover three ways to do that. Use the Settings toggle first, since it works on every edition. Group Policy and the registry are for cases where you need tighter control.
Disabling Optional Diagnostic Data via Settings
Turning off optional diagnostic data stops your computer from sending extra usage habits, inking data, and app activity to Microsoft. You do it from Settings, under Privacy & security and then Diagnostics & feedback. No restart is needed, and you can turn it back on later in the same place.
- Press Windows key + I to open Settings.
- Go to Privacy & security, then click Diagnostics & feedback.
Settings › Privacy › Diagnostics - Find the Send optional diagnostic data toggle.
- Click the switch to turn it Off. The label next to it changes to Off. From now on your system sends only the minimum required data needed for security and updates.
If the switch is greyed out, your device is probably managed by an organization, or a policy (see the next two sections) is controlling it. Turn off the optional data first, then run Delete diagnostic data again if you want to clear anything that was collected in the meantime.
Note for Windows Home Users: Some users on Windows 11 Home editions may find that specific registry or policy toggles behave differently depending on system updates. If you cannot change certain settings through the standard menus, the main Privacy & security settings page is the safest approach.
Managing Diagnostic Data Using Group Policy
Group Policy is an advanced method for Windows 11 Pro, Enterprise, and Education users. It lets you lock down telemetry settings for the whole system. You open the policy editor from the Run box and set a limit on what technical information your PC shares with Microsoft. Windows 11 Home does not include the Group Policy Editor, so use the registry method in the next section instead.
- Press Windows key + R to open the Run dialog box.
- Type gpedit.msc and press Enter. The Local Group Policy Editor opens. If you get a "cannot find" error, you are on Home.
- In the left sidebar, go to Computer Configuration Administrative Templates Windows Components Data Collection and Preview Builds.
- In the list on the right, find Allow Telemetry and double-click it. On some newer builds, the same setting is named Allow Diagnostic Data.
- Select the Enabled option.
- Under Options, use the drop-down menu to pick your telemetry level, such as 0 - Security or 1 - Basic.
- Click Apply, then click OK to save your changes.
Level 0 (Security) is honored only on Enterprise, Education, and Server editions. On Pro, Windows treats it as Basic (required data), so choose 1 there. The setting may need a restart or a sign-out to take full effect. To undo it, return to the same policy and select Not Configured.
Managing Diagnostic Data with Registry Settings
The registry gives you another way to control data collection, and it works on Windows 11 Home, which has no Group Policy Editor. You open the Registry Editor from the Run box and add a single value that limits how much technical information your computer sends out. Registry changes can break things if you edit the wrong key, so take it slowly.
- Press Windows key + R to open the Run dialog box.
- Type regedit and press Enter.
- A security prompt asks if you want to allow the app to make changes. Click Yes. The Registry Editor opens.
- Optional but wise: click File Export and save a backup of the registry before you change anything.
- In the left sidebar, click the arrows next to the folder names to work your way down:
- Click HKEY_LOCAL_MACHINE
- Click SOFTWARE
- Click Policies
- Click Microsoft
- Click Windows
- Click DataCollection. If you don't see the DataCollection folder, right-click Windows, select New, click Key, and name it DataCollection.
- With the DataCollection folder selected, right-click an empty area on the right side, select New, and then click DWORD (32-bit) Value.
- Name the new value exactly AllowTelemetry and press Enter.
- Double-click your new AllowTelemetry value.
- In the box that appears, set the base to Hexadecimal and type 0 (security data only) or 1 (basic data) in the Value data box. As with Group Policy, on Home and Pro the 0 setting is treated as basic, so 1 is the realistic choice there.
- Click OK and close the Registry Editor. Restart your computer so the change takes full effect.
To undo this, go back to the same key, right-click AllowTelemetry, choose Delete, and restart. Or import the backup you exported earlier.
Clearing Windows Telemetry Data with PowerShell
PowerShell is for advanced users who want to run commands that clean up cached log files and restart the diagnostic tracking service. The Settings menu is easier and is the better choice for most people. PowerShell with administrator rights gives you a direct way to deal with stubborn diagnostic files that the standard tools miss.
- Click the Start button and type PowerShell in the search box.
- Right-click Windows PowerShell in the search results and choose Run as administrator.
- Click Yes on the confirmation prompt. A PowerShell window opens, and its title bar should say Administrator.
- To stop and restart the diagnostic tracking service, type the following commands one at a time and press Enter after each line:
Stop-Service DiagTrack
Remove-Item -Path "C:\ProgramData\Microsoft\Diagnosis\*" -Recurse -Force -ErrorAction SilentlyContinue
Start-Service DiagTrack
- Wait for each command to finish and return to the prompt, then close the PowerShell window.
If a command returns a red error, check that you opened PowerShell as administrator and that you copied the line exactly. Type commands only from a source you trust, because administrator rights let them change the whole system. A restart brings the service back to its normal state if anything looks off.
Summary
Clearing diagnostic data history in Windows 11 protects your privacy by removing stored telemetry logs and giving you control over what technical details your computer shares. This guide covered the built-in Delete diagnostic data option, turning off optional sharing, and using Group Policy, the registry, or PowerShell when you need more control. Start with Settings. Use the advanced tools only if the basic page doesn't give you what you need.
Was this guide helpful?

About the Author
Richard
Tech Writer, IT Professional
Richard is a writer at Geek Rewind who turns complex IT tasks into clear, step-by-step guides. He draws on years of hands-on experience in system administration and enterprise IT operations, focusing on Windows, Linux and WordPress: the problems people actually run into, and the fixes that work. His server and WordPress guides come from systems he runs himself. Richard builds and maintains the platform behind Geek Rewind, from its Ubuntu servers and Nginx configuration to its custom WordPress plugins. Many new tutorials start with readers' questions, and he's always glad to answer them in the comments.

No comments yet — be the first to share your thoughts!