How to Check, Turn On, or Turn Off TRIM for SSD Drives in Windows 11


TRIM is a background command in Windows 11 that tells your solid-state drive (SSD) which blocks of data are no longer in use, so the drive can clean them up ahead of time. This keeps the drive fast and helps it last longer. Without TRIM, an SSD can slow down as you save and delete files over months of use.
Command Prompt is a text-based tool for running system commands. You can use it to check TRIM status or turn the feature on and off in under a minute. Most Windows 11 PCs have TRIM on by default, but it takes a few seconds to confirm. The steps below are the same on Windows 11 Home and Pro.
Open Command Prompt as administrator, type fsutil behavior query disabledeletenotify and press Enter. If DisableDeleteNotify equals 0, TRIM is on; if it equals 1, TRIM is off. To turn TRIM on, run fsutil behavior set disabledeletenotify 0.
What is TRIM and Why Does It Matter?
SSD TRIM in Windows 11 is a system command that tells your SSD which blocks of data are empty and ready to be wiped. This matters because an SSD can’t overwrite old data directly. It has to erase a block first, and that takes time. TRIM clears deleted files in the background, before you need to write new data to those spots. The result is steadier speed and less unnecessary wear on the drive.
TRIM only helps SSDs. When you delete a file, Windows marks the space as free, but the SSD doesn’t know that unless it is told. TRIM passes that information to the drive so it can do its cleanup early instead of in the middle of a write. This keeps write speeds consistent and spreads wear more evenly across the drive.
Windows also runs a scheduled optimization job that re-trims SSDs on a regular basis. You don’t need to do anything for that. The commands in this tutorial only control whether Windows sends TRIM commands at all.
When Should You Use TRIM?
- Keep it ON: For everyday use, leave TRIM enabled. It keeps your SSD working well and helps it last longer. There is no real downside for normal home or office use.
- Turn it OFF temporarily: If you accidentally deleted files and want to try recovering them, turning off TRIM temporarily might help, because TRIM can erase deleted data quickly. Turning it off is no guarantee. Blocks that were already trimmed are gone for good. If the files matter, stop using the drive as soon as you can and turn TRIM back on once you have finished the recovery attempt.
How to Check If TRIM is Enabled on Your SSD
- Press Win+X and choose Windows Terminal or Command Prompt. A window with a blinking prompt should open. If the next command gives an access error, close the window and reopen it as administrator (the Terminal (Admin) option in the same menu).
- Type or copy-paste this command and press Enter:
fsutil behavior query disabledeletenotify - Look at the result. The output shows a DisableDeleteNotify value for each file system. A value of 0 means TRIM is on. A value of 1 means TRIM is off.
Output What it Means DisableDeleteNotify = 0 TRIM is ON (good!) DisableDeleteNotify = 1 TRIM is OFF
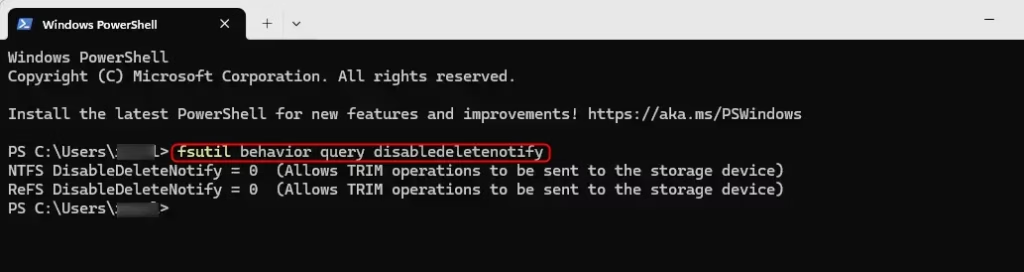
The line to check is the one for NTFS, which is the file system on most Windows 11 system drives. If a file system line says it is not currently set, Windows is using its default behavior. On an SSD, that default means TRIM is on. Nothing changes until you run one of the commands in the next sections.
How to Turn ON TRIM
⚠️ ADMIN REQUIRED: You need to be an administrator (have admin rights) to do this. On a standard account, Windows will ask for an administrator password.
- Right-click the Start button and select Windows Terminal (Admin). Click Yes if the User Account Control prompt appears. An elevated window opens, with “Administrator” in its title bar.
- Copy and paste the command below and press Enter to turn on TRIM:
fsutil behavior set disabledeletenotify 0

The change takes effect right away, and you do not need to restart. To confirm it, run the check command from the earlier section again. The value should now be 0. If it still shows 1, close the window, reopen it as administrator, and run the command again.
How to Turn OFF TRIM
With TRIM off, an SSD can slow down over time and may wear faster.
- Open Windows Terminal (Admin) again, as administrator, and click Yes if the User Account Control prompt appears.
- Type this command and press Enter:
fsutil behavior set disabledeletenotify 1

Run the check command again to confirm that the value is now 1. To undo the change, run the turn-on command from the previous section. Don't leave TRIM off any longer than you need to.
Summary
TRIM is a key feature that keeps your SSD performing well, and it's generally best to leave it turned on for everyday use in Windows 11. Check it now and then with the status command, and turn it off only for a short, specific job such as a recovery attempt.
Learn More
Have a question about this guide?
Answered by AI from this guide. Good questions may be added to this page — please don't include personal details.
Did this guide fix your problem?

About the Author
Richard
Tech Writer, IT Professional
Richard is a writer at Geek Rewind who turns complex IT tasks into clear, step-by-step guides. He draws on years of hands-on experience in system administration and enterprise IT operations, focusing on Windows, Linux and WordPress: the problems people actually run into, and the fixes that work. His server and WordPress guides come from systems he runs himself. Richard builds and maintains the platform behind Geek Rewind, from its Ubuntu servers and Nginx configuration to its custom WordPress plugins. Many new tutorials start with readers' questions, and he's always glad to answer them in the comments.
No comments yet — be the first to share your thoughts!