How to Change Agent Connector Protections on Windows 11

Agent connector protections in Windows 11 are security settings that stop third-party AI apps and agents from reading your private files or changing system files without your permission.
You can lower these guardrails when a specialized utility needs deeper access to your PC to work. Loosening them lets that software run, but every permission you widen is also open to anything else that uses the connector. Make the change only for a tool you trust, and switch the protections back on when you are done with it.
To change Agent Connector Protections, open Settings , go to System Advanced, and find “AI components.” Toggle “Enable more agent connectors by reducing protections” on or off. This controls how AI agents access your apps and data.
What Is “Reducing Protections for Agent Connectors”?
By default, Windows limits what agents can reach so that local files stay protected. Allowing broader access makes more advanced workflows possible, but it also adds risk. An agent that can touch more of your system can also make bigger mistakes, or be misused if the app itself is compromised.
The setting is available in current Windows 11 builds that include agent features, and it appears on both Home and Pro. Some builds roll these features out gradually. If you cannot find the option, run Windows Update and check again.
Why Would You Change This Setting?
Turn the protections down only when an automated assistant needs deeper integration with the software installed on your PC and the tool will not work without it. Turn them back on, or leave them on, in these cases:
- You no longer use the agent that needed the extra access.
- The PC holds sensitive personal or work data.
- You are not sure what the tool does with the access it asks for.
Re-enabling the protections restores the standard isolation barriers and puts local security first.
How to Turn It On or Off Using Windows Settings
Windows Settings is the safest way to change this, because you never touch system files or the registry. It takes a few clicks, and you do not need to be an advanced user.
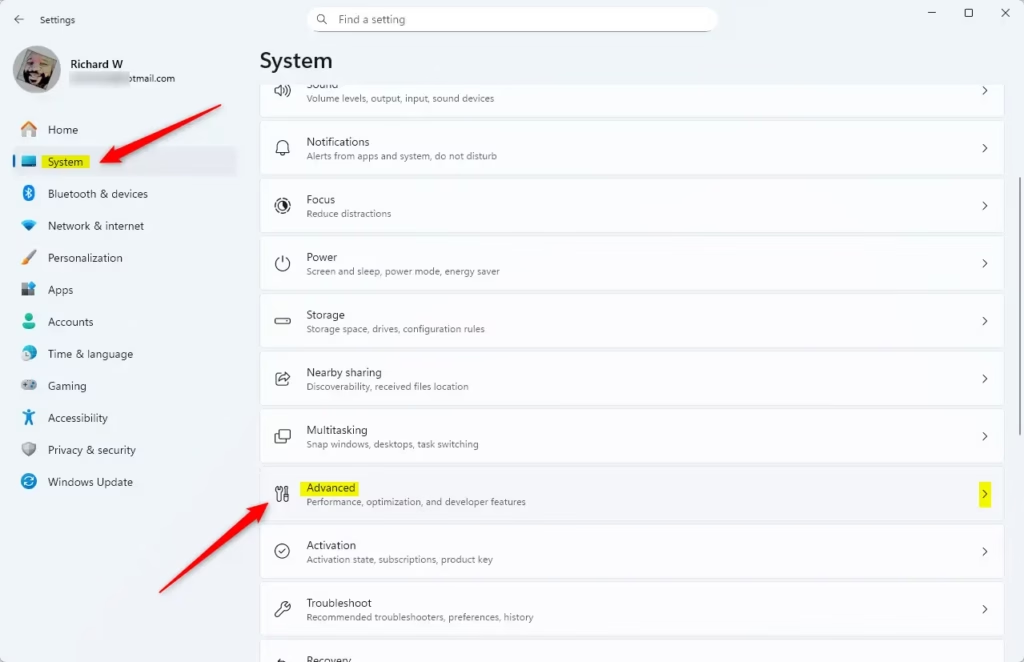
Open the Settings app by pressing the Windows key plus I. Then go to Settings System Advanced and look for the AI components section, where the connector security options are listed. The numbered steps below walk through each screen.
If you do not see the AI components section, your build may not include it yet, or the menu may be arranged differently. If the option is greyed out, a work or school account may be managing the PC. Policies set by your organization override the setting, and you will need to ask your administrator to change it.
- Open the Settings app. You can do this two ways:
- Click the Start menu and select Settings, or
- Press Windows key + I on your keyboard.
- In Settings, click System on the left side.
- On the right, find and click Advanced.
- Look for the section called AI components.
- Find the switch labeled "Enable more agent connectors by reducing protections" and turn it On or Off depending on what you want.
To undo the change, open the same page and set the option back to its previous state. If an app still behaves as though the old setting applies, close it and reopen it, or restart the PC.
How to Change This Setting Using the Registry (For Advanced Users)
The Windows Registry lets advanced users set these rules directly. It works the same on Home and Pro. Use it only if the Settings page is missing or you need to apply the change in a way Settings does not allow.
To open the Registry Editor, type regedit into the Start menu search and press Enter. If Windows asks for permission, click Yes. The Registry Editor window should open with a folder tree on the left.
Back up the registry or create a System Restore point before you change any keys. A wrong edit can cause data loss or stop Windows from starting, and a backup lets you recover quickly.
⚠️ Requires admin privileges
Before you start:
- Back up your registry or
- create a System Restore point just in case.
Follow the steps below in order, and change only the values they name. Registry changes often take effect only after you sign out and back in, or restart the PC.
- Open the Registry Editor by typing
regeditin the Start menu search and pressing Enter. - Navigate to this folder path:
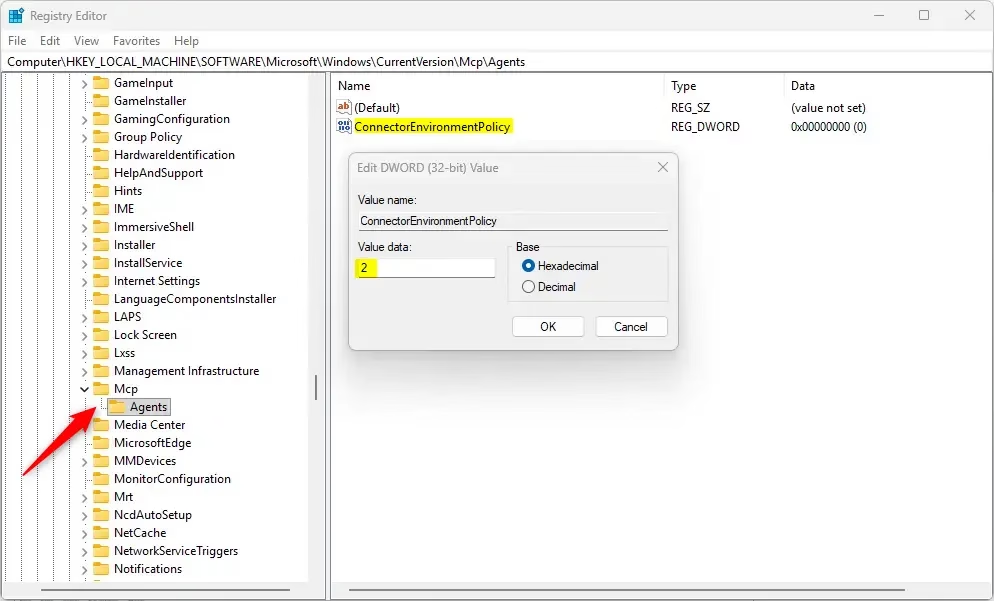
Computer\HKEY_LOCAL_MACHINE\SOFTWARE\Microsoft\Windows\CurrentVersion\McpAgents - Right-click on the Agents folder, select New DWORD (32-bit) Value.
- Name the new DWORD value
ConnectorEnvironmentPolicy. - Double-click it and set the value to:
2to enable reducing protections (allow more access)1to disable reducing protections (keep it safe)
- Click OK and close the Registry Editor.
- Restart your computer to apply the change.
To undo a registry change, set the value back to what it was, or delete the value if you created it. If something goes wrong, restore the registry backup you made or use your System Restore point.
What Happens When You Change This?
Wider connector permissions let AI utilities work with more of your installed programs. Tasks usually run faster and with fewer interruptions, because the tool meets fewer blocks along the way. Restricting these permissions keeps strict isolation between apps and the rest of the operating system, which is safer but can stop some tools from working.
Whichever way you change the setting, check afterward that your agent app still does what you need. If it works with the protections on, leave them on.
Summary
Adjusting connector rules expands assistant capabilities at the expense of tighter isolation.
Was this guide helpful?

About the Author
Richard
Tech Writer, IT Professional
Richard is a writer at Geek Rewind who turns complex IT tasks into clear, step-by-step guides. He draws on years of hands-on experience in system administration and enterprise IT operations, focusing on Windows, Linux and WordPress: the problems people actually run into, and the fixes that work. His server and WordPress guides come from systems he runs himself. Richard builds and maintains the platform behind Geek Rewind, from its Ubuntu servers and Nginx configuration to its custom WordPress plugins. Many new tutorials start with readers' questions, and he's always glad to answer them in the comments.




No comments yet — be the first to share your thoughts!