How to Change Account Lockout Threshold in Windows 11

The account lockout threshold in Windows 11 locks your PC after a specific number of failed sign-in attempts to block hackers from guessing your password. Setting this rule to 5, for example, blocks access after five wrong tries.
You can change this number using the Local Security Policy tool (a built-in app for managing advanced security rules) on Windows 11 Pro or Enterprise editions.
You change the Windows 11 account lockout threshold using the Local Group Policy Editor (secpol.msc) or Windows Terminal. Navigate to Computer Configuration\Windows Settings \Security Settings\Account Policies\Account Lockout Policy, then double-click Account lockout threshold and enter a number between 1 and 999.
Prerequisites
Modifying these system policies requires administrator access. Standard user accounts lack the permissions necessary to change these system-wide security rules.
How to change the Account Lockout Threshold
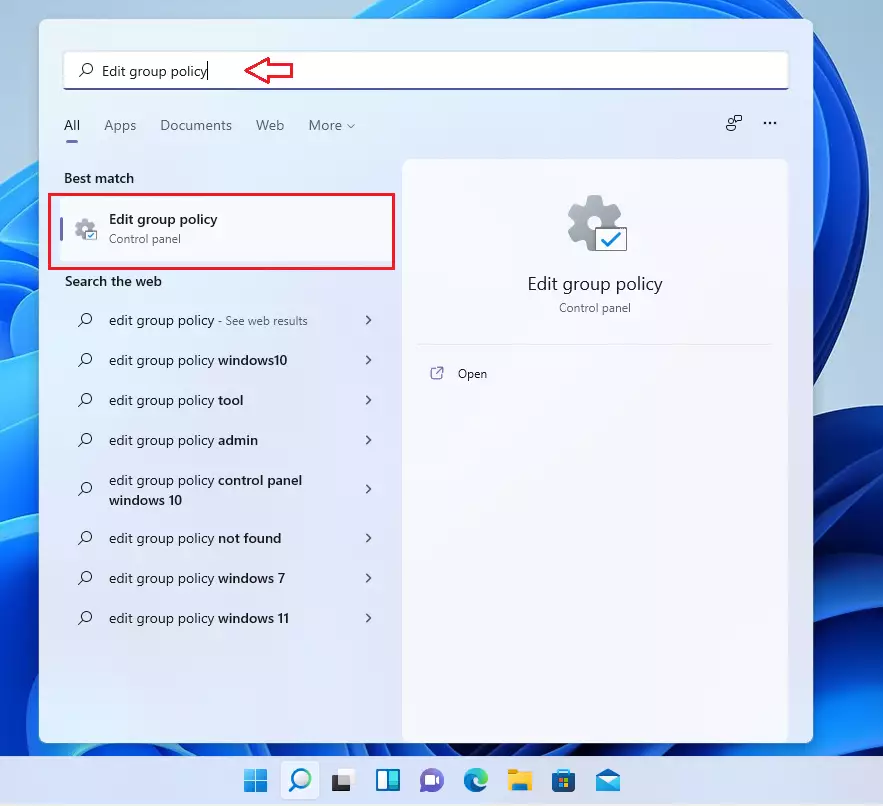
Changing the Windows 11 account lockout threshold lets you set how many times someone can type the wrong password before Windows locks the account. You can change this number using the Local Group Policy Editor to protect your computer from guessing attacks. Open the run box by pressing the Win plus R, type gpedit.msc, and press Enter to start.
- Open the Local Group Policy Editor by pressing Win+R, typing
secpol.msc, and hitting Enter.
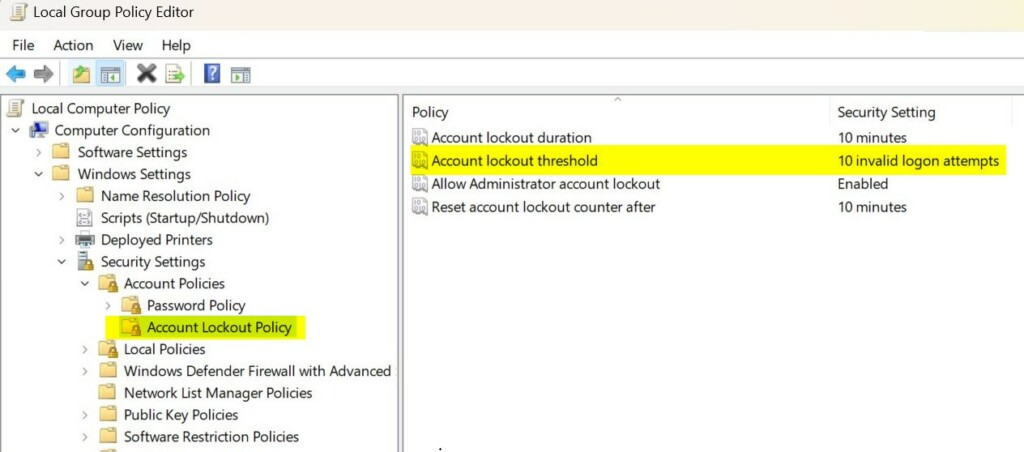
- Navigate to: Computer Configuration\Windows Settings \Security Settings\Account Policies\Account Lockout Policy.
- Double-click on Account lockout threshold.
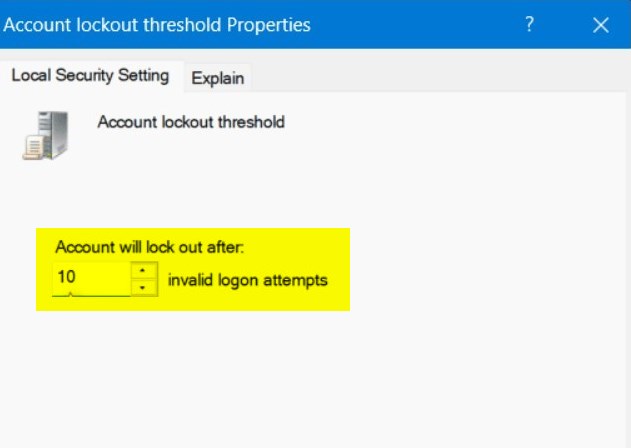
- Enter a number between 1 and 999. Setting this to 0 disables the lockout feature entirely.
- Click OK to save.
Change the threshold using Windows Terminal
Command-line execution offers faster results for administrators needing speed.
- Open Windows Terminal as an administrator.
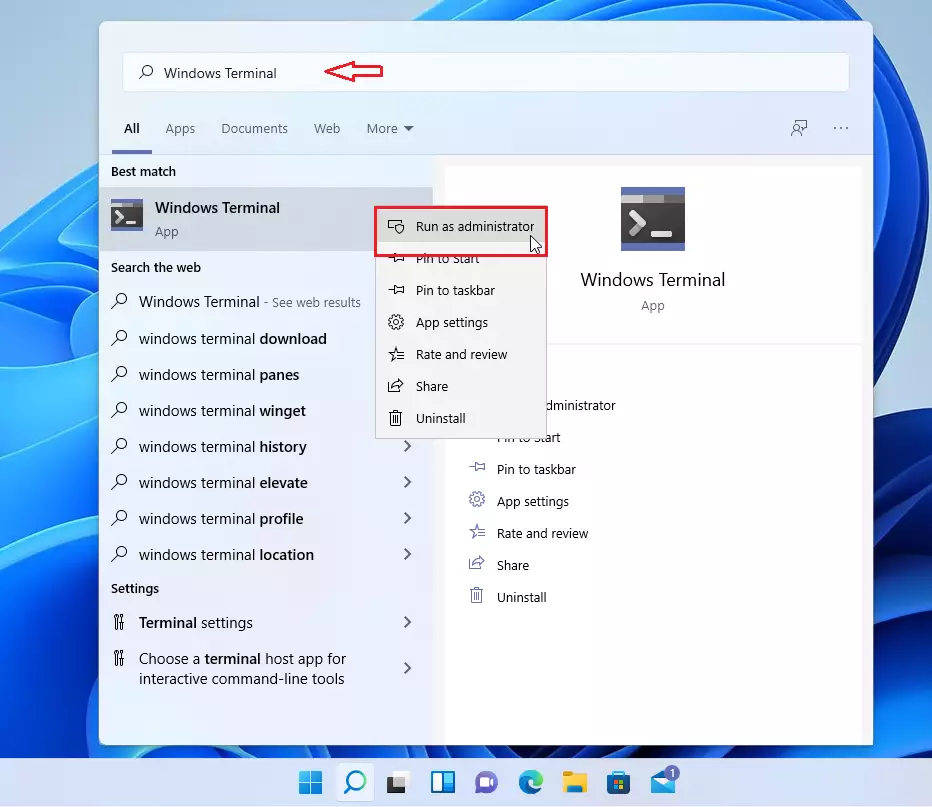
- Type the following command and press Enter:
net accounts /lockoutthreshold:<number>Troubleshooting Locked Accounts
Wait for the account lockout duration to expire, or clear the lock manually. Administrators can also open the Computer Management console to clear a lock. Right-click the affected user, select Properties, and uncheck ‘Account is locked out’.
Security Best Practices
Pairing a lockout threshold of 5-10 attempts with a strong password maximizes protection. Enable multi-factor authentication whenever available. Disabling the threshold completely leaves your system vulnerable to brute-force attacks (automated programs that try thousands of password combinations).
Summary
Lockout thresholds provide a reliable defense against unauthorized login attempts.
Consult the official Microsoft documentation for advanced configuration details.
Was this guide helpful?

About the Author
Richard
Tech Writer, IT Professional
Richard is a writer at Geek Rewind who turns complex IT tasks into clear, step-by-step guides. He draws on years of hands-on experience in system administration and enterprise IT operations, focusing on Windows, Linux and WordPress: the problems people actually run into, and the fixes that work. His server and WordPress guides come from systems he runs himself. Richard builds and maintains the platform behind Geek Rewind, from its Ubuntu servers and Nginx configuration to its custom WordPress plugins. Many new tutorials start with readers' questions, and he's always glad to answer them in the comments.


For all 3 parameters via command line:
net accounts /lockoutthreshold:15 /lockoutduration:15 /lockoutwindow:10
[…] you subject the built-in admin user to the account lockout policy, it will apply the Account lockout threshold policy setting, which determines the number of failed sign-in attempts that will cause a user […]
[…] account lockout threshold is now set to 10 failed sign-in attempts by […]
[…] account lockout threshold is now set to 10 failed sign-in attempts by […]